Azure Data Lake Storage データを(CData Connect 経由の)Tableau Desktop でビジュアライズ
CData Connect(またはConnect Server)でAzure Data Lake Storage データのMySQL データべースを作成し、Tableau Desktop でリアルタイムAzure Data Lake Storage データからビジュアライゼーションを構築します。
加藤龍彦
デジタルマーケティング
最終更新日:2021-02-05
CData

こんにちは!ウェブ担当の加藤です。マーケ関連のデータ分析や整備もやっています。
Tableau は企業がデータを使用して問題を解決する方法を変革するビジュアル分析プラットフォームです。CData Connect (またはConnect Server)と組み合わせることで、Tableau 内のリアルタイムAzure Data Lake Storage データに簡単にアクセスできます。この記事では、Azure Data Lake Storage の仮想MySQL データベースを作成し、Tableau でその仮想データベースに接続して、簡単なチャートを作成する方法を説明します。
Azure Data Lake Storage データの仮想MySQL データベース
CData Connect は、シンプルなポイントアンドクリックインターフェースを使用してデータソースに接続し、API を生成します。
- Connect にログインし、「CONNECTIONS」をクリックします。
![データベースを追加]()
- [Available Data Sources]から[Azure Data Lake Storage]を選択します。
-
Azure Data Lake Storage に接続するために必要な認証プロパティを入力します。
Azure DataLakeStorage 接続プロパティの取得・設定方法
Azure DataLakeStorage Gen 1 への接続
Gen 1 DataLakeStorage アカウントに接続するには、はじめに以下のプロパティを設定します。
- Schema:ADLSGen1 を指定。
- Account:アカウント名に設定。
- AzureTenant:テナントId に設定。Azure Portal 内のAzure Data Lake プロパティから取得できます。
- Directory:(オプション)複製したファイルを格納するためのパスを設定。指定しない場合は、ルートディレクトリが使用されます。
Azure DataLakeStorage Gen 1 への認証
Gen 1 は、認証方法としてAzure Active Directory OAuth(AzureAD)およびマネージドサービスID(AzureMSI)をサポートしています。認証方法は、ヘルプドキュメントの「Azure DataLakeStorage Gen 1
への認証」セクションを参照してください。
Azure DataLakeStorage Gen 2 への接続
Gen 2 DataLakeStorage アカウントに接続するには、はじめに以下のプロパティを設定します。
- Schema:ADLSGen2 に設定。
- Account:ストレージアカウント名に設定。
- FileSystem:このアカウントで使用するファイルシステム名に設定。例えば、Azure Blob コンテナ名など。
- Directory:(オプション)複製したファイルを格納するためのパスを設定。指定しない場合は、ルートディレクトリが使用されます。
Azure DataLakeStorage Gen 2 への認証
Gen 2は、認証方法としてアクセスキー、共有アクセス署名(SAS)、Azure Active Directory
OAuth(AzureAD)、マネージドサービスID(AzureMSI)など多様な方法をサポートしています。AzureAD、AzureMSI での認証方法は、ヘルプドキュメントの「Azure DataLakeStorage Gen 2
への認証」セクションを参照してください。
アクセスキーを使用した認証
アクセスキーを使用して接続するには、AccessKey プロパティを取得したアクセスキーの値に、AuthScheme を「AccessKey」に設定します。
Azure ポータルからADLS Gen2 ストレージアカウントのアクセスキーを取得できます。
- Azure ポータルのADLS Gen2 ストレージアカウントにアクセスします。
- 設定で「アクセスキー」を選択します。
- 利用可能なアクセスキーの1つの値を「AccessKey」接続プロパティにコピーします。
共有アクセス署名(SAS)
共有アクセス署名を使用して接続するには、SharedAccessSignature プロパティを接続先リソースの有効な署名に設定して、AuthScheme を「SAS」に設定します。
共有アクセス署名は、Azure Storage Explorer などのツールで生成できます。
![Configuring a connection (Salesforce is shown).]()
- [ Test Database]をクリックします。
- [Permission]->[ Add]とクリックし、適切な権限を持つ新しいユーザー(または既存のユーザー) を追加します。
仮想データベースが作成されたら、Tableau Desktop からAzure Data Lake Storage に接続できるようになります。
Tableau Desktop でリアルタイムAzure Data Lake Storage データをビジュアライズ
以下のステップでは、CData Connect で仮想Azure Data Lake Storage データベースに接続し、データから簡単なビジュアライゼーションを構築する方法の概要を説明します。
- Tableau を開き、[Connect]->[To a Server]と進んだ先の[MySQL]をクリックします。
- 接続ウィザードで、CData Connect インスタンスの値を入力し、[Sign In]をクリックします。
- Server:Connect インスタンスのアドレス
- Port:Connect インスタンス用のMySQL エンドポイントのポート(デフォルト:8006)
- Database:Azure Data Lake Storage データ用に構成した仮想データベース
- Username & Password:CData Connect ユーザーの資格情報
![Connect to CData Connect from Tableau Desktop]()
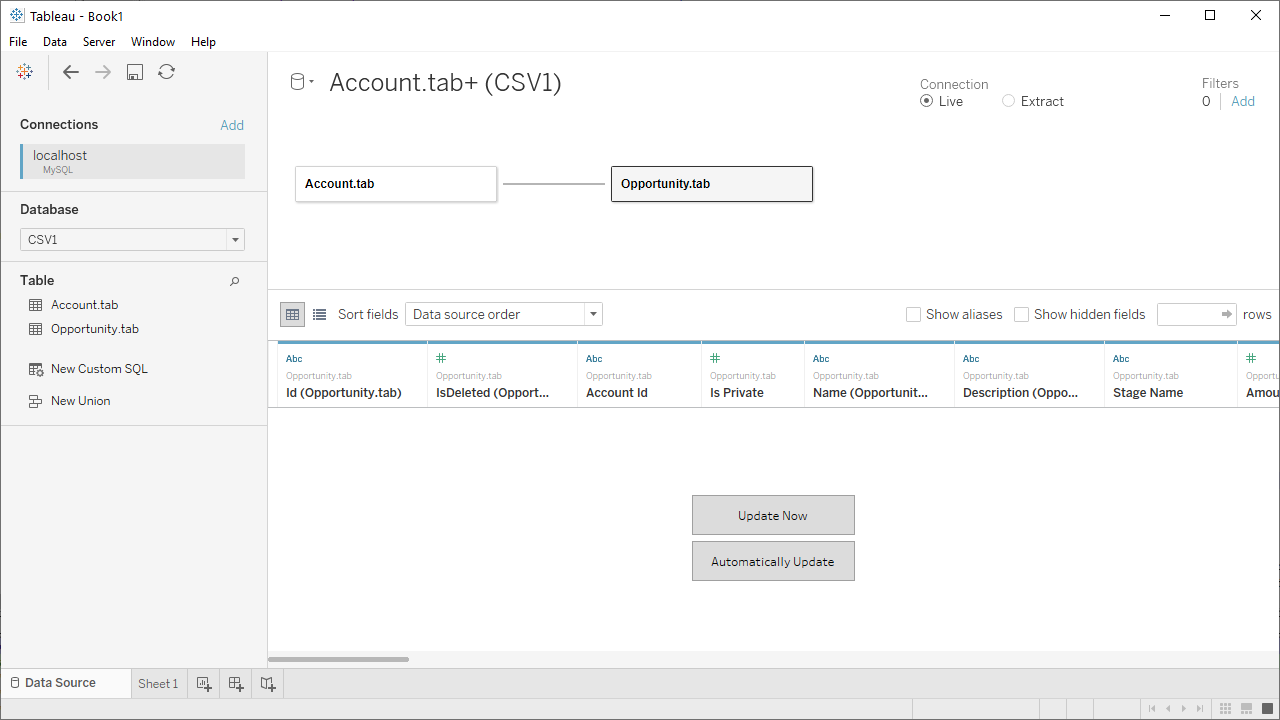
- 新しく作成したデータベースと、ビジュアライズするテーブルを選択します。(必要に応じて結合されたテーブルの関係を定義します。)
![Choosing a Database and Tables (a connection to CSV documents is shown)]()
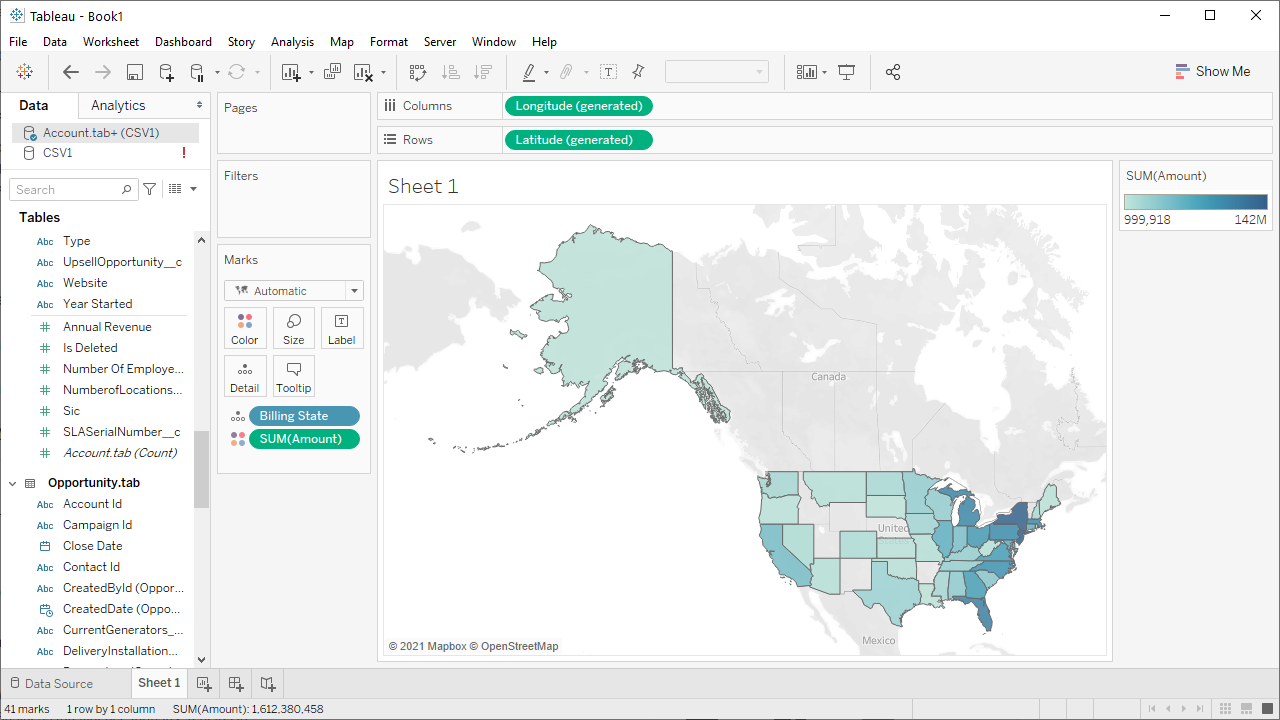
- [Dimensions and Measures]を選択して、ビジュアライゼーションを構成します。
![Visualizing Azure Data Lake Storage データ in Tableau Desktop]()
オンプレミスのアプリケーションからAzure Data Lake Storage データへのSQL アクセス
この時点で、Tableau Desktop ワークブックからリアルタイムAzure Data Lake Storage への、直接接続が有効になります。新しいビジュアライゼーションの作成やダッシュボードの構築などを行うことができます。Tableau などのデスクトップアプリケーションから、250 以上のSaaS、Big Data、NoSQL ソース(Azure Data Lake Storage を含む)のデータにSQL でアクセスする方法については、CData Connect ページを参照するか、無料トライアルをダウンロードしてください。