ノーコードでクラウド上のデータとの連携を実現。
詳細はこちら →Azure Data Lake Storage Driver の30日間無償トライアルをダウンロード
30日間の無償トライアルへ製品の詳細
Azure Data Lake Storage データに連携するJava アプリケーションを素早く、簡単に開発できる便利なドライバー。
CData

こんにちは!ウェブ担当の加藤です。マーケ関連のデータ分析や整備もやっています。
Informatica は、データを転送・変換するための強力で立派な手段を提供します。CData JDBC Driver for ADLS を利用することで、Informatica のEnterprise Data Catalog とシームレスに統合される、業界で実証済みの標準に基づくドライバーにアクセスできます。このチュートリアルでは、どんな環境でもAzure Data Lake Storage データを分類・整理する方法を説明します。
以下はJDBC ドライバーをロードする方法です。
$ java -jar setup.jar
$ cd ~/cdata-jdbc-driver-for-adls/lib
$ zip genericJDBC.zip cdata.jdbc.adls.jar cdata.jdbc.adls.lic
# mv genericJDBC.zip /opt/informatica/services/CatalogService/ScannerBinaries
# cd /opt/informatica/services/CatalogService/ScannerBinaries/CustomDeployer/
# nano scannerDeployer.xml
既存のExecutionContextProperty ノードを解凍したら、このコンテンツを含む新しいExecutionContextProperty ノードを追加します。
<ExecutionContextProperty
    isLocationProperty="true"
    dependencyToUnpack="genericJDBC.zip">
<PropertyName>JDBCScanner_DriverLocation</PropertyName>
<PropertyValue>scanner_miti/genericJDBC/Drivers</PropertyValue>
</ExecutionContextProperty>
以下の手順でJDBC リソースを構成します。
jdbc.adls:Schema=ADLSGen2;Account=myAccount;FileSystem=myFileSystem;AccessKey=myAccessKey;InitiateOAuth=GETANDREFRESH;Gen 1 DataLakeStorage アカウントに接続するには、はじめに以下のプロパティを設定します。
Gen 1 は、認証方法としてAzure Active Directory OAuth(AzureAD)およびマネージドサービスID(AzureMSI)をサポートしています。認証方法は、ヘルプドキュメントの「Azure DataLakeStorage Gen 1 への認証」セクションを参照してください。
Gen 2 DataLakeStorage アカウントに接続するには、はじめに以下のプロパティを設定します。
Gen 2は、認証方法としてアクセスキー、共有アクセス署名(SAS)、Azure Active Directory OAuth(AzureAD)、マネージドサービスID(AzureMSI)など多様な方法をサポートしています。AzureAD、AzureMSI での認証方法は、ヘルプドキュメントの「Azure DataLakeStorage Gen 2 への認証」セクションを参照してください。
アクセスキーを使用して接続するには、AccessKey プロパティを取得したアクセスキーの値に、AuthScheme を「AccessKey」に設定します。
Azure ポータルからADLS Gen2 ストレージアカウントのアクセスキーを取得できます。
共有アクセス署名を使用して接続するには、SharedAccessSignature プロパティを接続先リソースの有効な署名に設定して、AuthScheme を「SAS」に設定します。 共有アクセス署名は、Azure Storage Explorer などのツールで生成できます。
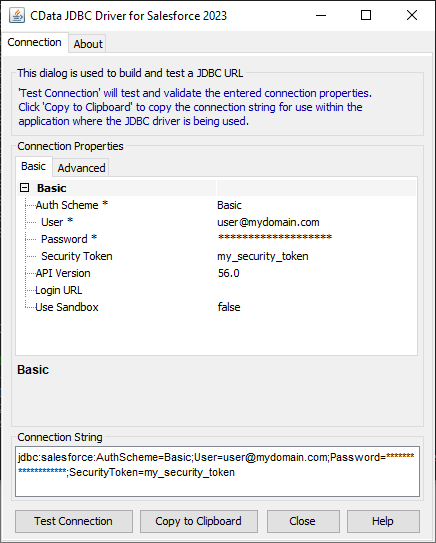
JDBC URL の構成については、Azure Data Lake Storage JDBC Driver に組み込まれている接続文字列デザイナを使用してください。.jar ファイルのダブルクリック、またはコマンドラインから.jar ファイルを実行します。
java -jar cdata.jdbc.adls.jar
接続プロパティを入力し、接続文字列をクリップボードにコピーします。
JDBC URL を構成する際に、Max Rows プロパティを定めることも可能です。これによって戻される行数を制限するため、可視化・レポートのデザイン設計時のパフォーマンスを向上させるのに役立ちます。
以下は、一般的な追加の接続文字列プロパティです。
JDBC;MSTR_JDBC_JAR_FOLDER=PATH\TO\JAR\;DRIVER=cdata.jdbc.adls.ADLSDriver;URL={jdbc:adls:Schema=ADLSGen2;Account=myAccount;FileSystem=myFileSystem;AccessKey=myAccessKey;};
使用しているドライバーに要求されなくても、ユーザー名とパスワードのプロパティは必須であることに注意してください。そのようなケースでは、代わりにプレスホルダー値を入力できます。
他のメタデータスキャナーは、必要に応じて有効にすることができます。
スキャンが完了すると、すべてのメタデータオブジェクトの概要が[Metadata Load job]のステータスとともに表示されます。エラーが発生した場合、[Log Location]リンクを開き、インフォマティカまたはドライバーから報告されたエラーを確認できます。
[Catalog Service]を開き、データソースから検出されたメタデータを表示します。メタデータスキャナーの構成時に選択したオプションによっては、定義したリソースのテーブル、ビュー、ストアドプロシージャの任意の組み合わせが表示される場合があります。