製品をチェック

無償トライアル:

無償トライアルへ

製品の情報と無償トライアルへ:

Azure Data Lake Storage JDBC Driver

Azure Data Lake Storage データに連携するJava アプリケーションを素早く、簡単に開発できる便利なドライバー。

データ連携でお困りですか?

お問い合わせ

JBoss のコネクションプールからAzure Data Lake Storage データに連携


Azure Data Lake Storage をJava サーブレットに統合します。JBoss のManagement Console を使用して、CData JDBC Driver for ADLS をインストールします。


azuredatalake ロゴ画像
jdbc ロゴ画像

JDBC

JBoss ロゴ画像

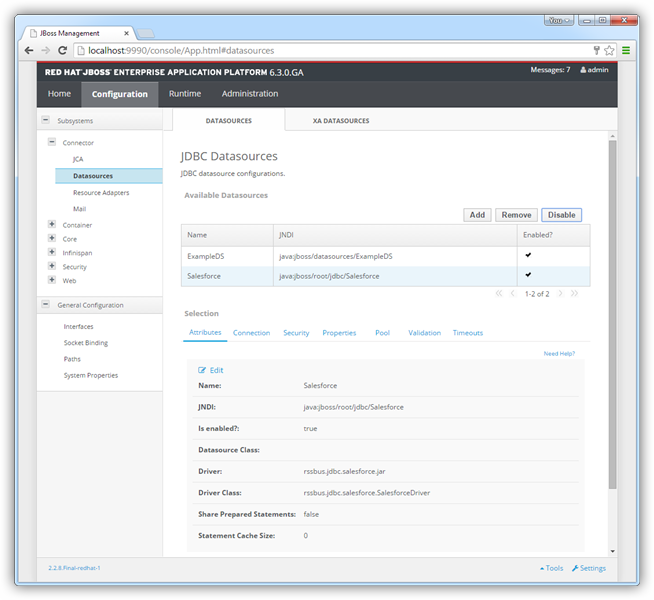
CData JDBC ドライバーは、コネクションプールの標準手順に従ってJBoss で構成できます。この記事では、JBoss アプリケーションのコネクションプールからSalesforce データにアクセスする方法について詳しく説明します。また、JBoss Management Interface を使用してCData JDBC Driver for ADLS を設定する方法についても詳しく説明します。最後には、コネクションプールからAzure Data Lake Storage にアクセスできるようになります。

Management Console からJDBC Data Source for ADLS を作成

以下のステップに従ってドライバーJAR を追加し、必要な接続プロパティを定義します。

  1. [Runtime]メニューで、展開先がマネージドドメインかスタンドアロンサーバーかに応じて[Domain]または[Server]メニューを選択し、[Manage deployments]をクリックして[Deployments]ページを開きます。
  2. [Add]をクリックします。表示されるウィザードで、インストールディレクトリのlib サブフォルダにあるドライバーのJAR ファイルとライセンスを追加します。ウィザードをデフォルトで終了し、ドライバーを選択して[Enable]をクリックします。 The deployed JAR.(Salesforce is shown.)
  3. [Configuration]メニューで[Subsystems]->[Connector]->[Datasources]と進みます。これにより、JDBC データソースページが開きます。
  4. [Add]をクリックし、表示されるウィザードでドライバーとJNDI の名前を入力します。例: java:jboss/root/jdbc/ADLS
  5. 上で追加したドライバーを選択します。
  6. JDBC URL、ユーザー名、パスワードを入力します。JDBC URL の構文は、jdbc:adls: の後にセミコロンで区切られた接続プロパティのリストが続きます。

    Authenticating to a Gen 1 DataLakeStore Account

    Gen 1 uses OAuth 2.0 in Azure AD for authentication.

    For this, an Active Directory web application is required. You can create one as follows:

    1. Sign in to your Azure Account through the .
    2. Select "Azure Active Directory".
    3. Select "App registrations".
    4. Select "New application registration".
    5. Provide a name and URL for the application. Select Web app for the type of application you want to create.
    6. Select "Required permissions" and change the required permissions for this app. At a minimum, "Azure Data Lake" and "Windows Azure Service Management API" are required.
    7. Select "Key" and generate a new key. Add a description, a duration, and take note of the generated key. You won't be able to see it again.

    To authenticate against a Gen 1 DataLakeStore account, the following properties are required:

    • Schema: Set this to ADLSGen1.
    • Account: Set this to the name of the account.
    • OAuthClientId: Set this to the application Id of the app you created.
    • OAuthClientSecret: Set this to the key generated for the app you created.
    • TenantId: Set this to the tenant Id. See the property for more information on how to acquire this.
    • Directory: Set this to the path which will be used to store the replicated file. If not specified, the root directory will be used.

    Authenticating to a Gen 2 DataLakeStore Account

    To authenticate against a Gen 2 DataLakeStore account, the following properties are required:

    • Schema: Set this to ADLSGen2.
    • Account: Set this to the name of the account.
    • FileSystem: Set this to the file system which will be used for this account.
    • AccessKey: Set this to the access key which will be used to authenticate the calls to the API. See the property for more information on how to acquire this.
    • Directory: Set this to the path which will be used to store the replicated file. If not specified, the root directory will be used.

    以下は一般的な接続文字列です。

    jdbc:adls:Schema=ADLSGen2;Account=myAccount;FileSystem=myFileSystem;AccessKey=myAccessKey;
  7. 接続を確認したらウィザードを終了します。Azure Data Lake Storage のデータソースを選択し、[Enable]をクリックします。
The enabled data source.(Salesforce is shown.)

その他のJBoss 統合

上記のステップは、単純なコネクションプールのシナリオでドライバーを構成する方法を示しています。より詳しい情報については、JBoss EAP ドキュメントの[Data Source Management]の章を参照してください。