ノーコードでクラウド上のデータとの連携を実現。
詳細はこちら →CData


こんにちは!ドライバー周りのヘルプドキュメントを担当している古川です。
AngularJS (Angular) は、動的なWeb アプリの構造フレームワークです。CData API サーバーであるAngular およびADO.NET Provider for SAPHybrisC4C (または250+ その他のADO.NET Providers) のCData API サーバーを使用して、SAP Hybris C4C からリアルタイムデータにアクセスできるシングルページアプリケーション(SPAs) を構築できます。 この記事では、CData API サーバーの設定と、SAP Hybris C4C へのライブアクセスを持つ単純なSPA の作成について説明します。 SPA はHTML テーブルを動的に作成して入力します。
ダウンロードしていない場合、CData API サーバーをダウンロードする必要があります。API サーバーとADO.NET プロバイダfor SAPHybrisC4C をインストールしてアプリケーションを実行し、SAP Hybris C4C に接続するようにドライバーを構成してから、SPA にアクセスしたい任意のテーブルのOData フィードを作成するようにドライバーを構成する必要があります。
AngularJS では、サーバーでCORS (Cross-origin resource sharing) を有効にする必要があります。API サーバーの[SETTINGS Server]タブに移動すると、CORS を有効にできます。 以下の設定を調整する必要があります。
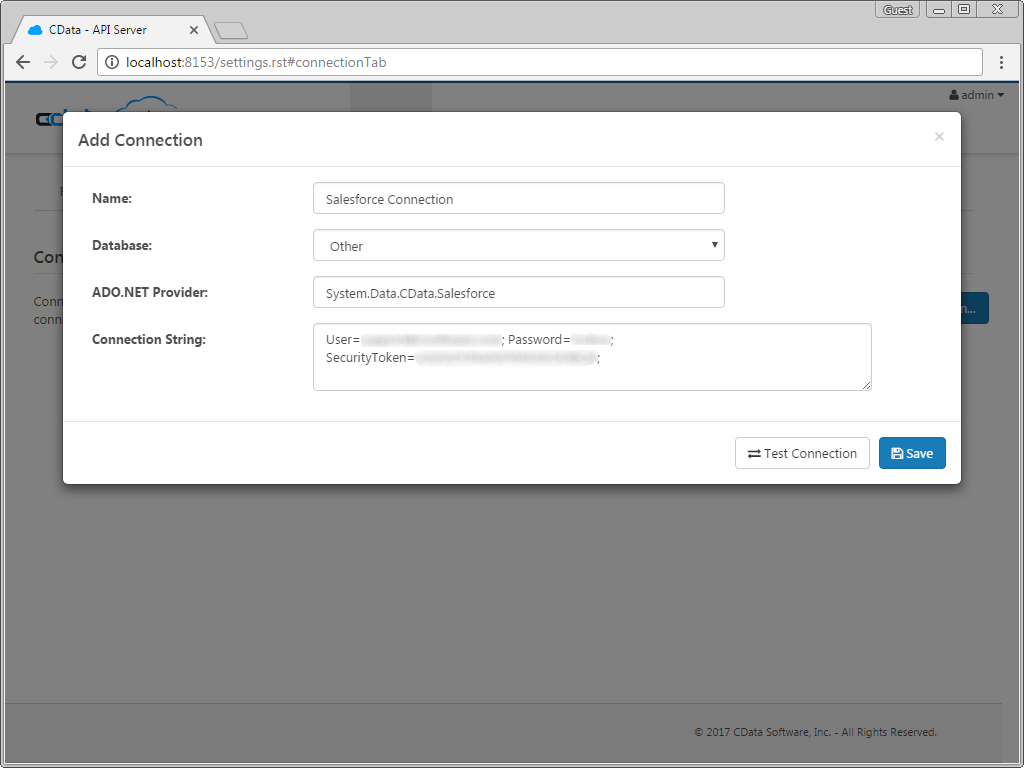
SAP Hybris C4C データに接続するようにAPI サーバーを構成するには、[Settings]ページの[Connections]タブに移動する必要があります。
接続に名前を付け、データベースとして[Other]を選択してADO.NET プロバイダ(System.Data.CData.SAPHybrisC4C) を設定します。そして、接続文字列を作成するか、接続プロパティを設定します。
AP Hybris Cloud for Customer はBasic 認証を使用します。Url およびTenant をインスタンスに適切な値に設定し、User およびPassword をログインクレデンシャルに設定します。
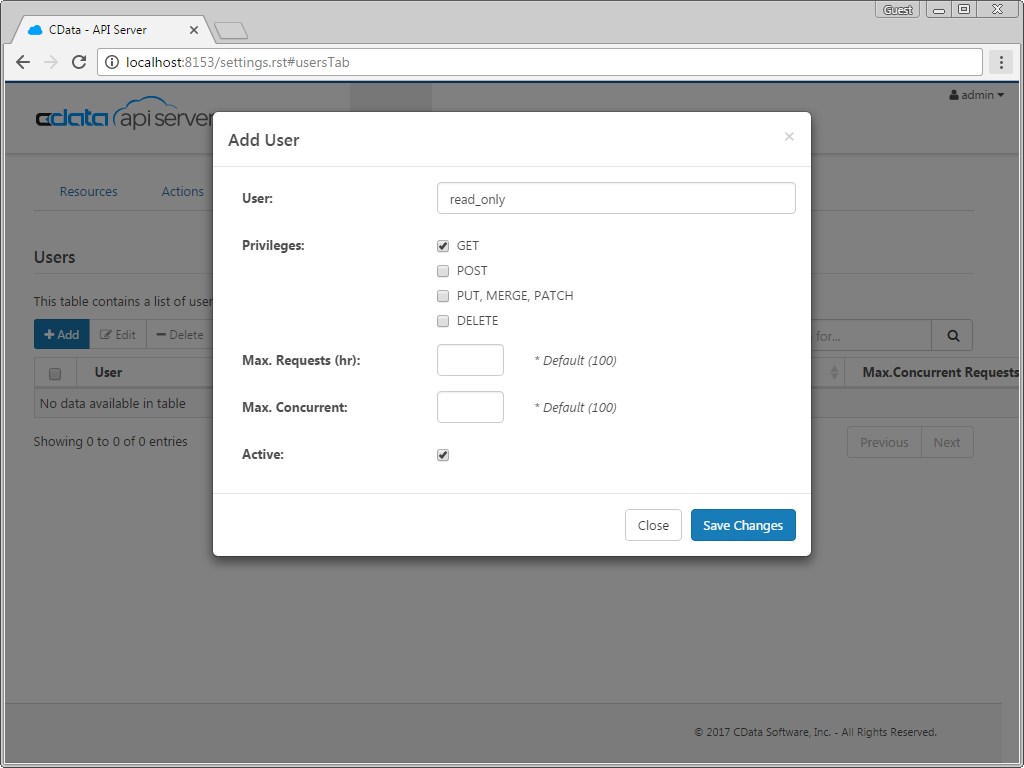
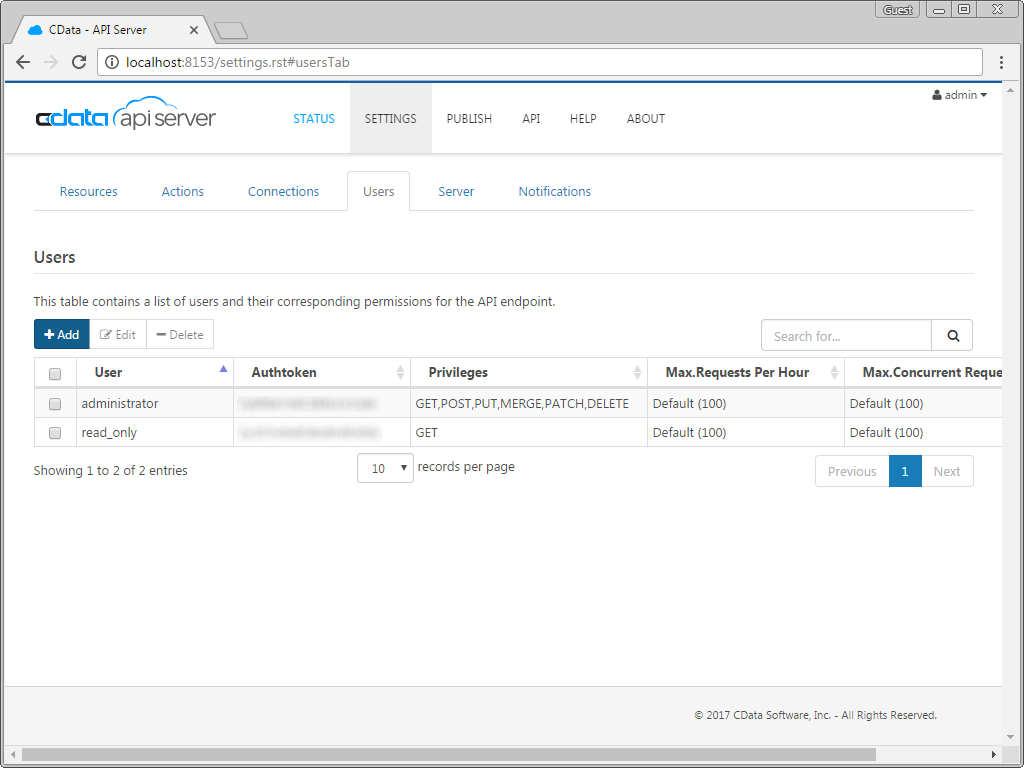
次に、API サーバーを介してSAP Hybris C4C データにアクセスするユーザーを作成します。[Settings]ページの[Users]タブでユーザーを追加及び構成できます。 データを表示するための単純なSPA のみを作成しているため、読み取り専用アクセス権を持つユーザーを作成します。 [ Add]をクリックし、ユーザに名前を付けて[Privileges]で[GET]を選択します。また、すべてのIP アドレスからの接続を許可します。
スクリーンショットにあるように、読み取り及び書き込みのアクセス権が設定されたユーザーがすでにあります。この記事では、関連付けられた認証トークンを使用し、読み取り専用ユーザーでAPI サーバーにアクセスします。
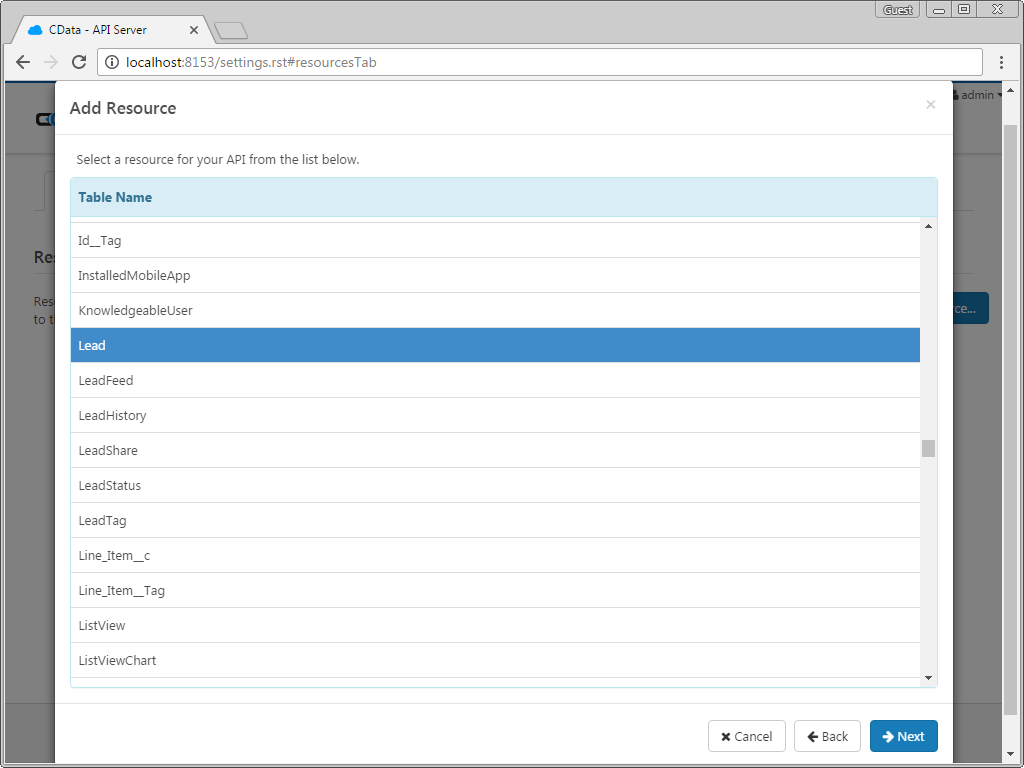
ユーザーを作成したらSAP Hybris C4C エンティティにテーブルとしてアクセスできるようになります。テーブルを有効にするためには、[Settings]ページの[Resources]タブにある[Add Resources]ボタンをクリックします。 アクセスするテーブルを選択し、[Save Changes]をクリックします。リソースを追加するとSAP Hybris C4C データのOData フィードが作成されます。
SAP Hybris C4C への接続を構成し、ユーザーを作成してAPI サーバーにテーブルを追加すれば、それらのテーブルのOData フィードにアクセスできます。 以下は、テーブルにアクセスするためのURL とテーブルのリストです。テーブルへのアクセスについては、([API Server Web]ページの右上にあるAPI リンクをクリックして)API サーバーのAPI ページに移動できます。 URL には、API サーバーのアドレスとポートが必要です。 Angular を使用しているため、デフォルトではJSON データを返さないURL の末尾に@json パラメータを追加します。
| Table | URL | |
|---|---|---|
| Entity (table) List | http://address:port/api.rsc/ | |
| Metadata for table AccountCollection | http://address:port/api.rsc/AccountCollection/$metadata?@json | |
| Account | http://address:port/api.rsc/AccountCollection |
返されるフィールドを制限する場合には、標準のOData フィードと同様に、$select パラメータを$filter、$orderby、$skip、$top などの他の標準のOData URL パラメータとともにクエリに追加できます。 サポートされているOData クエリの詳細については、ヘルプドキュメントを参照してください。
API サーバーのセットアップが完了したら、SPA を構築する準備が整います。これは単純なデモンストレーションなので、すべてのCSS、スクリプト、およびAngular コントローラーを1 つのファイルに含め、AngularJS サービス、ファクトリ、およびカスタムディレクティブによって提供される機能を意図的に使用しないようにします。
まずCSS ルールセットをいくつか作成し、table、th、td、tr 要素を変更してデータのテーブルをフォーマットします。また、SPA で使用するためにAngularJS ライブラリをインポートする必要があります。
  <style>
  table, th, td {
    border:1px solid grey;
    border-collapse: collapse;
    padding:5px;
  }
  table tr:nth-child(odd) {
    background-color: #f1f1f1;
  }
  table tr:nth-child(even) {
    background-color: #ffffff;
  }
  </style>
  <script src="http://ajax.googleapis.com/ajax/libs/angularjs/1.4.8/angular.min.js"></script>
次に、HTML の[body]タグにng-app ディレクティブとng-controller ディレクティブを追加します。これは、本体がAngular を使用す唯一の場所であるために必要な操作です。 そして、HTML 本文の最後にAngular アプリとコントローラーを作成及び定義するスクリプトタグを作成します。
<body ng-app="DataApp" ng-controller="SimpleController">
...
<script>
var app = angular.module('DataApp', []);
app.controller('SimpleController', function($scope, $http) {
    //we will add code here
    });
</script>
</body>
ここでのコントローラーはAngular オブジェクトを初期化してSPA を設定するinit、選択したテーブルのカラムを取得するgetTableColumns、選択したカラムから選択したフィールドのデータを取得するgetTableData の3つの関数で構成されます。 コントローラを作成するときの最初のアクションとして、init 関数を呼び出します。 他のすべての関数は必要に応じて呼び出され、これらの関数呼び出しでSAP Hybris C4C データを取得するために、API サーバーに対して必要なHTTP GET 呼び出しを行います。
init();

/*
 * Initialize the data object, which will be used with Angular to
 * build the different parts of our SPA and to retrieve data from
 * the API Server.
 */
function init() {
  $scope.data = {
  availableTables: [],
                 availableColumns: [],
                 selectedTable: {},
                 tableData: []
  };

  /*
   * Call to the API Server to get the list of Tables, select the
   * first table by default, and retrieve the available columns.
   *
   * The call to the API Server returns standard OData, so the
   * data we need is in the value object in the JSON returned.
   */
  $http.get("http://server:port/api.rsc",{headers: {"Authorization":"Basic "  + btoa("MyUser:MyAuthtoken")}})
    .then(function (response) {
        $scope.data.availableTables = response.data.value;
        $scope.data.selectedTable = $scope.data.availableTables[0];
        $scope.getTableColumns();
        });
}

/*
 * Call to the API Server to get the list of columns for the
 * selected table.
 *
 * The data returned here is not standard OData, so we drill
 * down into the response to extract exactly the data we need
 * (an array of column names).
 *
 * With the column names retrieved, we will transform the array
 * of column names into an array of objects with a name and Id
 * field, to be used when we build an HTML select.
 */
$scope.getTableColumns = function () {
  $scope.data.tableData = [];
  $scope.data.selectedColumns = [];
  table = $scope.data.selectedTable.url;
  if (table != "") {
    $http.get("http://server:port/api.rsc/" + table + "/$metadata?@json", {headers: {"Authorization":"Basic "  + btoa("MyUser:MyAuthtoken")}})
      .then(function (response) {
          $scope.data.availableColumns = response.data.items[0]["odata:cname"];
          for (i = 0; i < $scope.data.availableColumns.length; i++) {
            $scope.data.availableColumns[i] = { id: i, name: $scope.data.availableColumns[i] };
          }
          });
  }
}

/*
 * Call to the API Server to get the requested data.We get the data
 * based on the table selected in the associated HTML select.
 * Then we create a comma-separated string of the selected columns.
 *
 * With the table and columns known, we can make the appropriate call
 * to the API Server.Because the driver returns standard OData, the
 * table data is found in the value field of the response.
 */
$scope.getTableData = function () {
  table = $scope.data.selectedTable.url;
  columnsArray = $scope.data.selectedColumns;
  columnString = "";
  for (i = 0; i < columnsArray.length; i++) {
    if (columnString != "") {
      columnString += ",";
    }
    columnString += columnsArray[i].name;
  }

  if (table != "") {
    $http.get("http://server:port/api.rsc/" + table + "?$select=" + columnString, {headers: {"Authorization":"Basic "  + btoa("MyUser:MyAuthtoken")}})
      .then(function (response) { $scope.data.tableData = response.data.value; });
  } else {
    $scope.data.tableData = [];
  }
}
コントローラを定義したら、Angular を使用してWeb ページを構築する準備が整います。単純なページには、テーブルを選択するための選択ボックス、カラムを選択するための選択(複数)ボックス、データを取得するためのボタン、およびデータを表示するためのテーブルの4つの主要部分があります。 これら4つの部分の1つずつを通して、Angular の使用方法について説明します。
最初のselect 要素では、ng-options ディレクティブを使用し、使用可能なテーブル(前述のinit 関数から取得) を反復処理し、select 要素にデータを入力します。 ng-model ディレクティブを使用して、選択したオプションの値をdata.selectedTable フィールドに割り当てます。 選択したテーブルが変更された場合は、getTableColumns 関数を呼び出して使用可能なカラムを再設定します。
  <label>Select a Table</label>
  <br />
  <select name="tableDropDown" id="tableDropDown"
          ng-options="table.name for table in data.availableTables track by table.url"
          ng-model="data.selectedTable"
          ng-change="getTableColumns()">
  </select>
2番目のselect 要素では、再びng-options ディレクティブを使用しますが、今回は、(getTableColumns 関数によって取得された)使用可能なカラムを反復処理します。 使いやすさのために、select 要素に入力する前にカラムを名前でソートします。 この選択には複数 の属性が含まれているため、複数のカラムを選択できます。 選択した各列がdata.selectedColumns 配列に追加されます。カラムを選択すると、各列のテーブルヘッダーが作成されます(以下のデータテーブルのセクションを参照)。
  <label>Select Columns</label>
  <br />
  <select name="columnMultiple" id="columnMultiple"
          ng-options="column.name for column in data.availableColumns | orderBy:'name' track by column.id"
          ng-model="data.selectedColumns"
          multiple>
  </select>
このボタンでは、ボタンがクリックされるたびにgetTableData 関数を呼び出します。ユーザーがカラムを選択していない場合に、ng-disabled ディレクティブを使用してボタンを無効にしていることに注意してください。 また、選択したテーブルの名前でボタンのテキストを動的に更新します。
  <button name="getTableData" id="btnGetTableData"
          ng-click="getTableData()"
          ng-disabled="data.selectedColumns.length == 0">
  Get {{data.selectedTable.name}} Data
  </button>
このセクションは、選択したテーブルのデータを表示するというSPA の最終目標を満たしています。そのために、いくつかのng-repeat ディレクティブを使用します。1つは選択したカラムを反復処理してテーブルヘッダーを作成し、もう一つは返されたデータの行を反復処理して対応するデータを特定の行に表示します。
Angular を使用することで、表示するカラムを動的に決定できます。データがクリックされる「前」に選択されたカラムのみにデータが含まれることに注意してください。 使用可能なすべてのカラムを選択し、ボタンをクリックしてテーブルデータを取得してから、戻って別のカラムを選択または選択解除し、表示されるデータを変更することは簡単にできます。 選択したテーブルを変更すると、すべてのデータがクリアされます。
  <table>
    <tr>
      <th ng-repeat="column in data.selectedColumns | orderBy:'name'">{{column.name}}</th>
    </tr>
    <tr ng-repeat="row in data.tableData">
      <td ng-repeat="column in data.selectedColumns">{{ row[column.name] }}</td>
    </tr>
  </table>
<!DOCTYPE html>

<html>
<style>
table, th, td {
border:1px solid grey;
        border-collapse: collapse;
padding:5px;
}
table tr:nth-child(odd) {
  background-color: #f1f1f1;
}
table tr:nth-child(even) {
  background-color: #ffffff;
}
</style>
<script src="http://ajax.googleapis.com/ajax/libs/angularjs/1.4.8/angular.min.js"></script>
<body ng-app="DataApp" ng-controller="SimpleController">
<label>Select a Table</label>
<br>
<select name="tableDropDown" id="tableDropDown"
ng-options="table.name for table in data.availableTables track by table.url"
ng-model="data.selectedTable"
ng-change="getTableColumns()">
</select>
<label>Select Columns</label>
<br />
<select name="columnMultiple" id="columnMultiple"
ng-options="column.name for column in data.availableColumns | orderBy:'name' track by column.id"
ng-model="data.selectedColumns"
multiple>
</select>
<button name="getTableData" id="btnGetTableData"
ng-click="getTableData()"
ng-disabled="data.selectedColumns.length == 0">
Get {{data.selectedTable.name}} Data
</button>
<br />
<br />

<table>
<tr>
<th ng-repeat="column in data.selectedColumns | orderBy:'name'">{{column.name}}</th>
</tr>
<tr ng-repeat="row in data.tableData">
<td ng-repeat="column in data.selectedColumns">{{ row[column.name] }}</td>
</tr>
</table>
<script>
var app = angular.module('DataApp', []);
app.controller('SimpleController', function($scope, $http) {
    init();

    /*
     * Initialize the data object, which will be used with Angular to
     * build the different parts of our SPA and to retrieve data from
     * the API Server.
     */
    function init() {
    $scope.data = {
    availableTables: [],
    availableColumns: [],
    selectedTable: {},
    tableData: []
};

/*
 * Call to the API Server to get the list of tables, select the
 * first table by default, and retrieve the available columns.
 *
 * The call to the API Server returns standard OData, so the
 * data we need is in the value object in the JSON returned.
 */
$http.get("http://server:port/api.rsc",{headers: {"Authorization":"Basic "  + btoa("MyUser:MyAuthtoken")}})
.then(function (response) {
    $scope.data.availableTables = response.data.value;
    $scope.data.selectedTable = $scope.data.availableTables[0];
    $scope.getTableColumns();
    });
}

/*
 * Call to the API Server to get the list of columns for the
 * selected table.
 *
 * The data returned here is not standard OData, so we drill
 * down into the response to extract exactly the data we need
 * (an array of column names).
 *
 * With the column names retrieved, we will transform the array
 * of column names into an array of objects with a name and Id
 * field, to be used when we build an HTML select.
 */
$scope.getTableColumns = function () {
  $scope.data.tableData = [];
  $scope.data.selectedColumns = [];
  table = $scope.data.selectedTable.url;
  if (table != "") {
    $http.get("http://server:port/api.rsc/" + table + "/$metadata?@json", {headers: {"Authorization":"Basic "  + btoa("MyUser:MyAuthtoken")}})
      .then(function (response) {
          $scope.data.availableColumns = response.data.items[0]["odata:cname"];
          for (i = 0; i < $scope.data.availableColumns.length; i++) {
          $scope.data.availableColumns[i] = { id: i, name: $scope.data.availableColumns[i] };
          }
          });
  }
}

/*
 * Call to the API Server to get the requested data.We get the data
 * based on the table selected in the associated HTML select.
 * Then we create a comma-separated string of the selected columns.
 *
 * With the table and columns known, we can make the appropriate call
 * to the API Server.Because the driver returns standard OData, the
 * table data is found in the value field of the response.
 */
$scope.getTableData = function () {
  table = $scope.data.selectedTable.url;
  columnsArray = $scope.data.selectedColumns;
  columnString = "";
  for (i = 0; i < columnsArray.length; i++) {
    if (columnString != "") {
      columnString += ",";
    }
    columnString += columnsArray[i].name;
  }

  if (table != "") {
    $http.get("http://server:port/api.rsc/" + table + "?$select=" + columnString, {headers: {"Authorization":"Basic "  + btoa("MyUser:MyAuthtoken")}})
      .then(function (response) { $scope.data.tableData = response.data.value; });
  } else {
    $scope.data.tableData = [];
  }
}
});
</script>
</body>
</html>
Angular で構築されたWeb アプリケーションからSAP Hybris C4C (またはサポートされている他のデータソースからのデータ)に接続したい場合は、今すぐAPI サーバーの30日間無料トライアルダウンロードしてください。 API のより一般的な情報およびサポートされている他のデータソースについてはAPI サーバーページを参照してください。