製品をチェック

無償トライアル:

無償トライアルへ

製品の情報と無償トライアルへ:

ShipStation ADO.NET Provider

ShipStation データに連携する.NET アプリケーションを素早く、簡単に開発できる便利なドライバー。

データ連携でお困りですか?

お問い合わせ

ShipStation をSSIS 経由でSQL サーバーにバックアップする


ShipStation 用のCData ADO.NET プロバイダーを使用して簡単にSQL サーバーへデータをバックアップします。ここでは、ShipStation をデータベースに入力する際、SSIS ワークフローを使用します。


加藤龍彦
ウェブデベロッパー

ShipStation 用のCData ADO.NET プロバイダーはShipStation をバックアップ、レポート、フルテキスト検索、分析などを行うアプリケーションに接続します。

ここでは、SQL サーバー SSIS ワークフロー内でShipStation 用のプロバイダーを使用して、ShipStation をMicrosoft SQL サーバーデータベースに直接転送する方法を説明します。 以下のアウトラインと同じ手順を、CData ADO.NET データプロバイダーにて使用することで、SSIS 経由でSQL サーバーを直接リモートデータに接続できます。

  1. Visual Studio を開き、新しいIntegration サービスプロジェクトを追加します。
  2. ツールボックスからControl Flow 画面へ、新しいData Flow タスクを追加します。
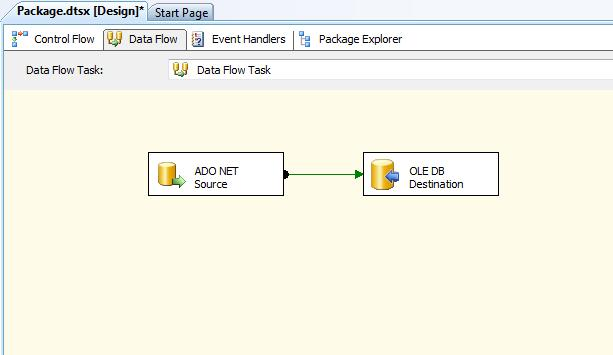
  3. Data Flow 画面で、ツールボックスから[ADO.NET Source] と[OLE DB Destination] を追加します。

    The components used in the data task in this example.
  4. 新しい接続を追加し、ShipStation 2015 用の .NET プロバイダー\CData ADO.NET プロバイダーを選択します。
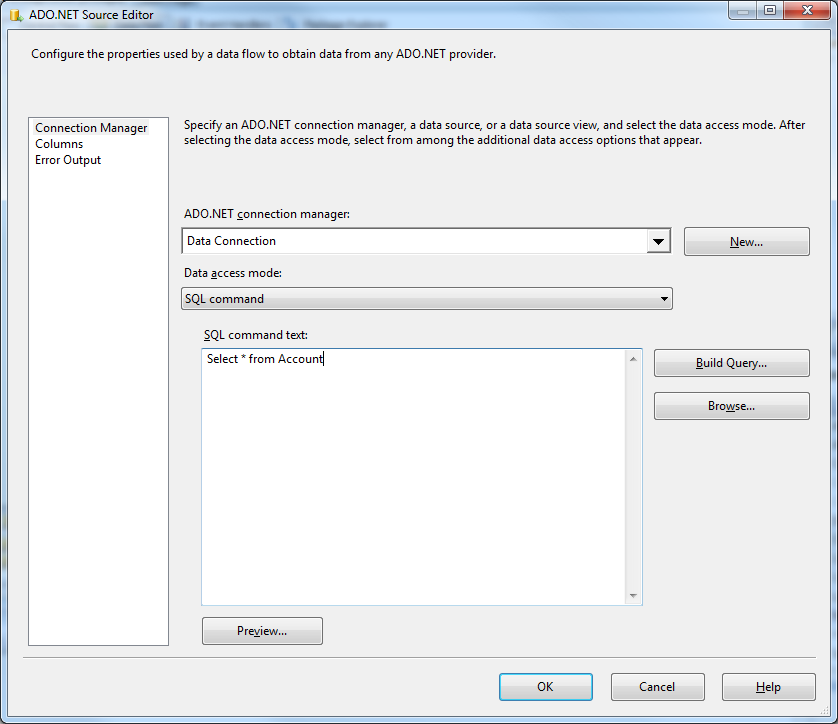
  5. Connection Manager で、ShipStation 用に接続の詳細を入力します。下は一般的な接続文字列です。

    APIKey='YourAPIKey';APISecret='YourAPISecret'

    Use the BASIC Authentication standard to connect.

    1. Login to your ShipStation account
    2. Click on the settings icon in the upper right corner. A column menu will show up on the left
    3. Click Account -> API Settings
    4. On the API Settings page, note the API Key and API Secret.

    Authenticating to ShipStation

    • APIKey: Set this to the API key from the API settings page.
    • APISecret: Set this to the Secret key from the API settings page.

    Connection properties in the Connection Manager dialog.(Salesforce is shown.)
  6. DataReader editor を開き、次のインフォメーションを設定します。

    • ADO.NET 接続マネージャー:Connection Manager のメニューで、先ほど作成した[Data Connection] を選択します。
    • データアクセスモード:[SQL command] を選択します。
    • SQL command テキスト:DataReader Source editor で、Component Properties タブを開き、下にあるようなSELECT command を入力します。

      SELECT Id, Color FROM Tags WHERE CustomerId = '1368175'

    The connection and query specified in the source component properties.(Salesforce is shown.)
  7. DataReader editor を閉じ、DataReader Source の下の矢印をドラッグして、OLE DB Destination に接続します。
  8. OLE DB Destination を開き、Destination Component Editor で次のインフォメーションを入力します。

    • コネクションマネージャー:新しい接続を追加します。接続するサーバーおよびデータベースの情報を入力します。ここでは、SQLExpress は他のマシンで運用中です。
    • データアクセスモード:データアクセスモードを[table or view] に設定し、データベースに入力するテーブルまたはビューを選択します。
  9. Mappings 画面で必要なプロパティを設定します。

    Input and destination columns in the OLE DB Destination Editor.
  10. OLE DB Destination Editor を閉じ、プロジェクトを始動します。SSIS タスクの実行が完了すれば、 ShipStation から取得したデータが、データベースに入力されます。