Discover how a bimodal integration strategy can address the major data management challenges facing your organization today.
Get the Report →Perform Batch Operations with Amazon Athena Data in Apache NiFi
Connect to Amazon Athena data and perform batch operations in Apache NiFi using the CData JDBC Driver.
Apache NiFi supports powerful and scalable directed graphs of data routing, transformation, and system mediation logic. When paired with the CData JDBC Driver for Amazon Athena, NiFi can work with live Amazon Athena data. This article shows how to read data from a CSV file and perform batch operations (INSERT/UPDATE/DELETE) using the CData JDBC Driver for Amazon Athena data in Apache NiFi (version 1.9.0 or later).
With built-in optimized data processing, the CData JDBC Driver offers unmatched performance for interacting with live Amazon Athena data. When you issue complex SQL queries to Amazon Athena, the driver pushes supported SQL operations, like filters and aggregations, directly to Amazon Athena and utilizes the embedded SQL engine to process unsupported operations client-side (often SQL functions and JOIN operations). Its built-in dynamic metadata querying allows you to work with and analyze Amazon Athena data using native data types.
Generate a JDBC URL
We need a JDBC URL to connect to Amazon Athena data from Apachi NiFi.
Built-in Connection String Designer
For assistance in constructing the JDBC URL, use the connection string designer built into the Amazon Athena JDBC Driver. Either double-click the JAR file or execute the jar file from the command-line.
java -jar cdata.jdbc.amazonathena.jar
Fill in the connection properties and copy the connection string to the clipboard.
Authenticating to Amazon Athena
To authorize Amazon Athena requests, provide the credentials for an administrator account or for an IAM user with custom permissions: Set AccessKey to the access key Id. Set SecretKey to the secret access key.
Note: Though you can connect as the AWS account administrator, it is recommended to use IAM user credentials to access AWS services.
Obtaining the Access Key
To obtain the credentials for an IAM user, follow the steps below:
- Sign into the IAM console.
- In the navigation pane, select Users.
- To create or manage the access keys for a user, select the user and then select the Security Credentials tab.
To obtain the credentials for your AWS root account, follow the steps below:
- Sign into the AWS Management console with the credentials for your root account.
- Select your account name or number and select My Security Credentials in the menu that is displayed.
- Click Continue to Security Credentials and expand the Access Keys section to manage or create root account access keys.
Authenticating from an EC2 Instance
If you are using the CData Data Provider for Amazon Athena 2018 from an EC2 Instance and have an IAM Role assigned to the instance, you can use the IAM Role to authenticate. To do so, set UseEC2Roles to true and leave AccessKey and SecretKey empty. The CData Data Provider for Amazon Athena 2018 will automatically obtain your IAM Role credentials and authenticate with them.
Authenticating as an AWS Role
In many situations it may be preferable to use an IAM role for authentication instead of the direct security credentials of an AWS root user. An AWS role may be used instead by specifying the RoleARN. This will cause the CData Data Provider for Amazon Athena 2018 to attempt to retrieve credentials for the specified role. If you are connecting to AWS (instead of already being connected such as on an EC2 instance), you must additionally specify the AccessKey and SecretKey of an IAM user to assume the role for. Roles may not be used when specifying the AccessKey and SecretKey of an AWS root user.
Authenticating with MFA
For users and roles that require Multi-factor Authentication, specify the MFASerialNumber and MFAToken connection properties. This will cause the CData Data Provider for Amazon Athena 2018 to submit the MFA credentials in a request to retrieve temporary authentication credentials. Note that the duration of the temporary credentials may be controlled via the TemporaryTokenDuration (default 3600 seconds).
Connecting to Amazon Athena
In addition to the AccessKey and SecretKey properties, specify Database, S3StagingDirectory and Region. Set Region to the region where your Amazon Athena data is hosted. Set S3StagingDirectory to a folder in S3 where you would like to store the results of queries.
If Database is not set in the connection, the data provider connects to the default database set in Amazon Athena.

Batch Operations (INSERT/UPDATE/DELETE) in Apache NiFi
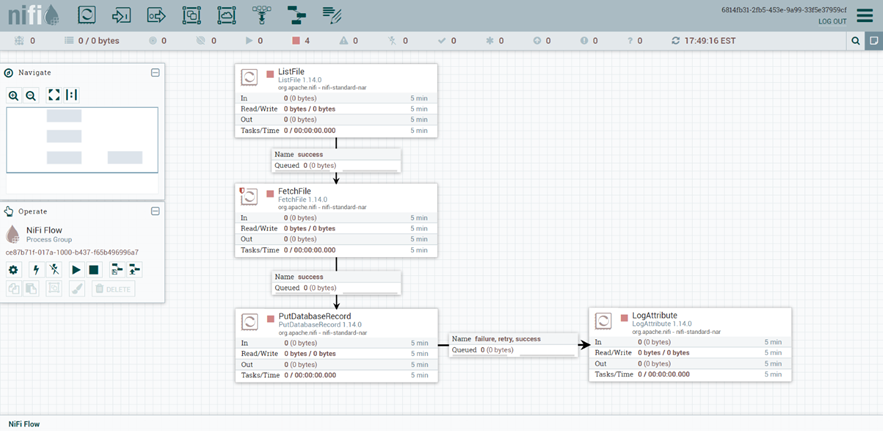
The sample flow presented below is based on the following NiFi Processors:
- ListFile - Retrieves a listing of files from the local filesystem and creates a FlowFile for each retrieved file.
- FetchFile - Reads the content of the FlowFile received from the ListFile processor.
- PutDatabaseRecord - Uses a specified RecordReader to input records from a flow file coming from the FetchFile processor. These records are translated to SQL statements and executed as a single transaction.
- LogAttribute - Emits attributes of the FlowFile at the specified log level.
This is what our finished product looks like:
Disclaimers
1. The column names of the CSV file must match the column names of the data source table records to be inserted/updated/deleted.
2. Apache NiFi versions earlier than 1.9.0 do not support the Maximum Batch Size property in the PutDatabaseRecord processor.
Configurations
In order to perform batch INSERT, UPDATE or DELETE, the NiFi Processors should be configured similar to the following:
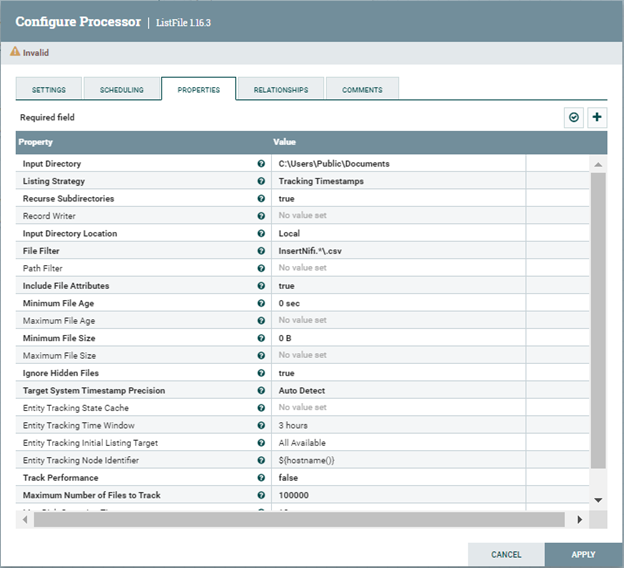
- Configure the ListFile processor: Set the Input Directory property to the local folder path from where to pull the CSV files. Set the File Filter property to a regular expression to pick up only the files whose names match the expression. i.e., if the CSV file's full path is C:\Users\Public\Documents\InsertNiFi.csv, the properties should be configured like in the following image:
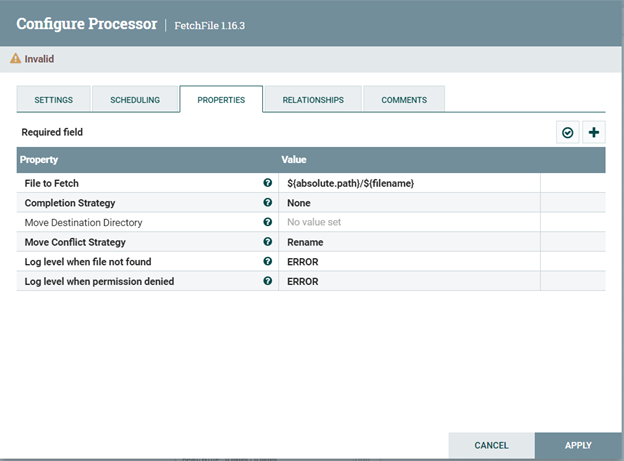
- Configure the FetchFile processor Leave the FetchFile processor's property configurations to their default values:
- Configure the PutDatabaseRecord processor
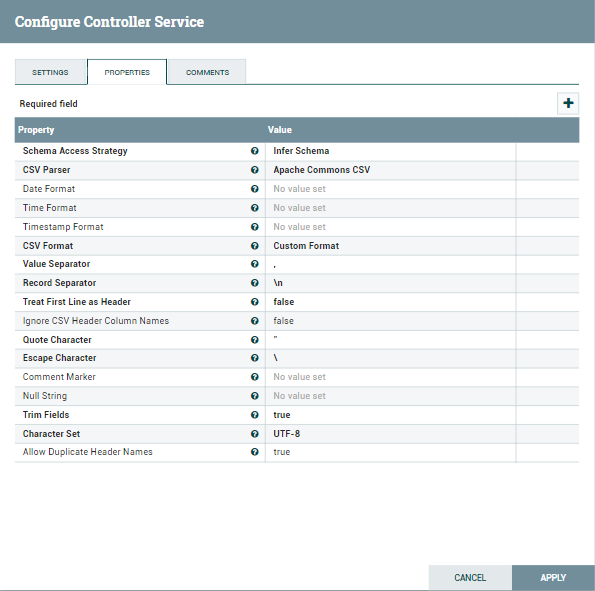
- Set the Record Reader property to a CSV Reader Controller Service. Configure the CSV Reader Controller Service to match the format of your CSV file.
- Set the Statement Type property to INSERT.
-
Set the Database Connection Pooling Service to the DBCPConnection Pool that
holds the driver configuration. Please note that the driver should be configured
to use Bulk API.
Property Value Database Connection URL jdbc:amazonathena:AccessKey='a123';SecretKey='s123';Region='IRELAND';Database='sampledb';S3StagingDirectory='s3://bucket/staging/'; Database Driver Class Name cdata.jdbc.amazonathena.AmazonAthenaDriver - Set the Catalog Name property to the name of the catalog that your table is part of.
- Set the Schema Name property to the name of the schema that your table is part of.
- Set the Table Name property to the name of the table that you want to INSERT into.
-
Set the Maximum Batch Size property to the maximum number of records that you want to be included in a single batch.
![config for PutDatabaseRecord-INSERT]()
-
Set the Record Reader property to a CSV Reader Controller Service. Configure the CSV Reader Controller Service to match the format of your CSV file.
![config for PutDatabaseRecord-INSERT]()
![config for PutDatabaseRecord-INSERT]()
- Set the Statement Type property to UPDATE.
- Set the Database Connection Pooling Service to the DBCPConnection Pool that holds the driver configuration. Please note that the driver should be configured to use Bulk API. Use the same Database Connection URL format as seen above.
- Set the Catalog Name property to the name of the catalog that your table is part of.
- Set the Schema Name property to the name of the schema that your table is part of.
- Set the Table Name property to the name of the table that you want to UPDATE.
- Set the Update Keys property to the name of the columns that are required for an UPDATE.
-
Set the Maximum Batch Size property to the maximum number of records that you want to be included in a single batch.
![config for PutDatabaseRecord-UPDATE]()
-
Set the Record Reader property to a CSV Reader Controller Service. Configure the CSV Reader Controller Service to match the format of your CSV file.
![config for PutDatabaseRecord-UPDATE]()
![config for PutDatabaseRecord-UPDATE]()
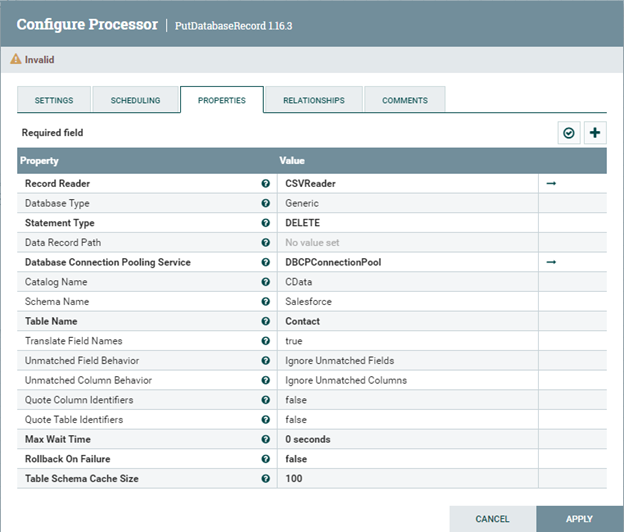
- Set the Statement Type property to DELETE.
- Set the Database Connection Pooling Service to the DBCPConnection Pool that holds the driver configuration. Please note that the driver should be configured to use Bulk API. Use the same Database Connection URL format as seen above.
- Set the Catalog Name property to the name of the catalog that your table is part of.
- Set the Schema Name property to the name of the schema that your table is part of.
- Set the Table Name property to the name of the table that you want to UPDATE.
- In comparison to INSERT and UPDATE statement types, the DELETE operation does not expose a Maximum Batch Size property. However, the operations are still processed in batches. If not changed, the maximum number of records per batch is 2000, adhering to the default value. In order to change the value of the Maximum Batch Size used for DELETE operations, change the statement type to INSERT or UPDATE, then change the value of the Maximum Batch Size property, and click Apply Changes. Finally, reopen the processor's configuration, change the Statement Type back to DELETE, and click Apply Changes.
-
Configure the LogAttribute processor
Finally, configure the LogAttribute processor by specifying the Attributes that you would like to log or ignore, as well as the log level, based on your use case.
INSERT operation
Configure the PutDatabaseRecord processor similar to the following in order to perform Batch INSERT Operations:

UPDATE Operation
Configure the PutDatabaseRecord processor similar to the following in order to perform Batch UPDATE Operations:
DELETE Operation
Configure the PutDatabaseRecord processor similar to the following in order to perform Batch DELETE Operations:
Free Trial & More Information
Download a free, 30-day trial of the CData JDBC Driver for Amazon Athena and start working with your live Amazon Athena data in Apache NiFi. Reach out to our Support Team if you have any questions.


