Discover how a bimodal integration strategy can address the major data management challenges facing your organization today.
Get the Report →


An Alternative to Microsoft JET/ACE for Excel
There are many situations where a developer might want programmatic access to data stored in an Excel file. Ideally, this would be a trivial task when working with the Microsoft .NET languages in Visual Studio. The unfortunate reality is that the older Microsoft Jet OLEDB Provider and the newer Microsoft ACE OLEDB Provider do not always work right out of the box, especially when working on a 64-bit machine or when working with a newer version of Windows or Microsoft Office. This is where CData can fill the gap: by providing an ADO.NET Provider (for both Windows and Xamarin) and a JDBC Driver for Excel, CData provides programmatic access from .NET, Xamarin, or Java applications to data in Excel tables as if they were a in relational database.
In this article, I will talk about the benefits of the CData drivers for Excel and how to configure the drivers' properties and prepare your Excel data to be consumed by the drivers. At the end of the article, I provide some sample code for accessing your Excel data from custom applications (in C# and VB.NET for Windows or Xamarin and in Java using the JDBC driver).
Functionality, Familiarity, & Flexibility
The CData Excel ADO.NET Provider gives you access to your Excel data using SQL queries with familiar Connection, Command, and DataReader objects (to name a few), bypassing the need to add and configure an OLEDB data source using the native Providers. And thanks to the full suite of CData drivers, you are not limited to using Windows when it comes to programmatic access to your Excel data. Our Excel ADO.NET Provider for Xamarin enables you to build mobile apps for Android and iOS and our JDBC Driver for Excel can be used in Mac and Unix/Linux development environments. Additionally, the drivers can be used on a machine that does not have Microsoft Excel installed (since they work directly with the Excel file).
Installing the Driver
To start working with your Excel data in custom applications, you will first need to download and install the appropriate driver (ADO.NET, JDBC). You will need to go through the installer, accepting the License Agreement, licensing the product (as a trial or using your current license), choosing the destination folder and which components to install.
Preparing the Excel Data
The CData drivers for Excel have two connection properties that grant you a lot of flexibility when it comes to accessing your data: Header and Orientation. These properties are configured based on how the data is stored in Excel and their use is described in the Help documentation (installed or online). I have outlined the options for configuring the properties and the corresponding data configurations in Excel below:
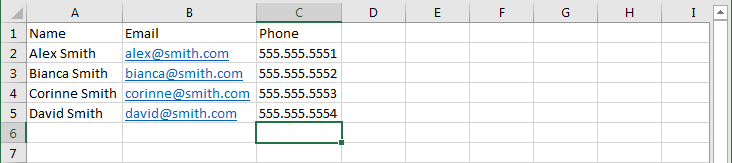
If a spreadsheet has column headers, the provider can use them to represent the column names of the worksheet table. To use header cells, set the Header property to True. Then you can query like so:
        SELECT
          Name,
          Email,
          Phone
        FROM Sheet
        WHERE Phone LIKE '555.555.%'
The query above assumes that the first row of the spreadsheet has the column names Name, Email, and Phone. The spreadsheet may have more columns than were selected and they can be in any order.
If a spreadsheet does not have header columns, or if you would like to ignore the header columns, you can set the Header property to false. In this case each column is represented by the column name in Excel (i.e.: A, B, C, ...).
        SELECT
        A,
        B,
        C
        FROM Sheet
        WHERE C LIKE '555.555.%'

If a spreadsheet is laid out horizontally (i.e., the column names are arranged vertically in the first column), then you can set the Orientation property to Horizontal to read each column as a row in the table. The Orientation property can be used in conjunction with the Header connection property and the range syntax described later.
If header columns are not set and the orientation is horizontal, the column names will be R1, R2, R3, ...
        SELECT
          R1,
          R2,
          R3
        FROM Sheet
        WHERE R3 LIKE '555.555.%'
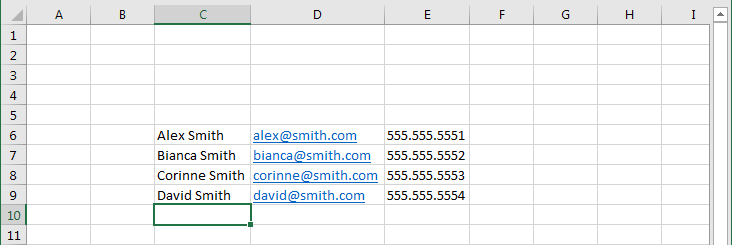
You can use the range feature to select data from a specific portion of the spreadsheet if, for example, you have a sparse spreadsheet that is not top-left aligned or if the data of interest is somewhere in the middle of the sheet. The range is specified as part of the table name. The following command will select the range of cells between C6 and E9:
        SELECT
          *
        FROM Sheet#C6:E9
        SELECT
          *
        FROM Sheet#C6:E*

If a spreadsheet has named range defined in it, then you can query this range as if it were a table. You can issue the following query to select data from the named range FamilyTable.
          SELECT
            *
          FROM FamilyTable
Using ADO.NET
The CData ADO.NET Provider for Excel implements two ADO.NET interfaces you can use to retrieve data from Excel: ExcelDataAdapter and ExcelDataReader. Where ExcelDataAdapter objects retrieve a single result set of all the data that matches a query, ExcelDataReader objects fetch data in subset increments as needed.
Using the ExcelDataReader
The ExcelDataReader retrieves data faster than the ExcelDataAdapter because it can retrieve data in pages. As you read data from the ExcelDataReader, it will periodically request the next page of results from the data source, if required. This causes results to be returned at a faster rate. The example below selects all the columns from the Sheet table and reports the RowId and LastName columns:
C#
string connectionString = "Excel File=C:\MyExcelWorkbooks\SampleWorkbook.xlsx;";
using (ExcelConnection connection = new ExcelConnection(connectionString)) {
  ExcelCommand cmd = new ExcelCommand("SELECT * FROM Sheet", connection);

  ExcelDataReader rdr = cmd.ExecuteReader();

  while (rdr.Read()) {
    Console.WriteLine(String.Format("\t{0}: \t{1}", rdr["RowId"], rdr["LastName"]));
  }
}
VB.NET
Dim connectionString As String = "Excel File=C:\MyExcelWorkbooks\SampleWorkbook.xlsx;"
Using connection As New ExcelConnection(connectionString)
  Dim cmd As New ExcelCommand("SELECT * FROM Sheet", connection)

  Dim rdr As ExcelDataReader = cmd.ExecuteReader()

  While rdr.Read()
    Console.WriteLine([String].Format(vbTab & "{0}: " vbTab & "{1}", rdr("RowId"), rdr("LastName")))
  End While
End Using
Using the ExcelDataAdapter
Use the adapter's Fill method to retrieve data from the data source. An empty DataTable instance is passed as an argument to the Fill method. When the method returns, the DataTable instance will be populated with the queried data. Note that the ExcelDataAdapter is slower than the ExcelDataReader because the Fill method will need to retrieve all data from the data source before returning.
The example below selects the RowId and LastName columns of the Sheet table.
C#
string connectionString = "Excel File=C:\MyExcelWorkbooks\SampleWorkbook.xlsx;";
using (ExcelConnection connection = new ExcelConnection(connectionString)) {
  ExcelDataAdapter dataAdapter = new ExcelDataAdapter("SELECT RowId, LastName FROM Sheet", connection);
  DataTable table = new DataTable();
  dataAdapter.Fill(table);

  Console.WriteLine("Contents of Sheet.");

  foreach (DataRow row in table.Rows) {
    Console.WriteLine("{0}: {1}", row["RowId"], row["LastName"]);
  }
}
VB.NET
Dim connectionString As String = "Excel File=C:\MyExcelWorkbooks\SampleWorkbook.xlsx;"
Using connection As New ExcelConnection(connectionString)
  Dim dataAdapter As New ExcelDataAdapter("SELECT RowId, LastName FROM Sheet", connection)

  Dim table As New DataTable()
  dataAdapter.Fill(table)

  Console.WriteLine("Contents of Sheet.")

  For Each row As DataRow In table.Rows
    Console.WriteLine("{0}: {1}", row("RowId"), row("LastName"))
  Next
End Using
Using JDBC
The CData JDBC Driver for Excel follows the JDBC 4.0 convention: Make a connection using a JDBC URL, execute the query, and retrieve the data from the ResultSet.
Establish a Connection
To establish a connection, you must prepare a connection string. The connection string must start with "jdbc:excel:" and may include any connection property. A typical connection string looks like "jdbc:excel:Excel File=C:\MyExcelWorkbooks\SampleWorkbook.xlsx;". The connection string can be used with the DriverManager.getConnection method to obtain a connection object.
Connection conn = DriverManager.getConnection("jdbc:excel:Excel File=C:\MyExcelWorkbooks\SampleWorkbook.xlsx;");
Alternatively, you may prepare the connection options using the Properties object and pass it to the DriverManager.
Properties prop = new Properties();
prop.setProperty("User","XXX");
prop.setProperty("Password","YYY");
prop.setProperty("Location","ZZZ");
Connection conn = DriverManager.getConnection("jdbc:excel:",prop);
Create a Statement
Statement stat = conn.createStatement();
Execute the Query
The example below selects the RowId and LastName columns of the Sheet table.
boolean ret = stat.execute("SELECT RowId, LastName FROM Sheet");
ResultSet rs=stat.getResultSet();
while(rs.next()){
  for(int i=1;i<=rs.getMetaData().getColumnCount();i++)
  {
    System.out.println(rs.getMetaData().getColumnName(i) +"="+rs.getString(i));
  }
}
You can also use the Statement object to execute an INSERT, UPDATE, or DELETE statement. The example below updates the RowId and LastName columns of the Sheet table.
stat.executeUpdate("UPDATE Sheet SET RowId = 'XXX' , LastName = 'YYY'");
int count=stat.getUpdateCount();
System.out.println(count+" rows are affected");
More Information & Free Trial
You can check out our Excel drivers page for more information. Download a free trial and get started working with your Excel data in .NET applications today!
Data Connectors
ETL/ ELT Solutions
Cloud & API Connectivity
OEM & Custom Drivers