Discover how a bimodal integration strategy can address the major data management challenges facing your organization today.
Get the Report →


Connect to QuickBooks Data from Google Apps Script
There are many on-premises accounting and CRM applications that facilitate the work that businesses do. From automated functionality, to single click reporting, these tools provide the opportunity to simplify and streamline tasks such as bookkeeping, lead management, and email campaigns (to name only a few). While these applications are useful, it can be difficult to access the data from cloud-based SaaS applications. CData Software provides two means of doing just that: our Sync Applications and the JDBC Remoting feature of our JDBC Drivers.
In this article, I will talk about connecting to QuickBooks data from Google Apps Script (specifically in Google Sheets), walking through the process of configuring both the Sync Application and the JDBC Remoting feature of the JDBC Driver, but the principles can be applied to any of the 80+ data sources that CData Software supports and any SaaS application that is capable of consuming data from a Web-facing database server. Google Apps Script is able to connect to MySQL databases through their built-in JDBC services support. By replicating your data to an online MySQL database (like Google Cloud SQL) with the QuickBooks Sync Application or by running the JDBC Remoting feature of the JDBC Driver to proxy your data as a MySQL database, you can connect to your QuickBooks data from Google Apps Script.
I should stop to point out that the Sync Application is the easier solution, as it requires less configuration. I discuss the JDBC Remoting feature of our JDBC Driver as an alternative that offers connectivity to live data and more customization in accessing the data. You can navigate to the relevant parts of the article using the links below.
- Replicating Data to the Cloud with Sync
- Real-Time Connectivity Through Drivers
- Connecting to QuickBooks Data with Apps Script
Replicating Data to the Cloud with Sync
The CData Sync Application allows you to replicate your QuickBooks data to any number of on-premises or online databases, providing you with the security of frequent data replication and access to your data from widely supported databases. In this example, we will be replicating to Google Cloud SQL, which hosts the Community Edition of MySQL. (It is worth pointing out that our products are one of the few commercial products that allow users to connect to the Community Edition of MySQL.)
1. Download the Application
To start, download and install CData Sync for QuickBooks.
2. Connect to QuickBooks
Once you have the product installed, configure the connection to QuickBooks by going to the Connection tab and setting the Remote Connector Location, URL, User, and Password Connection Properties (see the screen shot below).
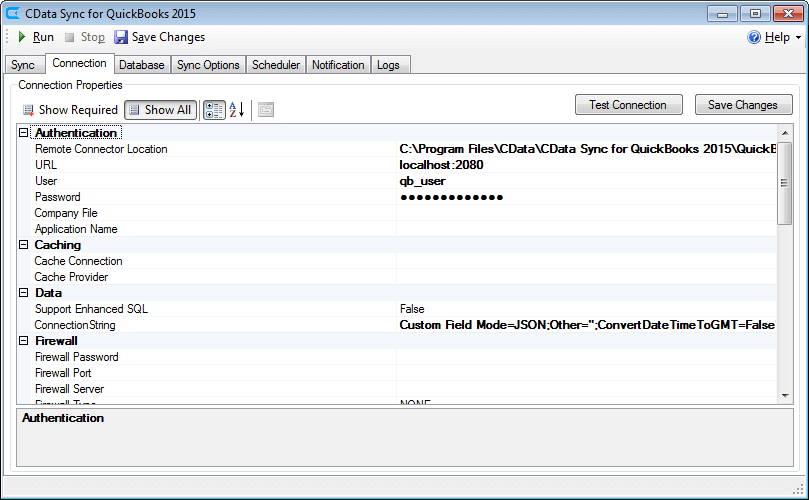
To ensure that you have properly configured the connection to QuickBooks, click the Test Connection button. A message box will pop up confirming your connection or reporting any errors or issues.
3. Connect to Google Cloud SQL
With the connection to QuickBooks established, you can configure the connection to Google Cloud SQL from the Database tab in the Application. Select MySQL from the Database Type drop down menu and fill in the appropriate values for the Server, Port, User, Password, and Database properties.
Again, you can ensure that you have properly configured the Sync App to connect to your Google Cloud SQL instance by clicking the Test Connection button.
If you are unsure of how to go about setting up a Google Cloud SQL instance, Google has written an excellent Quickstart article. Of course, you can connect our Sync Application to any Web-facing MySQL instance. If you have another Web-facing instance of MySQL that you would prefer to use, configure the Sync Application to connect to that instance.
4. Replicate Data
With the Sync App connected to QuickBooks and your MySQL instance, we can now configure the replication of data. This is done by configuring the properties on the Sync and Scheduler tabs (you can optionally configure the Sync Options tab, but we will not be discussing those features here).
In the Sync tab, select the QuickBooks tables you wish to replicate (or select the checkbox to replicate all tables). Once the specific Sync configuration is saved, you can set the values on the Scheduler tab to schedule the Sync Application to incrementally update the MySQL instances. With incremental updates, only data that has been added or updated since the last replication will be pushed to the database; incremental updates save you time (and money) by submitting significantly fewer queries to the MySQL instance than an application or service that performs a full replication every time it connects.
Real-Time Connectivity Through Drivers
The CData Software JDBC Drivers all come with built-in JDBC remoting functionality, which allows you to set up a service that acts as a MySQL interface to your data. By using JDBC remoting, you can connect to live QuickBooks data from any application or service that can connect to a MySQL database.
1. Download the Driver
To begin, download and install the CData JDBC Driver for QuickBooks.
2. Configure JDBC Remoting
There are two options for configuring the JDBC Remoting service. You can configure the service directly from the CLI (command-line interface, see the next section) or edit the INI file included in the installation.
Included in the installation of the JDBC Driver is a sample INI file for configuring the JDBC Remoting. There are several sections in the INI file, but the ones we need are the [mysqld], [databases], [users], [mysql_vars], and [acl] sections. Below, I describe each section briefly and provide sample values for each section. For detailed information and a sample INI file, refer to our online Help documentation.
- [mysqld]: This section configures the MySQL daemon, providing information about the port, connections, logging, and SSL options.
- [databases]: This section defines the databases that will be proxied through the JDBC Driver. Each database is defined through a connection string for the JDBC driver.
- [users]: This section defines any usernames and passwords for the MySQL server. If the [acl] section is not defined, all users have access to all databases.
- [mysql_vars]: This section defines any system variables for the MySQL server. The standard variables are supported.
- [acl]: This section defines the access for users to the defined databases. Databases must be defined in the [databases] section and users must be defined in the [users] section.
3. Start the JDBC Remoting Service
You can start the JDBC Remoting from the command prompt (or from a script) as shown below:
java -jar cdata.jdbc.quickbooks.jar [ options ]
Option 1: Use the INI File
If you have configured the INI file (see the previous section), you can start the daemon using the --config-file option (there is no need to set the --protocol option since the default is MySQL).
java -jar cdata.jdbc.quickbooks.jar --config-file "cdata.jdbc.quickbooks.remoting.ini"
Option 2: Use Command Line Options
If you have not configured an INI file, then you can use the CLI options as described in our online Help documentation as follows:
java -jar cdata.jdbc.quickbooks.jar --user root --password rootPassWord --database QuickBooks --connection "user=myuseraccount;password=mypassword;URL=http://localhost:2080;"
In either case, the MySQL daemon is now running, allowing you to access your QuickBooks data as if it were in a MySQL database.
Connecting to QuickBooks Data with Apps Script
At this point, you should have configured either the Sync Application or JDBC Remoting for QuickBooks. All that is left now is to use Google Apps Script to access the MySQL server (or daemon, in the case of the JDBC driver) and work with your QuickBooks data in Google Sheets.
In this section, you will create a script (with a menu option to call the script) to populate a spreadsheet with QuickBooks data. We have created a sample script and explained the different parts. You can view the raw script at the end of the article.
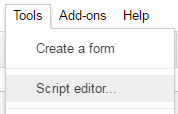
1. Create an Empty Script
To create a script for your Google Sheet, click Tools Script editor from the Google Sheets menu:
2. Declare Class Variables
We will create a handful of class variables that will be available for any functions created in the script. Our script will only read data from a specified table, but you can extend the script to incorporate insert, update, or delete functionality.
//replace the variables in this block with real values as needed
var address = 'my.server.address:port';
var user = 'root';
var userPwd = 'rootPassWord';
var db = 'quickbooks';

var dbUrl = 'jdbc:mysql://' + address + '/' + db;
3. Add a Menu Option
This function adds a menu option to your Google Sheet, allowing you to use the UI to call your function.
function onOpen() {
  var spreadsheet = SpreadsheetApp.getActive();
  var menuItems = [
    {name: 'Write data to a sheet', functionName: 'connectToQuickBooksData'}
  ];
  spreadsheet.addMenu('QuickBooks Data', menuItems);
}

4. Write a Helper Function
This function is used to find the first empty row in a spreadsheet.
/*
 * Finds the first empty row in a spreadsheet by scanning an array of columns
 * @return The row number of the first empty row.
 */
function getFirstEmptyRowByColumnArray(spreadSheet, column) {
  var column = spreadSheet.getRange(column + ":" + column);
  var values = column.getValues(); // get all data in one call
  var ct = 0;
  while ( values[ct] && values[ct][0] != "" ) {
    ct++;
  }
  return (ct+1);
}
5. Write a Function to Write QuickBooks Data to a Spreadsheet
The function below will write the QuickBooks data, using the Google Apps Script JDBC functionality to connect to the MySQL server/daemon, SELECT data, and populate a spreadsheet. When the script is run, two input boxes will appear:
The first one asking the user to input the name of a spreadsheet to hold the data (if the spreadsheet does not exist, the function will create it)

and the second one asking the user to input the name of a QuickBooks table to read. If an invalid table is chosen, an error message appears and the function is exited.

It is worth noting that, while the function is designed to be used as a menu option, it could be extended for use as a formula in a spreadsheet.
/*
 * Reads data from a specified QuickBooks 'table' and writes it to the specified sheet.
 *    (If the specified sheet does not exist, it will be created.)
 */
function connectToQuickBooksData() {
  var thisWorkbook = SpreadsheetApp.getActive();

  //select a sheet and create it if it does not exist
  var selectedSheet = Browser.inputBox('Which sheet would you like the data to post to?',Browser.Buttons.OK_CANCEL);
  if (selectedSheet == 'cancel')
    return;

  if (thisWorkbook.getSheetByName(selectedSheet) == null)
    thisWorkbook.insertSheet(selectedSheet);
  var resultSheet = thisWorkbook.getSheetByName(selectedSheet);
  var rowNum = 2;

  //select a QuickBooks 'table'
  var table = Browser.inputBox('Which table would you like to pull data from?',Browser.Buttons.OK_CANCEL);
  if (table == 'cancel')
    return;

  var conn = Jdbc.getConnection(dbUrl, user, userPwd);

  //confirm that var table is a valid table/view
  var dbMetaData = conn.getMetaData();
  var tableSet = dbMetaData.getTables(null, null, table, null);
  var validTable = false;
  while (tableSet.next()) {
    var tempTable = tableSet.getString(3);
    if (table.toUpperCase() == tempTable.toUpperCase()){
      table = tempTable;
      validTable = true;
      break;
    }
  }
  tableSet.close();
  if (!validTable) {
    Browser.msgBox("Invalid table name: " + table, Browser.Buttons.OK);
    return;
  }

  var stmt = conn.createStatement();

  var results = stmt.executeQuery('SELECT * FROM ' + table);
  var rsmd = results.getMetaData();
  var numCols = rsmd.getColumnCount();

  //if the sheet is empty, populate the first row with the headers
  var firstEmptyRow = getFirstEmptyRowByColumnArray(resultSheet, "A");
  if (firstEmptyRow == 1) {
    //collect column names
    var headers = new Array(new Array(numCols));
    for (var col = 0; col < numCols; col++){
      headers[0][col] = rsmd.getColumnName(col+1);
    }
    resultSheet.getRange(1, 1, headers.length, headers[0].length).setValues(headers);
  } else {
    rowNum = firstEmptyRow;
  }

  //write rows of QuickBooks data to the sheet
  var values = new Array(new Array(numCols));
  while (results.next()) {
    for (var col = 0; col < numCols; col++) {
      values[0][col] = results.getString(col + 1);
    }
    resultSheet.getRange(rowNum, 1, 1, numCols).setValues(values);
    rowNum++;
  }

  results.close();
  stmt.close();
}
When the function is completed, you will have a spreadsheet populated with your QuickBooks data and you can now leverage all of the calculating, graphing, and charting functionality of Google Sheets anywhere you have access to the Internet.
More Information & Next Steps
For more information on what has been featured in this article refer to the links below:
- CData QuickBooks Sync Application
- CData QuickBooks JDBC Driver
- External Databases via JDBC in Google Apps Script
If you are interested in trying this out for yourself, we offer free, 30-day trials for both the QuickBooks Sync Application and the QuickBooks JDBC Driver. Download a trial (Sync, JDBC) and connect to your QuickBooks data today!
Complete Google Apps Script
//replace the variables in this block with real values as needed
var address = 'my.server.address:port';
var user = 'root';
var userPwd = 'rootPassWord';
var db = 'quickbooks';

var dbUrl = 'jdbc:mysql://' + address + '/' + db;

function onOpen() {
  var spreadsheet = SpreadsheetApp.getActive();
  var menuItems = [
    {name: 'Write table data to a sheet', functionName: 'connectToQuickBooksData'}
  ];
  spreadsheet.addMenu('QuickBooks Data', menuItems);
}

/*
 * Finds the first empty row in a spreadsheet by scanning an array of columns
 * @return The row number of the first empty row.
 */
function getFirstEmptyRowByColumnArray(spreadSheet, column) {
  var column = spreadSheet.getRange(column + ":" + column);
  var values = column.getValues(); // get all data in one call
  var ct = 0;
  while ( values[ct] && values[ct][0] != "" ) {
    ct++;
  }
  return (ct+1);
}

/*
 * Reads data from a specified QuickBooks 'table' and writes it to the specified sheet.
 *    (If the specified sheet does not exist, it will be created.)
 */
function connectToQuickBooksData() {
  var thisWorkbook = SpreadsheetApp.getActive();

  //select a sheet and create it if it does not exist
  var selectedSheet = Browser.inputBox('Which sheet would you like the data to post to?',Browser.Buttons.OK_CANCEL);
  if (selectedSheet == 'cancel')
    return;

  if (thisWorkbook.getSheetByName(selectedSheet) == null)
    thisWorkbook.insertSheet(selectedSheet);
  var resultSheet = thisWorkbook.getSheetByName(selectedSheet);
  var rowNum = 2;

  //select a QuickBooks 'table'
  var table = Browser.inputBox('Which table would you like to pull data from?',Browser.Buttons.OK_CANCEL);
  if (table == 'cancel')
    return;

  var conn = Jdbc.getConnection(dbUrl, user, userPwd);

  //confirm that var table is a valid table/view
  var dbMetaData = conn.getMetaData();
  var tableSet = dbMetaData.getTables(null, null, table, null);
  var validTable = false;
  while (tableSet.next()) {
    var tempTable = tableSet.getString(3);
    if (table.toUpperCase() == tempTable.toUpperCase()){
      table = tempTable;
      validTable = true;
      break;
    }
  }
  tableSet.close();
  if (!validTable) {
    Browser.msgBox("Invalid table name: " + table, Browser.Buttons.OK);
    return;
  }

  var stmt = conn.createStatement();

  var results = stmt.executeQuery('SELECT * FROM ' + table);
  var rsmd = results.getMetaData();
  var numCols = rsmd.getColumnCount();

  //if the sheet is empty, populate the first row with the headers
  var firstEmptyRow = getFirstEmptyRowByColumnArray(resultSheet, "A");
  if (firstEmptyRow == 1) {
    //collect column names
    var headers = new Array(new Array(numCols));
    for (var col = 0; col < numCols; col++){
      headers[0][col] = rsmd.getColumnName(col+1);
    }
    resultSheet.getRange(1, 1, headers.length, headers[0].length).setValues(headers);
  } else {
    rowNum = firstEmptyRow;
  }

  //write rows of QuickBooks data to the sheet
  var values = new Array(new Array(numCols));
  while (results.next()) {
    for (var col = 0; col < numCols; col++) {
      values[0][col] = results.getString(col + 1);
    }
    resultSheet.getRange(rowNum, 1, 1, numCols).setValues(values);
    rowNum++;
  }

  results.close();
  stmt.close();
}
Data Connectors
ETL/ ELT Solutions
Cloud & API Connectivity
OEM & Custom Drivers