ノーコードでクラウド上のデータとの連携を実現。
詳細はこちら →Azure Data Lake Storage Driver の30日間無償トライアルをダウンロード
30日間の無償トライアルへ製品の詳細
Azure Data Lake Storage データに連携するJava アプリケーションを素早く、簡単に開発できる便利なドライバー。
こんにちは!ウェブ担当の加藤です。マーケ関連のデータ分析や整備もやっています。
CData JDBC Driver for ADLS は、ColdFusion のrapid development tools を使ってAzure Data Lake Storage への接続をシームレスに統合します。この記事では、ColdFusion でAzure Data Lake Storage に連携しAzure Data Lake Storage テーブルをクエリする方法を説明します。
下記の手順に従ってAzure Data Lake Storage データソースを作成し、ColdFusion アプリケーションへの連携を可能にします。
ドライバーのJAR および.lic ファイルを、インストールディレクトリから C:\ColdFusion10\cfusion\wwwroot\WEB-INF\lib にコピーします。
ドライバーのJAR およびlicense はインストールディレクトリの[lib]サブフォルダに配置されています。
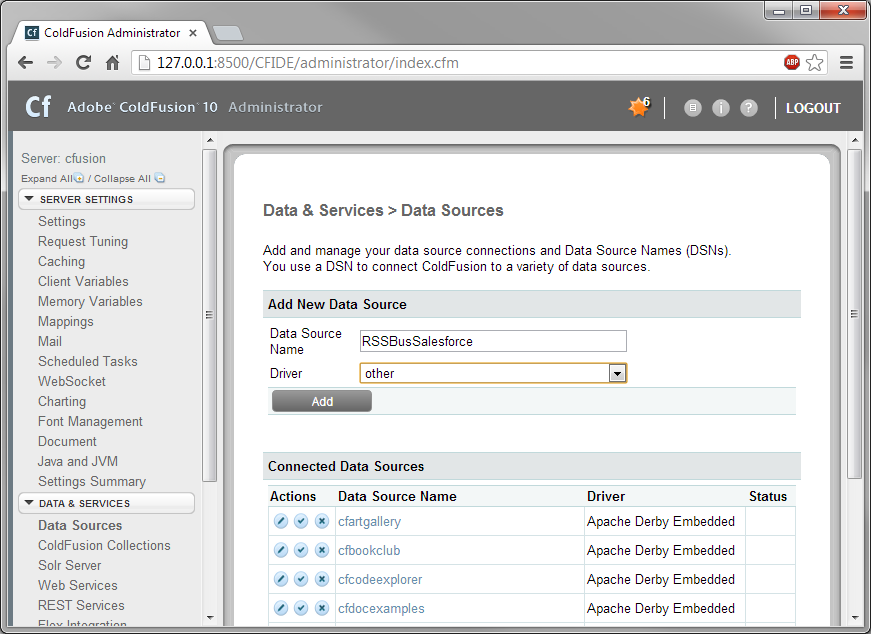
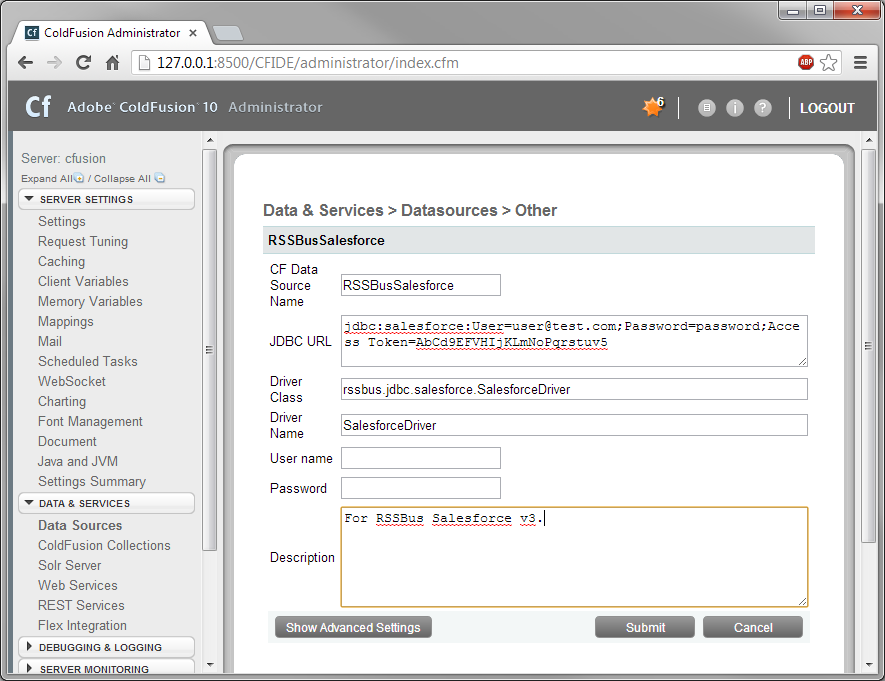
ドライバーをデータソースとして追加:
ColdFusion Administrator インターフェースで[Data & Services]ノードを展開し、[Data Sources]>[Add New Data Source]をクリックします。ダイアログが表示されたら、以下のプロパティを入力します。
JDBC Driver のプロパティ設定:
JDBC URL:JDBC URL に接続プロパティを入力。JDBC のURL は以下で始まり jdbc:adls: 次に、セミコロン区切りでname=value ペアの接続プロパティを入力します。以下は一般的なJDBC URL です:
jdbc:adls:Schema=ADLSGen2;Account=myAccount;FileSystem=myFileSystem;AccessKey=myAccessKey;
Gen 1 DataLakeStorage アカウントに接続するには、はじめに以下のプロパティを設定します。
Gen 1 は、認証方法としてAzure Active Directory OAuth(AzureAD)およびマネージドサービスID(AzureMSI)をサポートしています。認証方法は、ヘルプドキュメントの「Azure DataLakeStorage Gen 1 への認証」セクションを参照してください。
Gen 2 DataLakeStorage アカウントに接続するには、はじめに以下のプロパティを設定します。
Gen 2は、認証方法としてアクセスキー、共有アクセス署名(SAS)、Azure Active Directory OAuth(AzureAD)、マネージドサービスID(AzureMSI)など多様な方法をサポートしています。AzureAD、AzureMSI での認証方法は、ヘルプドキュメントの「Azure DataLakeStorage Gen 2 への認証」セクションを参照してください。
アクセスキーを使用して接続するには、AccessKey プロパティを取得したアクセスキーの値に、AuthScheme を「AccessKey」に設定します。
Azure ポータルからADLS Gen2 ストレージアカウントのアクセスキーを取得できます。
共有アクセス署名を使用して接続するには、SharedAccessSignature プロパティを接続先リソースの有効な署名に設定して、AuthScheme を「SAS」に設定します。 共有アクセス署名は、Azure Storage Explorer などのツールで生成できます。
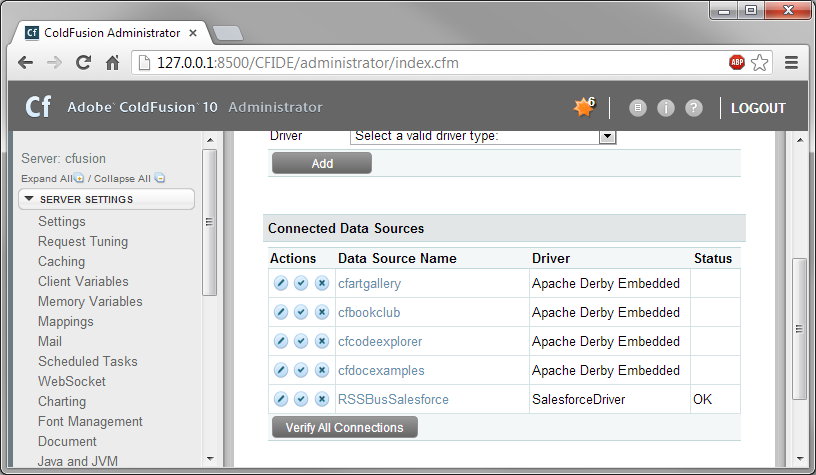
[Actions] カラムのCData Azure Data Lake Storage データソースを有効にして、接続をテストできます。ステータスがOK になったら、Azure Data Lake Storage データソースを使うことができます。
下記の手順に従って、Azure Data Lake Storage の基準に合ったレコードをクエリし、結果をHTML テーブルに出力する簡単なアプリケーションを作成します。
新規ColdFusion markup ファイルでクエリを定義:C:\ColdFusion10\cfusion\wwwroot directory for ColdFusion の.cfm ファイルに次のコードを入力:
<cfquery name="ADLSQuery" dataSource="CDataADLS">
  SELECT * FROM Resources
</cfquery>
Note:CData JDBC Drivers は、cfqueryparam エレメントを使ってパラメータ化されたクエリもサポートします。例:
<cfquery name="ADLSQuery" dataSource="CDataADLS">
  SELECT * FROM Resources WHERE Type = <cfqueryparam>FILE</cfqueryparam>
</cfquery>
CFTable を使ってHTML にテーブルを出力:
<cftable
  query = "ADLSQuery"
  border = "1"
  colHeaders
  colSpacing = "2"
  headerLines = "2"
  HTMLTable
  maxRows = "500"
  startRow = "1"/>
  <cfcol header="<b>FullPath</b>" align="Left" width=8 text="#FullPath#"></cfcol>
  <cfcol header="<b>Permission</b>" align="Left" width=10 text="#Permission#"></cfcol>
</cftable>
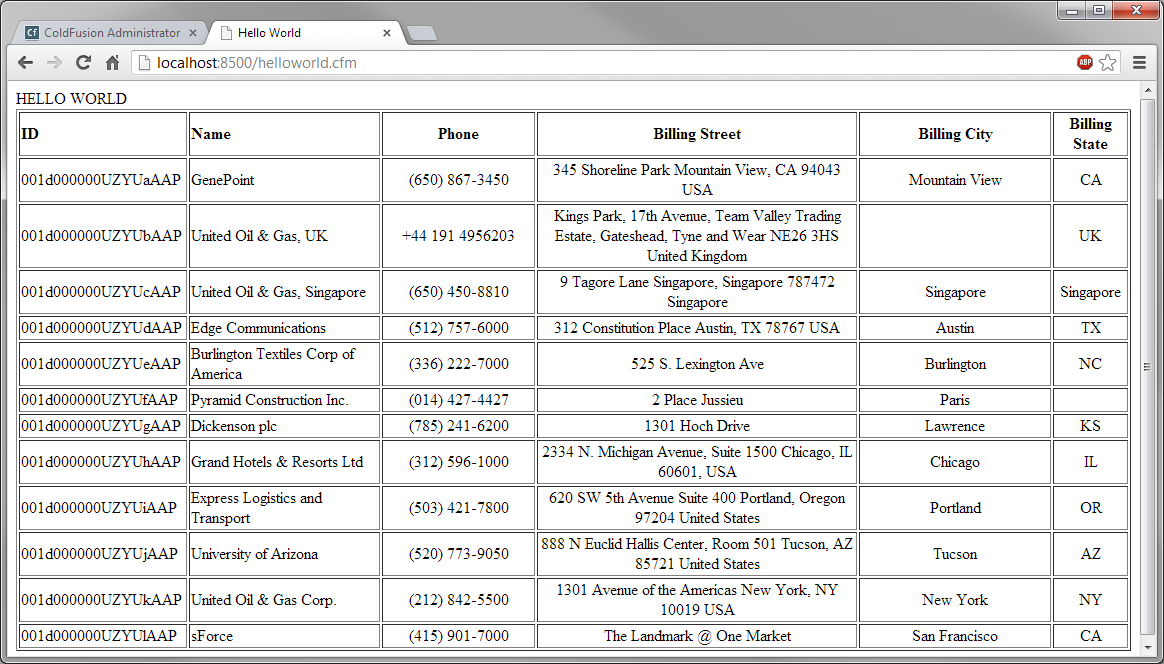
コードを実行してグリッドを表示します。
HTML 部分を含む以下のフルコードが利用できます。
<html>
<head><title>Hello World</title></head>
<body>
<cfoutput>#ucase("hello world")#</cfoutput>

<cfquery name="ADLSQuery" dataSource="CDataADLS">
  SELECT * FROM Resources
</cfquery>
<cftable
  query = "ADLSQuery"
  border = "1"
  colHeaders
  colSpacing = "2"
  headerLines = "2"
  HTMLTable
  maxRows = "500"
  startRow = "1">
  <cfcol header="<b>FullPath</b>" align="Left" width=8 text="#FullPath#"></cfcol>
  <cfcol header="<b>Permission</b>" align="Left" width=10 text="#Permission#"></cfcol>
</cftable>
</body>
</html>