ノーコードでクラウド上のデータとの連携を実現。
詳細はこちら →こんにちは!ウェブ担当の加藤です。マーケ関連のデータ分析や整備もやっています。
この記事では、CData BizTalk Adapter for GoogleDataCatalog で実行できるアップデートグラムを作成します。設計したスキーマは、インサート、アップデート、デリートのアップデートグラムを作成するためのテンプレートとして使用します。
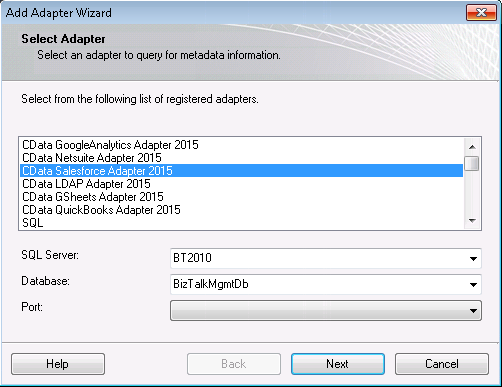
[Add Adapter] ウィザードから、アダプターをVisual Studio のBizTalk サーバープロジェクトに追加します。アダプターを使って、修正したいテーブルに関するGoogle Data Catalog のメタデータをクエリします。
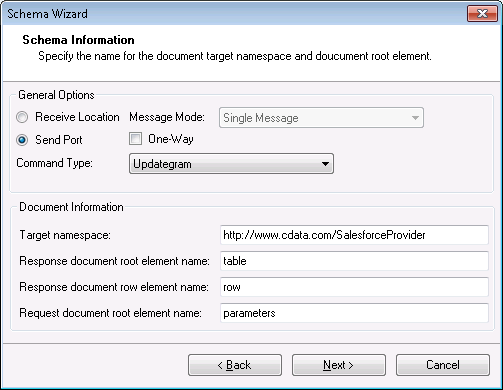
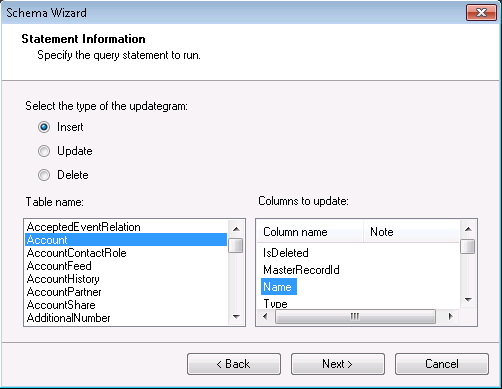
以下のステップに従って、Visual Studio のBizTalk サーバープロジェクトでスキーマを作成します。
ProjectId=YourProjectId;
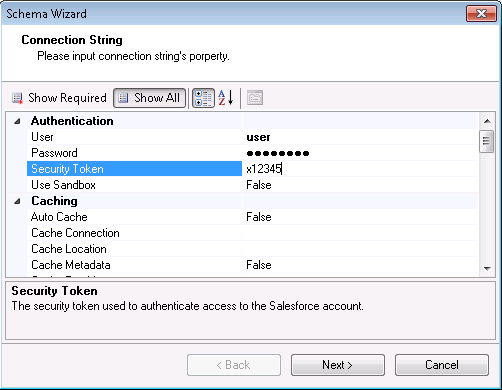
認証プロパティを追加する前に、次の接続プロパティを設定してください。
CData 製品は、認証にユーザーアカウント、サービスアカウント、およびGCP インスタンスアカウントの使用をサポートします。
OAuth の設定方法については、ヘルプドキュメントの「OAuth」セクションを参照してください。
接続プロパティの詳細は、ヘルプドキュメントの"BizTalk Configuration" チャプターを参照してください。
Noteアップデートグラムを作成する際、修正はスキーマに含ませたカラムに限定されます。
アップデートグラムスキーマの作成後、アップデートグラムを生成する.xsd ファイルを使用できます。.xsd ファイルを右クリックし、[Generate Instance]を選択します。このファイルは、アップデートグラムを手動で作成するテンプレートとして使用することもできます。以下は、インサート、アップデート、デリートそれぞれに生成されたアップデートグラムインスタンスの例です。
まず、インサートの一例です。このインスタンスでは、データの変化を指定するafter ブロックのみを扱います。
  <ns0:parameters xmlns:ns0="http://www.cdata.com/jp/GoogleDataCatalogProvider">
    <ns0:sync>
      <ns0:before></ns0:before>
      <ns0:after>
        <ns0:Schemas Type="Type_0" DatasetName="DatasetName_1" />
      </ns0:after>
    </ns0:sync>
  </ns0:parameters>
次に、アップデートの一例です。このインスタンスでは、before ブロック(テーブルに存在するデータ)と、after ブロック(データの変化)の両方を扱います。
  <ns0:parameters xmlns:ns0="http://www.cdata.com/jp/GoogleDataCatalogProvider">
    <ns0:sync>
      <ns0:before>
        <ns0:Schemas Id=001d000000YBRseAAH></ns0:Schemas>
      </ns0:before>
      <ns0:after>
        <ns0:Schemas Type="Type_0" DatasetName="DatasetName_1" ></ns0:Schemas>
      </ns0:after>
    </ns0:sync>
  </ns0:parameters>
最後に、デリートの一例です。after ブロックは空になり、アイテムを除去していることを示します。
  <ns0:parameters xmlns:ns0="http://www.cdata.com/jp/GoogleDataCatalogProvider">
    <ns0:sync>
      <ns0:before>
        <ns0:Schemas Id=001d000000YBRseAAH></ns0:Schemas>
      </ns0:before>
      <ns0:after></ns0:after>
    </ns0:sync>
  </ns0:parameters>
Google Data Catalog レコードのインサート、アップデート、デリートにアップデートグラムを使用するには、こちらのチュートリアルをご覧ください。