Discover how a bimodal integration strategy can address the major data management challenges facing your organization today.
Get the Report →


Connect to Nonstandard OData Services
The CData ADO.NET Provider for OData enables you to expose Web services as a fully managed ADO.NET data source. It allows you to access almost any OData service from native ADO.NET tools. You can follow the procedure below to access OData sources that do not conform exactly to the OData protocol. This article will add support for the Microsoft Research service, which does not implement some common functionality, including support for retrieving metadata.
Define a Custom Schema File
The CData providers allow you to write custom schema files that define the metadata for the tables in your data source. This is useful when accessing OData services that do not implement the "$metadata" service metadata document. Additionally, storing metadata locally increases performance because it does not need to be retrieved from the data source each time.
Follow the steps below to create a schema file for the Downloads table in the Microsoft Research service.
- Use an existing schema as a template: Navigate to the db folder in the installation directory and make a copy of the sys_data.rsd schema file. Name the new file the same name as the table you want to connect to.
- In the new file (Downloads.rsd), delete all the rows between the rsb:info tags. On the rsb:info node, change the Title attribute to match the name of the file (without the .rsd extension).
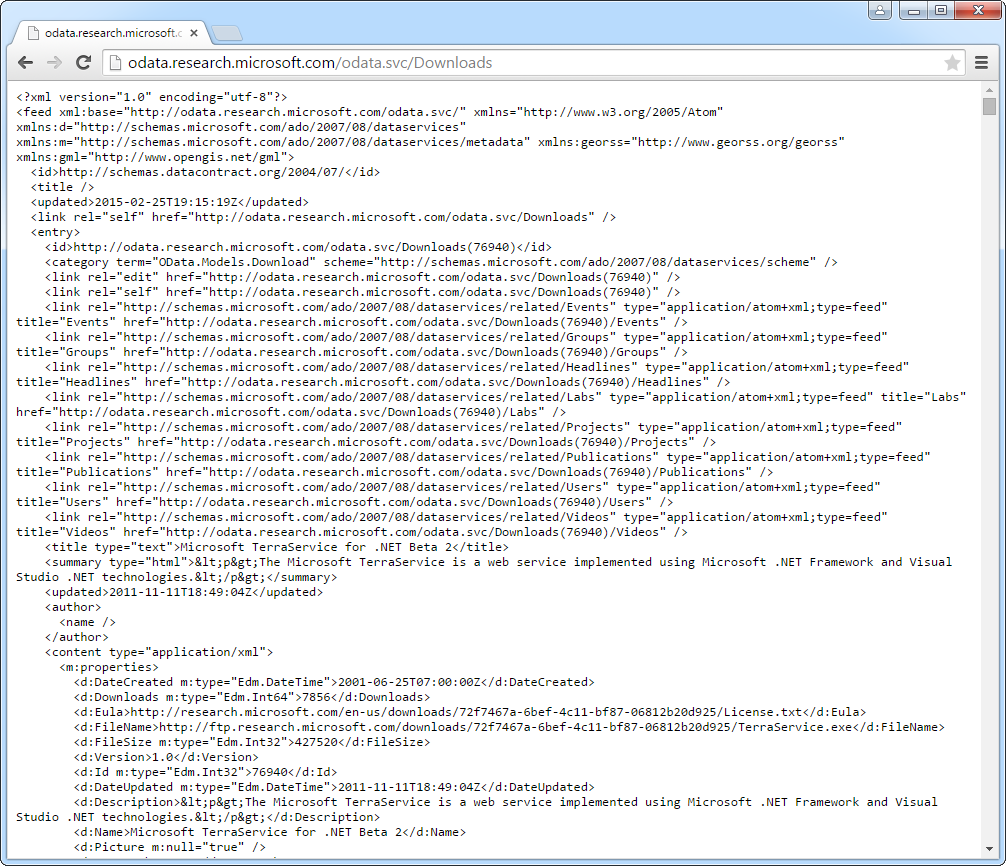
- Get the listing of columns by visiting the URL for the table in your browser, for example, http://odata.research.microsoft.com/odata.svc/Downloads. There should be an XML document returned with all the tables we are ultimately interested in retrieving with the OData data provider. You might need to view the page source here to see the actual XML in your browser. Look for the m:properties node under one of the entries returned. Each of the child elements here can be a field in the schema.
![]()
- Define columns for the fields that you want to have access to: Define an attr entry that (at a minimum) has the name and xs:type attributes. Here's a basic example for the Downloads table:
<attr name="ID"          xs:type="integer"  key="true" readonly="true" description="The primary key for the Downloads table." ></attr>
<attr name="Name"        xs:type="string" ></attr>
<attr name="Downloads"   xs:type="long" ></attr>
The preceding example uses the following optional attributes:
- key: This attribute marks the field as the primary key. It is not necessary to have a primary key if the OData service is read-only.
- readonly: If set to "true", this attribute disallows updates for this field.
- description: This attribute provides a description.
To specify complex data types, such as arrays, you can add the following attributes:
- other:int_ColumnName: To denote child elements, set this attribute to the path of the field. Use periods instead of slashes.
- other:datasourcedatatype: This attribute specifies the type of the root element followed by the EDM type of the child element.
For example, on the Northwind Suppliers table, the other:int_ColumnName of "Address_Street" is "Address.Street" and the other:datasourcedatatype is "ODataDemo.Address.Edm.String".
- Add the following line exactly as is in order to support paging.
<input name="rows@next" desc="A system column used for paging. Do not change.">
You can find the complete script below.
<rsb:script xmlns:rsb="https://www.cdata.com/ns/rsbscript/2">
  <rsb:info title="Downloads" description="This is an example table showing how build a custom schema file to connect to an OData source that does not conform exactly to the OData protocol.">
    <attr name="ID"               xs:type="integer"  key="true" />
    <attr name="Name"             xs:type="string"  ></attr>
    <attr name="Downloads"        xs:type="long"  ></attr>
    <attr name="FileName"         xs:type="string"  ></attr>
    <attr name="FileSize"         xs:type="integer"  ></attr>
    <attr name="Description"      xs:type="string"  ></attr>
    <attr name="Version"          xs:type="string"  ></attr>
    <attr name="Picture"          xs:type="string"  ></attr>
    <attr name="ResearchAreas"    xs:type="string"  ></attr>
    <attr name="Tags"             xs:type="string"  ></attr>
    <attr name="URL"              xs:type="string"  ></attr>
    <attr name="Eula"             xs:type="string"  ></attr>
    <attr name="DateUpdated "     xs:type="datetime"  ></attr>
    <attr name="DateCreated"      xs:type="datetime"  ></attr>

    <input name="rows@next" description="A system column used for paging. Do not change." />
  </rsb:info>

  <rsb:script method="GET">
    <rsb:call op="odataadoExecuteSearch" in="_input">
      <rsb:push />
    </rsb:call>
  </rsb:script>

    <rsb:script method="MERGE">
    <rsb:call op="odataadoExecuteUpdate" input="_input">
      <rsb:push />
    </rsb:call>
  </rsb:script>

  <rsb:script method="POST">
    <rsb:call op="odataadoExecuteInsert" input="_input">
     <rsb:push />
    </rsb:call>
  </rsb:script>

  <rsb:script method="DELETE">
    <rsb:call op="odataadoExecuteDelete" input="_input">
      <rsb:push />
    </rsb:call>
  </rsb:script>
</rsb:script>
Query the Table
After adding columns, you can now use them in SELECT queries. If you do not need INSERT, UPDATES, or DELETEs, you can remove the rsb:script elements for POST, MERGE, and DELETE respectively.
To use the schema file with any CData Data Provider, set the Location connection property to the folder containing this file.
Note that the default Id will be a URL of the OData item. If you have an Id field defined in the m:properties element for the service that you would rather use, you can set the "Use Id URL" connection string property to False.
Add INSERT, UPDATE, and DELETE Support
The Microsoft service in the example does not support INSERT, UPDATE, or DELETE because it does not provide a category node. For data sources that assign category elements to entries, you can get this support by setting the _input.entityname and _input.schemanamespace inputs. These values will be hard-coded for the particular table. Set these inputs to the following values:
- _input.entityname: Set this input to the name of the table.
- _input.schemanamespace: Set this input to the category element for an entry from the table you are interested in. If the Microsoft service supported data manipulation queries, you could get the schema namespace by searching for a category node at the following URL: http://odata.research.microsoft.com/odata.svc/Downloads. The value for the Microsoft Download table would be "OData.Models.Download".
Once you have these values, set the following two lines directly after the closing tag but before the rsb:script method="GET" tag:
<rsb:set attr="_input.entityname" value="Downloads" />
<rsb:set attr="_input.schemanamespace" value="OData.Models.Download" />
Data Connectors
ETL/ ELT Solutions
Cloud & API Connectivity
OEM & Custom Drivers