Discover how a bimodal integration strategy can address the major data management challenges facing your organization today.
Get the Report →


Tutorial: Create and Process Updategrams with the Salesforce BizTalk Adapter
The CData BizTalk Adapter for Salesforce enables you to execute SQL commands, updategrams, and stored procedures on Salesforce data in BizTalk. This article provides a walk-through of an application that uses an updategram to insert Salesforce data.
- A one-way file receive location picks up the XML document that contains the updategram.
- The document is routed to a CData Adapter for Salesforce solicit-response send port.
- The adapter executes the command. The results of an insert contain the Id of the new record.
- The response from Salesforce is routed to a one-way file send port, which writes the BizTalk message to a file.
Create the Sample Application
The following sections walk through creating the sample application:
- Generate the Schema and an Updategram Instance
- Configure a Receive Port
- Configure a File Receive Location
- Configure the Adapter for Salesforce in a Solicit-Response Send Port
- Configure a File Send Port
- Create Filters to Route BizTalk Messages Through the Application
- Enlist and Enable the Locations and Ports
- View Application Logs
Generate the Schema and an Updategram Instance
You can use wizards in Visual Studio to generate the schema and updategram instance:
- Add the Adapter for Salesforce to Your Project
- Generate a Schema to Insert into the Account table
- Generate an Updategram Instance
Add the Adapter for Salesforce to Your Project
Use the Add Adapter wizard to add the adapter for Salesforce to your project. You will use the adapter to query Salesforce for metadata about the table you want to insert to; for example, "Account".
- Right-click on the project in the Solution Explorer and click Add -> Add Generated Items.
- Select Add Adapter Metadata in the resulting dialog box.
- In the resulting Add Adapter Wizard, select the CData BizTalk Adapter for Salesforce from the list view.
- In the Port menu, leave the selection blank. Or, if you want to use the connection string for an adapter you have already configured, select the send port or receive location from your BizTalk application.
![]()

Generate a Schema to Insert into the Account Table
You will use the schema as a template for creating an updategram that will insert Salesforce data. The schema is an .xsd file that defines the XML request and response. As an example, an insert updategram is generated. You can follow the same process to create update and delete updategrams.
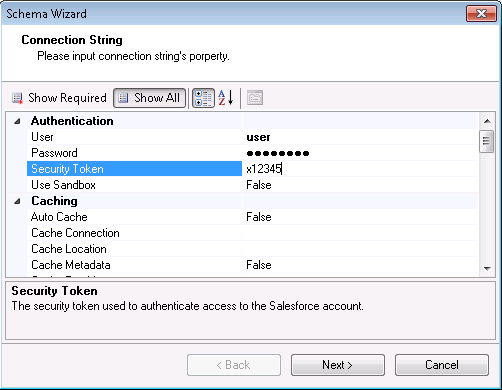
- In the Connection String page of the Schema Wizard, enter authentication credentials and other connection properties, if you have not already configured them in your BizTalk application.
![]()
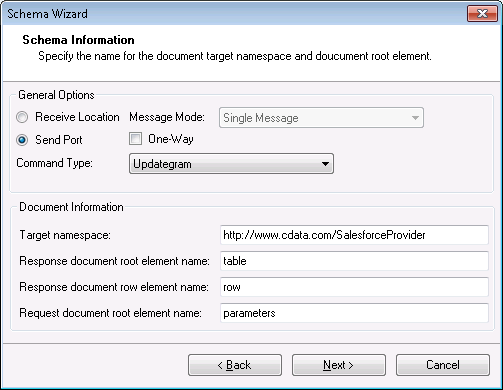
- Select the Send Port option.
- Disable the One-Way option. The One-Way option ignores any response from the adapter for the updategram, such as the AffectedRows value that is returned. The Id of the newly created row is also returned. By disabling the One-Way option you will get an updategram schema that supports retrieving the Id.
- In the Command Type menu, select Updategram.
![]()
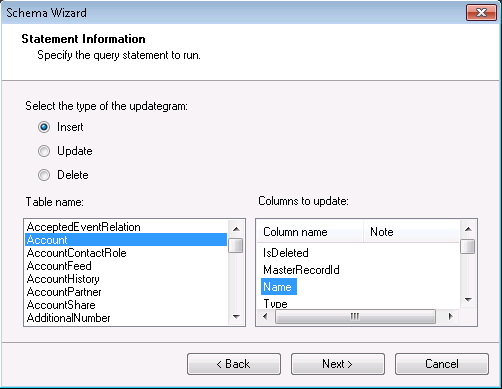
-
Select the Insert option and select the table and columns you want to insert into. This tutorial uses Name and AnnualRevenue.
Note: When you create the updategram, you are limited to selecting the columns you include in the schema. Id is required for updates and deletes. It is not required for inserts.
![]()
- On the summary page, verify the settings you defined and click Finish to close the wizard.
Generate an Updategram Instance
In this step, you will create the XML message that will in later steps be sent to the Salesforce adapter. To create the updategram, right-click the .xsd file in the Solution Explorer and then click Generate Instance. The location where the updategram is saved is listed in the Output tab.
The updategram is structured to define what response is desired from Salesforce. For example updategrams and more information, see How to Generate Updategrams with the CData BizTalk Adapter for Salesforce.

Configure the Receive Port
To add a receive location to your application, you first need to add a receive port. Receive ports can receive data from multiple receive locations.
- If you have not already done so, open your application in the BizTalk Server Administration Console.
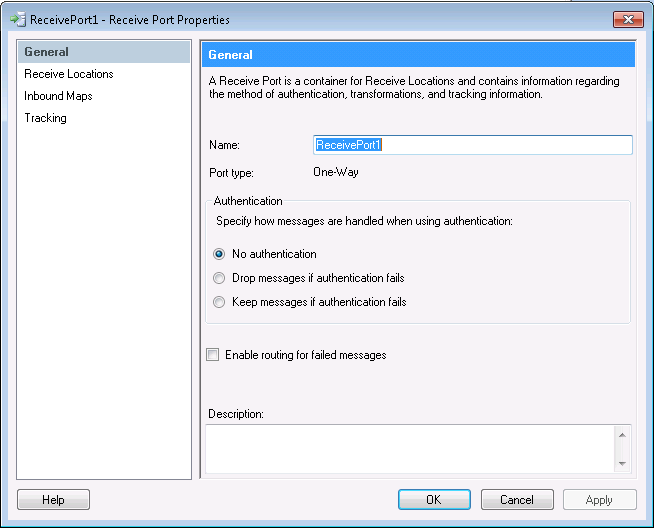
- In your application, right-click Receive Ports and click New -> One-Way Receive Port. The Receive Port Properties dialog is displayed.
- In the Name menu, enter a name for the Receive Port.
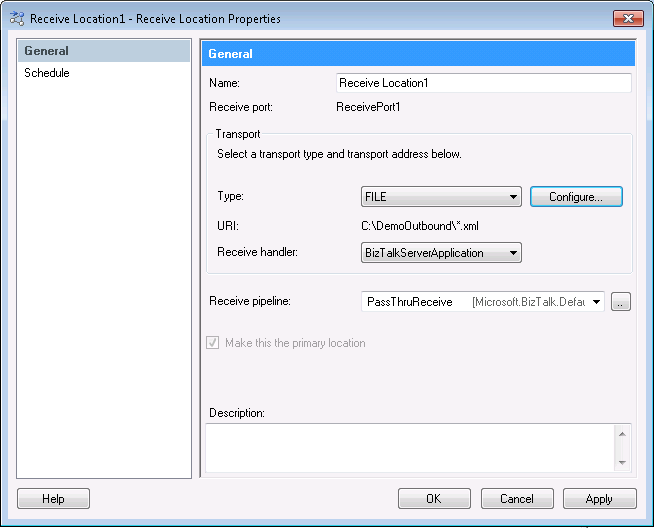
Configure the File Receive Location
The static one-way file receive location will enable you to use the updategram in BizTalk. The file receive location creates a BizTalk message containing the updategram.
- Right-click Receive Locations and click New -> One-Way Receive Location.
- Select the receive port of which the new receive location will be a member. The Receive Location Properties dialog is displayed.
- In the Name menu, enter a name for the receive location.
- In the receive location properties, select FILE in the Transport Type menu.
- Click Configure. The File Transport Properties dialog is displayed.
- In the Receive Folder box, enter the path to a folder; for example, DemoOutbound. The receive location will scan this folder for files that match the criteria in the File mask box.
- In the Receive pipeline menu, select the default option, PassThruReceive.
Configure the Adapter for Salesforce in a Solicit-Response Send Port
Configuration consists of the following steps:
- Create and Configure the Solicit-Response Send Port
- Configure the CData Adapter for Salesforce
- Configure the Connection to Salesforce
Create and Configure the Solicit-Response Send Port
Use a solicit-response send port to obtain the results of an updategram command; in this tutorial, the Id of the newly inserted record is returned in BizTalk.
- If you have not already done so, open your BizTalk application in the BizTalk Administration Console.
- In the node for your BizTalk application, right-click Send Ports and select New -> Static Solicit-Response Send Port. The Send Port Properties dialog is displayed.
- In the send port properties, enter a name for the send port.
- In the Transport Type menu, select CData.Salesforce.

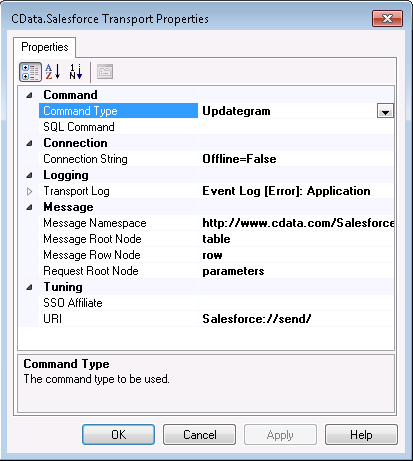
Configure the CData Adapter for Salesforce
Define the command the adapter will execute in the Adapter Transport Properties dialog.
- In the send port properties, click the Configure button. The Adapter Transport Properties dialog is displayed.
- In the CommandType property, select "Updategram".
Configure the Connection to Salesforce
Configure credentials and other properties required to connect to Salesforce in the Connection String Options dialog.
- If you have not already done so, open the Adapter Transport properties dialog: In the send port properties, click Configure.
- Click the button in the Connection String property. The Connection String Options dialog is displayed.
- Enter connection properties. Required connection properties are User, Password, and AccessToken.
- Click Test Connection to verify the values.
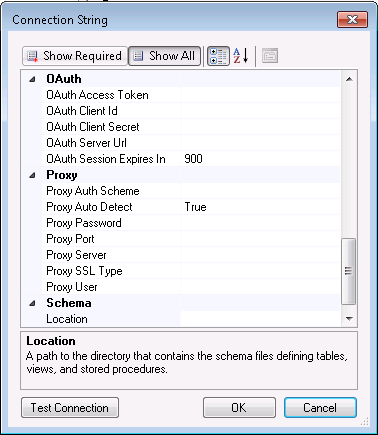
The connection properties for the adapter. (Salesforce is shown.)
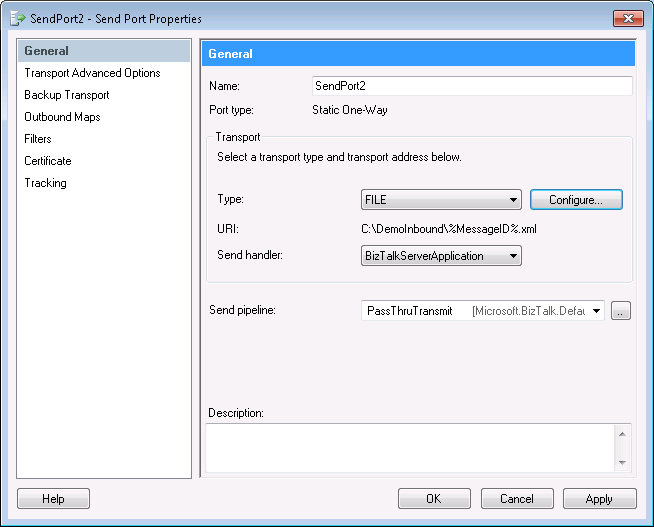
Configure a File Send Port
The file send port will write to a file the Id that is returned from the insert. Follow the steps below to configure a one-way send port to write incoming messages to a file.
- Right-click Send Ports and then click Static One-Way Send Port.
- In the Type menu, select FILE.
- Click Configure.
- In the Destination folder box, enter the path to the folder where the message will be written. For example, DemoInbound.
Create Filters to Route BizTalk Messages Through the Application
Follow the steps below to create filter rules that will define the following associations in your application:
- Associate the solicit-response send port with the BizTalk message that contains the updategram.
- Associate the file send port with the BizTalk message created by the results of executing the updategram.
-
In the solicit-response send port properties, click Filters and set the following values:
- Property: Select BTS.InboundTransportLocation from the menu.
- Value: Enter the URI of the one-way receive location, "C:\DemoOutbound\*.xml" in this example.
![]()
-
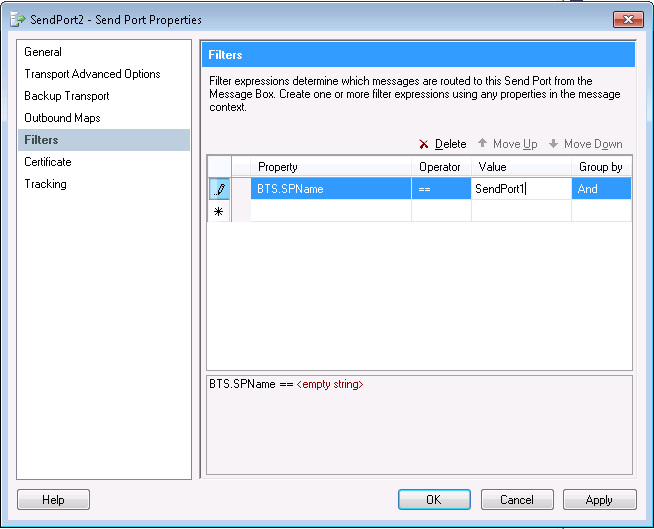
In the one-way send port properties, click Filters and set the following values:
- Property: Select BTS.SPName from the menu.
- Value: Enter the name (not URI) of the solicit-response send port.
![]()

Enlist and Enable the Locations and Ports
To ensure that the updategram is picked up by the receive location, follow the steps below when starting your BizTalk application:
- Right-click the solicit-response send port and click Start. This will also enlist the send port.
- Right-click the one-way send port and click Start. This will also enlist the send port.
- Right-click the receive location and click Enable.
You can now copy the updategram into the folder that you configured for the receive location.
Open the folder that you configured for the one-way send port: This folder contains the new Id in an XML file. The message will resemble the following example:
<table xmlns="https://www.cdata.com/SalesforceProvider" AffectedRows="1">
  <row><Id>0014000001XERBUAA5</Id></row>
</table>
View the Application Logs
In the Application Logs, you can view error messages and quickly check that your application has initialized successfully. To open the logs, expand the Event Viewer (Local) in the navigation tree in the Administration Console. Expand Windows Logs and select Application.
A list of errors that have occurred will be available here. This will include error messages for all applications on the system, so it is important to check the source of the error message. For the receive location, the source should be the CData BizTalk Adapter for Salesforce. Details of the error message should provide insight into why the error is occurring.
Contact support@cdata.com for guidance on resolving the error.
Data Connectors
ETL/ ELT Solutions
Cloud & API Connectivity
OEM & Custom Drivers