Discover how a bimodal integration strategy can address the major data management challenges facing your organization today.
Get the Report →Configure a One-Way Send Port for the CData BizTalk Adapter for Amazon Athena
Use the adapter for Amazon Athena with a one-way send port to execute updategrams and data manipulation SQL in BizTalk.
This section provides step-by-step instructions for creating, configuring, and testing a static one-way send port using the CData BizTalk Adapter for Amazon Athena. You can use static one-way send ports to execute updategrams, SQL commands, and stored procedures. Send ports are useful for operations that modify Amazon Athena data but do not have any response data. Typically, this would be DELETE or UPDATE SQL commands or updategrams, and occasionally stored procedure operations.
If you want to trigger actions that will return a response, such as executing SELECT commands or retrieving the Id of a record that you have created, use a solicit-response send port.
Create and Configure the One-Way Send Port
Create a static one-way send port and configure it to use the Amazon Athena adapter as its transport type.
- If you have not already done so, open your BizTalk application in the BizTalk Administration Console.
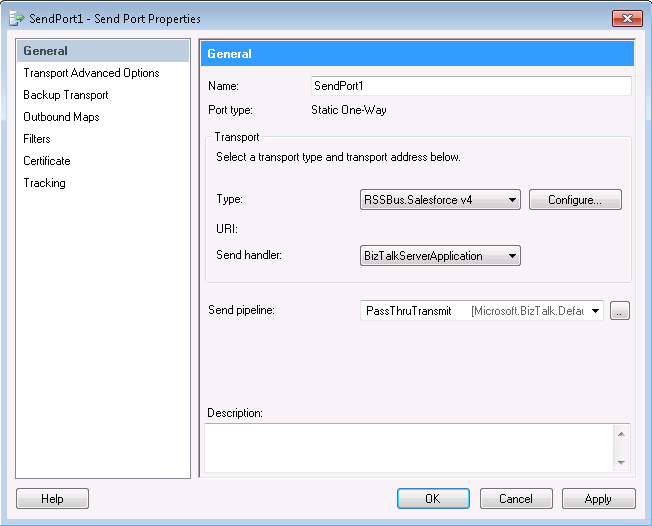
- In the node for your BizTalk application, right-click Send Ports and select New -> Static One-Way Send Port. The send port properties dialog is displayed.
- In the Name menu, enter a name for the send port.
- In the Type menu, select CData.AmazonAthena.
- In the Send Pipeline menu, select the default option, PassThruTransmit.

Configure the Adapter
Define the command that the adapter will execute in the Transport Properties dialog.
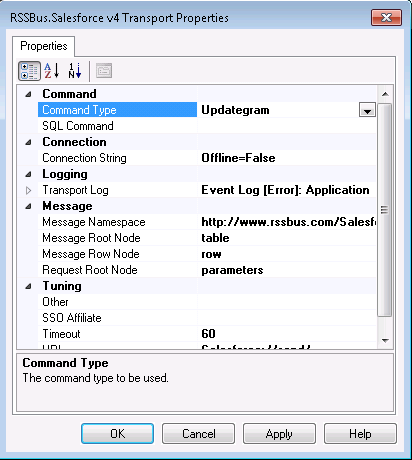
- In the send port properties, click the Configure button. The CData.Amazon Athena Transport Properties dialog is displayed.
- In the CommandType property, select the command type you want.
- If you want to execute an SQL command, enter the command in the SQL Command box.

Configure the Connection to Amazon Athena
Configure credentials and other properties required to connect to Amazon Athena in the Connection String Options dialog.
- In the send port properties dialog, click Configure. The adapter properties dialog is displayed.
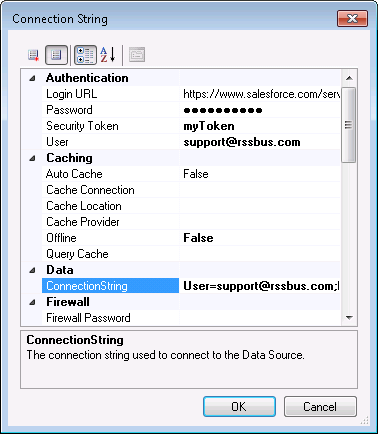
- Click the button in the Connection String property.
- Click the box in the Connection String property. The Connection String Options dialog is displayed.
- Enter connection properties. Below is a typical connection string:
AccessKey='a123';SecretKey='s123';Region='IRELAND';Database='sampledb';S3StagingDirectory='s3://bucket/staging/';Authenticating to Amazon Athena
To authorize Amazon Athena requests, provide the credentials for an administrator account or for an IAM user with custom permissions: Set AccessKey to the access key Id. Set SecretKey to the secret access key.
Note: Though you can connect as the AWS account administrator, it is recommended to use IAM user credentials to access AWS services.
Obtaining the Access Key
To obtain the credentials for an IAM user, follow the steps below:
- Sign into the IAM console.
- In the navigation pane, select Users.
- To create or manage the access keys for a user, select the user and then select the Security Credentials tab.
To obtain the credentials for your AWS root account, follow the steps below:
- Sign into the AWS Management console with the credentials for your root account.
- Select your account name or number and select My Security Credentials in the menu that is displayed.
- Click Continue to Security Credentials and expand the Access Keys section to manage or create root account access keys.
Authenticating from an EC2 Instance
If you are using the CData Data Provider for Amazon Athena 2018 from an EC2 Instance and have an IAM Role assigned to the instance, you can use the IAM Role to authenticate. To do so, set UseEC2Roles to true and leave AccessKey and SecretKey empty. The CData Data Provider for Amazon Athena 2018 will automatically obtain your IAM Role credentials and authenticate with them.
Authenticating as an AWS Role
In many situations it may be preferable to use an IAM role for authentication instead of the direct security credentials of an AWS root user. An AWS role may be used instead by specifying the RoleARN. This will cause the CData Data Provider for Amazon Athena 2018 to attempt to retrieve credentials for the specified role. If you are connecting to AWS (instead of already being connected such as on an EC2 instance), you must additionally specify the AccessKey and SecretKey of an IAM user to assume the role for. Roles may not be used when specifying the AccessKey and SecretKey of an AWS root user.
Authenticating with MFA
For users and roles that require Multi-factor Authentication, specify the MFASerialNumber and MFAToken connection properties. This will cause the CData Data Provider for Amazon Athena 2018 to submit the MFA credentials in a request to retrieve temporary authentication credentials. Note that the duration of the temporary credentials may be controlled via the TemporaryTokenDuration (default 3600 seconds).
Connecting to Amazon Athena
In addition to the AccessKey and SecretKey properties, specify Database, S3StagingDirectory and Region. Set Region to the region where your Amazon Athena data is hosted. Set S3StagingDirectory to a folder in S3 where you would like to store the results of queries.
If Database is not set in the connection, the data provider connects to the default database set in Amazon Athena.
- Click Test Connection to verify the values and test connectivity.

After you connect successfully and define the command the adapter will execute, the send port is ready for use. See the following section for an example of using a one-way send port in a simple application. The application reads updategram commands contained in a file and uses a send port to execute the command.
In the example, filters are used to move the messages that contain the updategram from the receive location to the send port. See the following section for more information on filters.
Create Filters to Route BizTalk Messages Through an Application
To associate a send port with the messages you want, create a filter rule in the Filters section of the properties for that send port. Messages matching the criteria will be routed to the send port. See the following example to filter on a receive location.
Example: Execute Updategrams with a One-Way Send Port
This section shows how to use a one-way send port in a simple application. The application reads updategram commands contained in a file and executes the commands:
- A one-way receive location picks up the XML document containing the updategram.
- The receive location creates a BizTalk message containing the results of the command.
- A one-way send port filters on the URI of the receive location. The document is routed to the one-way send port.
- The send port executes the updategram command.
As in the preceding example, the followings steps show how to set up a receive location to read updategrams from a file and use a send port to execute the commands:
- Create and configure a static one-way receive location. Use the File transport type. You can follow the same procedure to create and configure a receive location for the CData BizTalk Adapter for Amazon Athena.
- Create a static one-way send port.
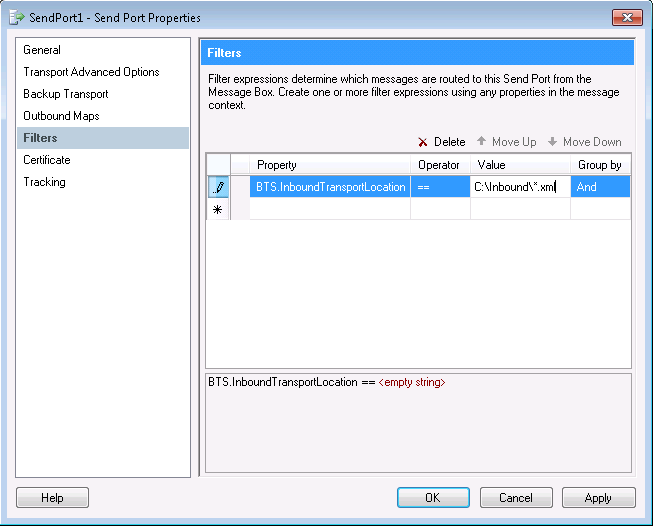
- In the send port properties, click Filters.
- In an empty property, set the following values:
- Property
- Select BTS.InboundTransportLocation from the menu.
- Value
- Enter the URI of the newly created one-way receive location.


