Discover how a bimodal integration strategy can address the major data management challenges facing your organization today.
Get the Report →Using AngularJS to Build Dynamic Web Pages with XML Data
Create single-page applications with connectivity to XML.
AngularJS (Angular) is a structural framework for dynamic Web apps. With Angular, the CData API Server, and the ADO.NET Provider for XML (or any of 200+ other ADO.NET Providers), you can build single-page applications (SPAs) with access to live data from XML. This article will walk through setting up the CData API Server and creating a simple SPA that has live access to XML data. The SPA will dynamically build and populate an HTML table.
Setting Up the API Server
If you have not already done so, you will need to download the CData API Server. Once you have installed the API Server and the ADO.NET Provider for XML, you will need to run the application, configure the driver to connect to your XML data, and then configure the driver to create OData feeds for any tables you wish to access in your SPA.
Enable CORS
AngularJS requires servers to have CORS (Cross-origin resource sharing) enabled. We can enable CORS by navigating to the SETTINGS Server tab in the API Server. You will need to adjust the following settings.
- Click the checkbox to "Enable cross-origin resource sharing (CORS)".
- Either click the checkbox to "Allow all domains without '*'" or specify the domain(s) that are allowed to connect in Access-Control-Allow-Origin.
- Set Access-Control-Allow-Methods to "GET,PUT,POST,OPTIONS".
- Set Access-Control-Allow-Headers to "authorization".
- Click "Save Changes".
Configure Your Connection to XML
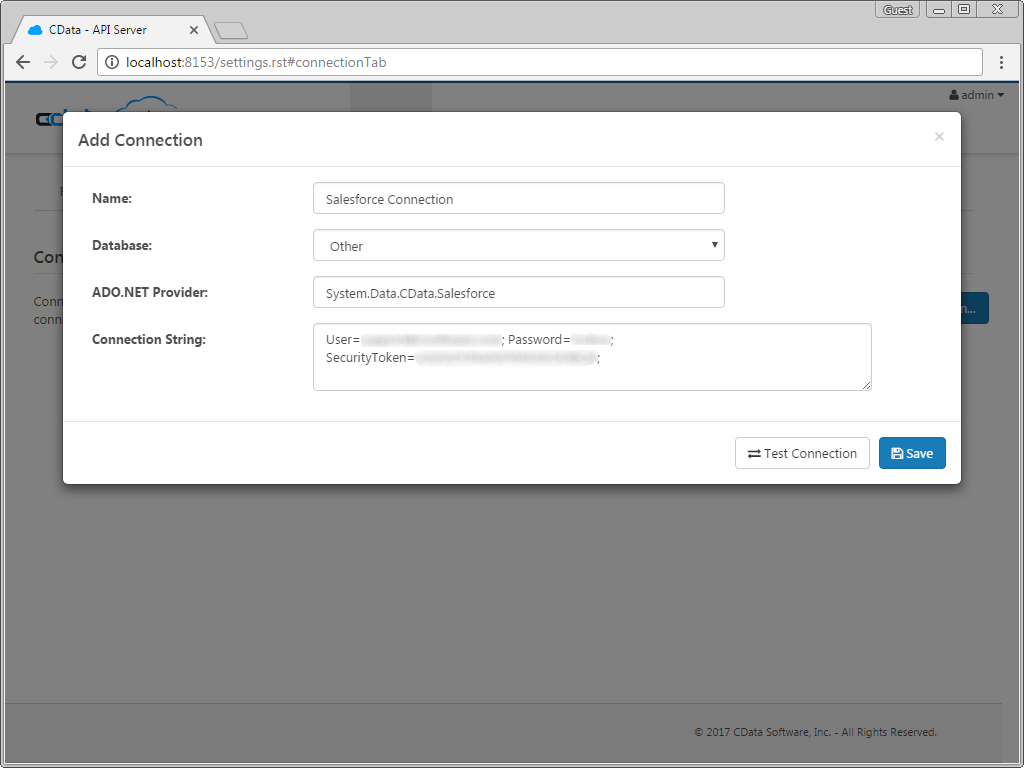
To configure the API Server to connect to your XML data, you will need to navigate to the Connections tab on the Settings page.
Name your connection, select Other as the database, set the ADO.NET Provider (System.Data.CData.XML), and build a connection string (or populate connection properties).
See the Getting Started chapter in the data provider documentation to authenticate to your data source: The data provider models XML APIs as bidirectional database tables and XML files as read-only views (local files, files stored on popular cloud services, and FTP servers). The major authentication schemes are supported, including HTTP Basic, Digest, NTLM, OAuth, and FTP. See the Getting Started chapter in the data provider documentation for authentication guides.
After setting the URI and providing any authentication values, set DataModel to more closely match the data representation to the structure of your data.
The DataModel property is the controlling property over how your data is represented into tables and toggles the following basic configurations.
- Document (default): Model a top-level, document view of your XML data. The data provider returns nested elements as aggregates of data.
- FlattenedDocuments: Implicitly join nested documents and their parents into a single table.
- Relational: Return individual, related tables from hierarchical data. The tables contain a primary key and a foreign key that links to the parent document.
See the Modeling XML Data chapter for more information on configuring the relational representation. You will also find the sample data used in the following examples. The data includes entries for people, the cars they own, and various maintenance services performed on those cars.

Configure a User
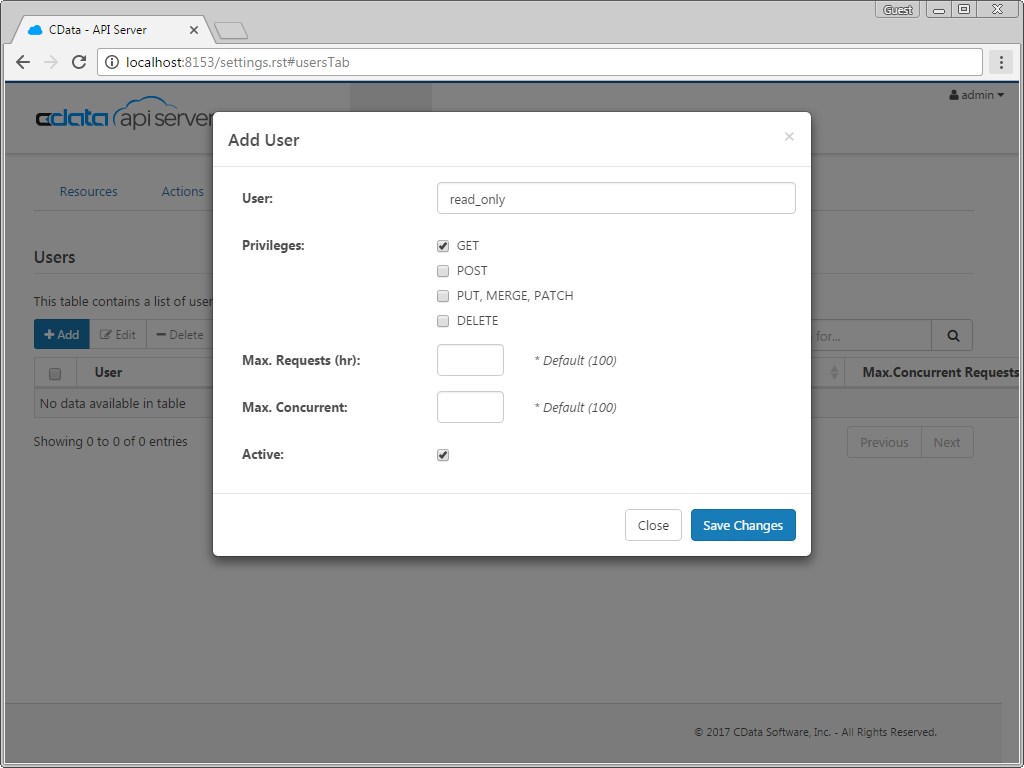
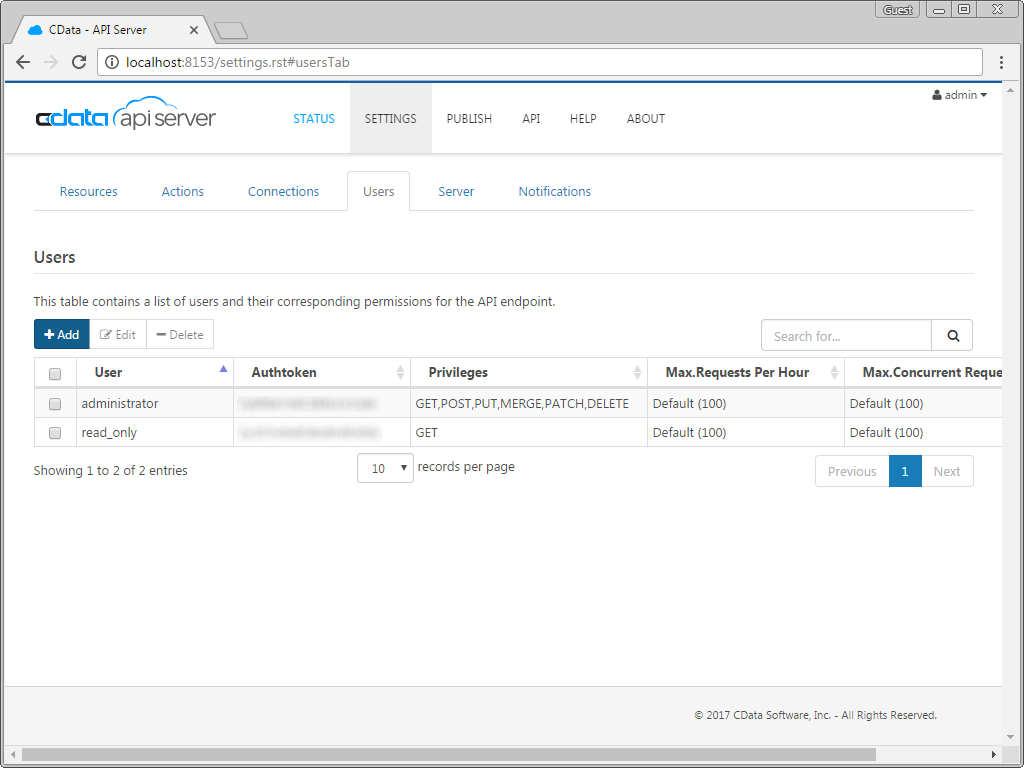
Next, create a user to access your XML data through the API Server. You can add and configure users on the Users tab of the Settings page. Since we are only creating a simple SPA for viewing data, we will create a user that has read-only access. Click Add, give the User a name, and select GET for the Privileges. We also allow connections from all IP addresses.

As you can see in the screenshots, we already had a user configured with read and write access. For this article, we will access the API Server with the read-only user, using the associated authtoken.

Accessing Tables
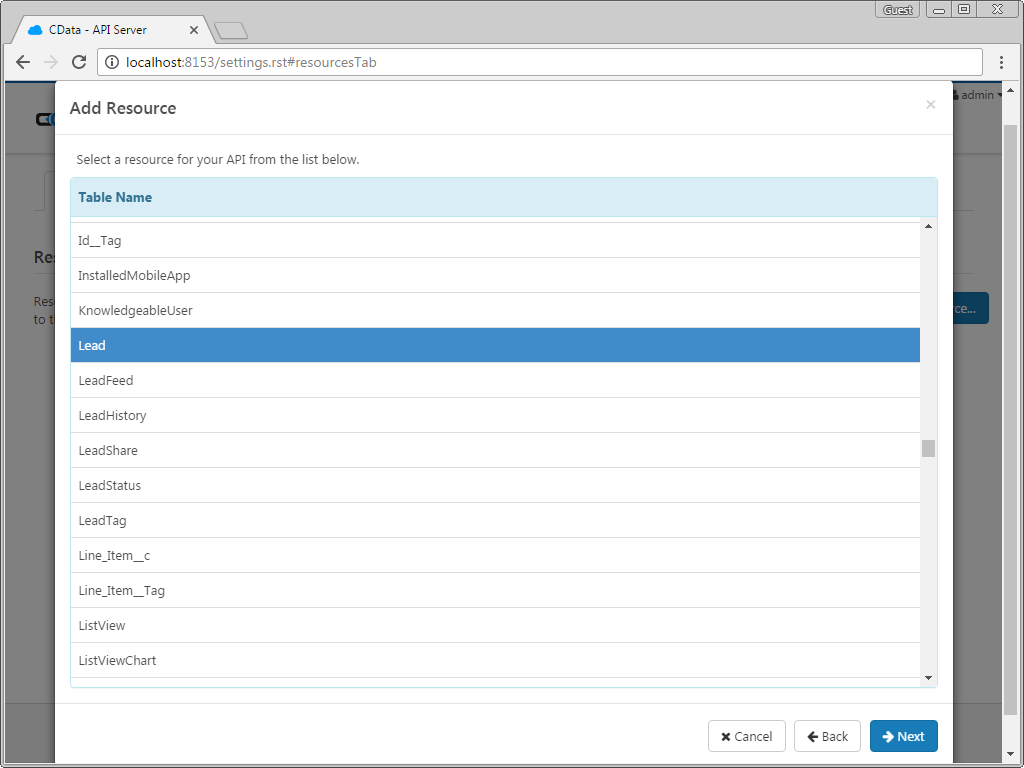
Having created a user, we are ready to enable access to XML entities as tables. To enable tables, click the Add Resources button on the Resources tab of the Settings page. Select the tables you wish to access and click Save Changes. Adding resources will create OData feeds for XML data.

Sample URLs for OData Feeds
Having configured a connection to XML, created a user, and added tables to the API Server, we can access OData feeds for those tables. Below, you will see the URLs to access tables and the list of tables. For information on accessing the tables, you can navigate to the API page for the API Server (click the API link on the top right of the API Server Web page). For the URLs, you will need the address and port of the API Server. Since we are working with Angular, we will append the @json parameter to the end of URLs that do not return JSON data by default.
| Table | URL | |
|---|---|---|
| Entity (table) List | http://address:port/api.rsc/ | |
| Metadata for table people | http://address:port/api.rsc/people/$metadata?@json | |
| Account | http://address:port/api.rsc/people |
As with standard OData feeds, if you wish to limit the fields returned, you can add a $select parameter to the query, along with other standard OData URL parameters, such as $filter, $orderby, $skip, and $top. See the help documentation for more information on supported OData queries.
Building a Single Page Application
With the API Server setup completed, we are ready to build our SPA. Since this is a simple demonstration, we will include all of our CSS, scripting, and Angular controllers in a single file, deliberately not engaging the functionality provided by AngularJS services, factories, and custom directives.
CSS Definitions & Importing AngularJS Libraries
To start with, create some CSS rulesets to modify the table, th, td, and tr elements to format the tables of data. We also need to import the AngularJS libraries for use in our SPA.
  <style>
  table, th, td {
    border: 1px solid grey;
    border-collapse: collapse;
    padding: 5px;
  }
  table tr:nth-child(odd) {
    background-color: #f1f1f1;
  }
  table tr:nth-child(even) {
    background-color: #ffffff;
  }
  </style>
  <script src="https://ajax.googleapis.com/ajax/libs/angularjs/1.4.8/angular.min.js"></script>
Creating & Referencing the Angular App and Controller Objects
Next, add the ng-app and ng-controller directives in the HTML body tag, since the body is the only place we will be using Angular. Then, at the end of the HTML body, we will create the script tag in which we will create and define the Angular app and controller.
<body ng-app="DataApp" ng-controller="SimpleController">
...
<script>
var app = angular.module('DataApp', []);
app.controller('SimpleController', function($scope, $http) {
    //we will add code here
    });
</script>
</body>
Defining Our Controller
Our controller for this example will consist of three functions: init to initialize our Angular objects and set up the SPA, getTableColumns to retrieve the columns for a selected table, and getTableData to retrieve data for the selected fields from the selected column. The first action we take when creating the controller is to call the init function. All other functions will be called as needed and it is in these function calls that we make the required HTTP GET calls to the API Server to retrieve XML data.
init();

/*
 * Initialize the data object, which will be used with Angular to
 * build the different parts of our SPA and to retrieve data from
 * the API Server.
 */
function init() {
  $scope.data = {
  availableTables: [],
                 availableColumns: [],
                 selectedTable: {},
                 tableData: []
  };

  /*
   * Call to the API Server to get the list of Tables, select the
   * first table by default, and retrieve the available columns.
   *
   * The call to the API Server returns standard OData, so the
   * data we need is in the value object in the JSON returned.
   */
  $http.get("http://server:port/api.rsc",{headers: {"Authorization": "Basic "  + btoa("MyUser:MyAuthtoken")}})
    .then(function (response) {
        $scope.data.availableTables = response.data.value;
        $scope.data.selectedTable = $scope.data.availableTables[0];
        $scope.getTableColumns();
        });
}

/*
 * Call to the API Server to get the list of columns for the
 * selected table.
 *
 * The data returned here is not standard OData, so we drill
 * down into the response to extract exactly the data we need
 * (an array of column names).
 *
 * With the column names retrieved, we will transform the array
 * of column names into an array of objects with a name and Id
 * field, to be used when we build an HTML select.
 */
$scope.getTableColumns = function () {
  $scope.data.tableData = [];
  $scope.data.selectedColumns = [];
  table = $scope.data.selectedTable.url;
  if (table != "") {
    $http.get("http://server:port/api.rsc/" + table + "/$metadata?@json", {headers: {"Authorization": "Basic "  + btoa("MyUser:MyAuthtoken")}})
      .then(function (response) {
          $scope.data.availableColumns = response.data.items[0]["odata:cname"];
          for (i = 0; i < $scope.data.availableColumns.length; i++) {
            $scope.data.availableColumns[i] = { id: i, name: $scope.data.availableColumns[i] };
          }
          });
  }
}

/*
 * Call to the API Server to get the requested data. We get the data
 * based on the table selected in the associated HTML select.
 * Then we create a comma-separated string of the selected columns.
 *
 * With the table and columns known, we can make the appropriate call
 * to the API Server. Because the driver returns standard OData, the
 * table data is found in the value field of the response.
 */
$scope.getTableData = function () {
  table = $scope.data.selectedTable.url;
  columnsArray = $scope.data.selectedColumns;
  columnString = "";
  for (i = 0; i < columnsArray.length; i++) {
    if (columnString != "") {
      columnString += ",";
    }
    columnString += columnsArray[i].name;
  }

  if (table != "") {
    $http.get("http://server:port/api.rsc/" + table + "?$select=" + columnString, {headers: {"Authorization": "Basic "  + btoa("MyUser:MyAuthtoken")}})
      .then(function (response) { $scope.data.tableData = response.data.value; });
  } else {
    $scope.data.tableData = [];
  }
}
Building the Web Page
With our Controller defined, we are now ready to build our Web page, using Angular. There are four major parts in our simple page: a select box to choose a table, a select (multiple) box to choose columns, a button to retrieve data, and a table to display the data. We will walk through these four parts one at a time, explaining the use of Angular as we go.
Select a Table
In the first select element, we utilize the ng-options directive to iterate through the available tables (retrieved from the init function mentioned earlier) and populate our select element. With the ng-model directive, we assign the value of the selected option to the data.selectedTable field. If the selected table ever changes, the getTableColumns function is called to repopulate the available columns.
  <label>Select a Table</label>
  <br />
  <select name="tableDropDown" id="tableDropDown"
          ng-options="table.name for table in data.availableTables track by table.url"
          ng-model="data.selectedTable"
          ng-change="getTableColumns()">
  </select>
Select Columns
In the second select element, we again utilize the ng-options directive, but this time to iterate through the available columns (as retrieved by the getTableColumns function). For the sake of usability, the columns are sorted by name before populating the select element. Since this select contains the multiple attribute, you can select more than one column. Each selected column is added to the data.selectedColumns array. You will notice that as you select columns, a table header for each column is created (see the data table section below).
  <label>Select Columns</label>
  <br />
  <select name="columnMultiple" id="columnMultiple"
          ng-options="column.name for column in data.availableColumns | orderBy:'name' track by column.id"
          ng-model="data.selectedColumns"
          multiple>
  </select>
Get Table Data
In this button, we simply make a call to the getTableData function whenever the button is clicked. You will notice that we use the ng-disabled directive to disable the button whenever the user has not selected any columns. We also dynamically update the text of the button with the name of the selected table.
  <button name="getTableData" id="btnGetTableData"
          ng-click="getTableData()"
          ng-disabled="data.selectedColumns.length == 0">
  Get {{data.selectedTable.name}} Data
  </button>
Display the Table Data
This section satisfies the end goal of our SPA, to display the data from the selected table. To do so, we utilize several ng-repeat directives: one to iterate through the selected columns and create table headers, one to iterate through the rows of data returned, and a last one to iterate through the selected columns and display the corresponding data for a given row of data.
By using Angular, we are able to dynamically determine which columns to display. It is worth noting that only those columns selected *before* the button was clicked will contain data. But it is a simple task to select all of the available columns, click the button to get the table data, and then go back and select/unselect different columns to change the data that is displayed. If you change the selected table, then all of the data will be cleared.
  <table>
    <tr>
      <th ng-repeat="column in data.selectedColumns | orderBy:'name'">{{column.name}}</th>
    </tr>
    <tr ng-repeat="row in data.tableData">
      <td ng-repeat="column in data.selectedColumns">{{ row[column.name] }}</td>
    </tr>
  </table>
Complete App
<!DOCTYPE html>

<html>
<style>
table, th, td {
border: 1px solid grey;
        border-collapse: collapse;
padding: 5px;
}
table tr:nth-child(odd) {
  background-color: #f1f1f1;
}
table tr:nth-child(even) {
  background-color: #ffffff;
}
</style>
<script src="https://ajax.googleapis.com/ajax/libs/angularjs/1.4.8/angular.min.js"></script>
<body ng-app="DataApp" ng-controller="SimpleController">
<label>Select a Table</label>
<br>
<select name="tableDropDown" id="tableDropDown"
ng-options="table.name for table in data.availableTables track by table.url"
ng-model="data.selectedTable"
ng-change="getTableColumns()">
</select>
<label>Select Columns</label>
<br>
<select name="columnMultiple" id="columnMultiple"
ng-options="column.name for column in data.availableColumns | orderBy:'name' track by column.id"
ng-model="data.selectedColumns"
multiple>
</select>
<button name="getTableData" id="btnGetTableData"
ng-click="getTableData()"
ng-disabled="data.selectedColumns.length == 0">
Get {{data.selectedTable.name}} Data
</button>
<br>
<br>

<table>
<tr>
<th ng-repeat="column in data.selectedColumns | orderBy:'name'">{{column.name}}</th>
</tr>
<tr ng-repeat="row in data.tableData">
<td ng-repeat="column in data.selectedColumns">{{ row[column.name] }}</td>
</tr>
</table>
<script>
var app = angular.module('DataApp', []);
app.controller('SimpleController', function($scope, $http) {
    init();

    /*
     * Initialize the data object, which will be used with Angular to
     * build the different parts of our SPA and to retrieve data from
     * the API Server.
     */
    function init() {
    $scope.data = {
    availableTables: [],
    availableColumns: [],
    selectedTable: {},
    tableData: []
};

/*
 * Call to the API Server to get the list of tables, select the
 * first table by default, and retrieve the available columns.
 *
 * The call to the API Server returns standard OData, so the
 * data we need is in the value object in the JSON returned.
 */
$http.get("http://server:port/api.rsc",{headers: {"Authorization": "Basic "  + btoa("MyUser:MyAuthtoken")}})
.then(function (response) {
    $scope.data.availableTables = response.data.value;
    $scope.data.selectedTable = $scope.data.availableTables[0];
    $scope.getTableColumns();
    });
}

/*
 * Call to the API Server to get the list of columns for the
 * selected table.
 *
 * The data returned here is not standard OData, so we drill
 * down into the response to extract exactly the data we need
 * (an array of column names).
 *
 * With the column names retrieved, we will transform the array
 * of column names into an array of objects with a name and Id
 * field, to be used when we build an HTML select.
 */
$scope.getTableColumns = function () {
  $scope.data.tableData = [];
  $scope.data.selectedColumns = [];
  table = $scope.data.selectedTable.url;
  if (table != "") {
    $http.get("http://server:port/api.rsc/" + table + "/$metadata?@json", {headers: {"Authorization": "Basic "  + btoa("MyUser:MyAuthtoken")}})
      .then(function (response) {
          $scope.data.availableColumns = response.data.items[0]["odata:cname"];
          for (i = 0; i < $scope.data.availableColumns.length; i++) {
          $scope.data.availableColumns[i] = { id: i, name: $scope.data.availableColumns[i] };
          }
          });
  }
}

/*
 * Call to the API Server to get the requested data. We get the data
 * based on the table selected in the associated HTML select.
 * Then we create a comma-separated string of the selected columns.
 *
 * With the table and columns known, we can make the appropriate call
 * to the API Server. Because the driver returns standard OData, the
 * table data is found in the value field of the response.
 */
$scope.getTableData = function () {
  table = $scope.data.selectedTable.url;
  columnsArray = $scope.data.selectedColumns;
  columnString = "";
  for (i = 0; i < columnsArray.length; i++) {
    if (columnString != "") {
      columnString += ",";
    }
    columnString += columnsArray[i].name;
  }

  if (table != "") {
    $http.get("http://server:port/api.rsc/" + table + "?$select=" + columnString, {headers: {"Authorization": "Basic "  + btoa("MyUser:MyAuthtoken")}})
      .then(function (response) { $scope.data.tableData = response.data.value; });
  } else {
    $scope.data.tableData = [];
  }
}
});
</script>
</body>
</html>
Free Trial & More Information
If you are interested in connecting to your XML data (or data from any of our other supported data sources) from Web applications built with Angular, download a free, 30-day trial of our API Server today! For more general information on our API Server and to see what other data sources we support, refer to our API Server page.


