国産BI ツールのActionista! からAzure Analysis Services に直接連携してビジュアライズ
Actionista! からリアルタイムAzure Analysis Services データに直接連携して分析を実施。
桑島義行
テクニカルディレクター
最終更新日:2022-07-20
CData

こんにちは!テクニカルディレクターの桑島です。
CData Driver for AAS を使って、国産BIツールのActionista!(https://www.justsystems.com/jp/products/actionista/) からAzure Analysis Services データをノーコードで連携して利用できます。この記事では、間にETL/EAI ツールをはさむ方法ではなく、CData JDBC Driver for AAS をActionista! 側に組み込むだけで連携を実現できます。
Actionista! からAzure Analysis Services データへの連携を設定
CData JDBC Driver for AAS をActionista! に配置
- CData JDBC Driver for AAS をActionista! と同じマシンにインストールします。
-
次にインストールした.jar ファイルを以下のパスに格納します:
ドライバー.jar ファイルのディレクトリ C:\Program Files\CData\CData JDBC Driver for AAS 2019J\lib\cdata.jdbc.aas.jar
Actionista! 側のコピー先ディレクトリ C:\JUST\JustBI\jdbc
- 次に、C:\JUST\JustBI\conf にあるdatamanager.properties プロパティファイルに今回使用するAzure Analysis Services のドライバークラスなどを以下のように指定します:
# AAS
loader.jdbc.displayName.AAS = AAS
loader.jdbc.initJdbcUrl.AAS = jdbc:aas:
loader.jdbc.url.AAS = jdbc:aas:
loader.jdbc.driver.AAS = cdata.jdbc.aas.AASDriver
loader.jdbc.dbmsInfo.AAS = cdata.jdbc.aas.AASDriver
- これでActionista! へのドライバーの配置が完了しました。
Azure Analysis Services データをActionista! のキューブに取り込み
Actionista! ではデータの保持をキューブという単位で保存します。また、クエリでデータソースからデータを取得するのではなく、キューブに対してクエリを行います。このステップでは、Azure Analysis Services データをキューブに取り込み、分析で使えるようにします。
- Actionista! にログインします。
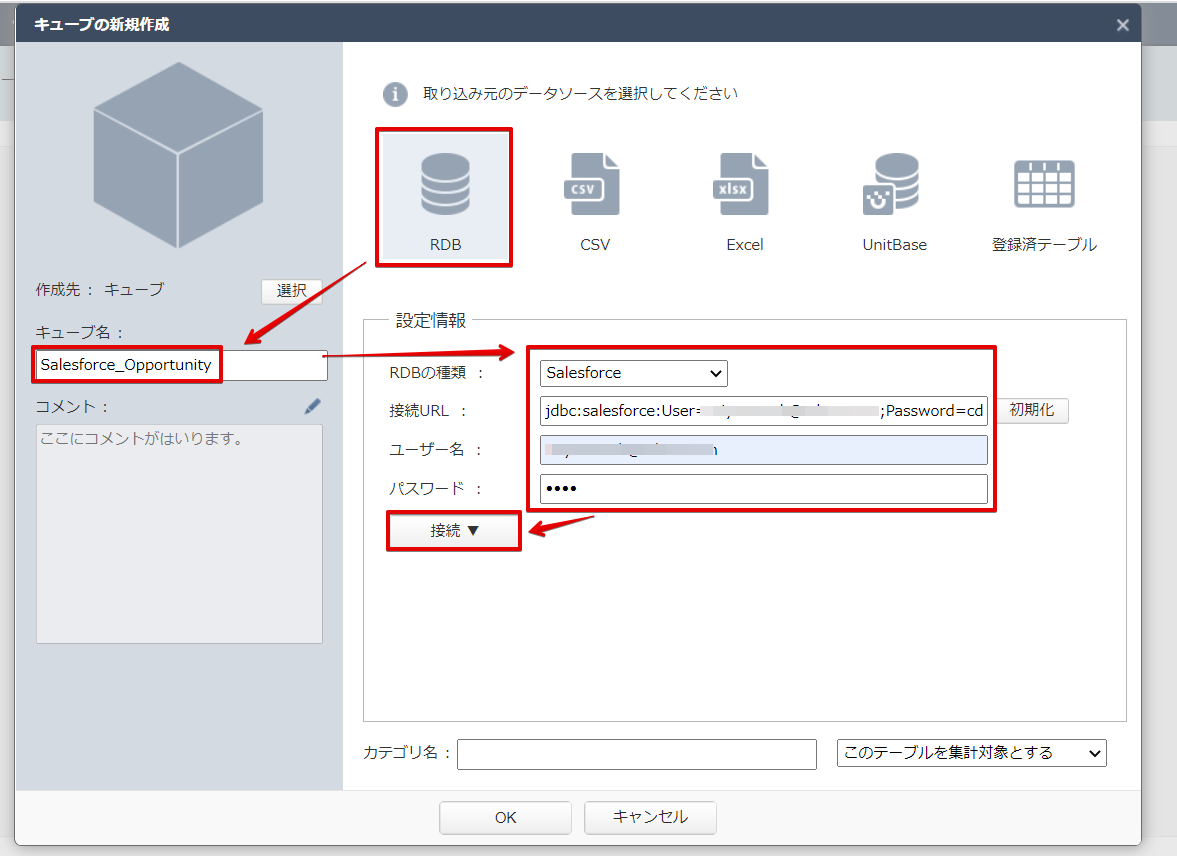
- 「DataManager」-> 「+キューブの新規作成」をクリックします。
- CData JDBC ドライバはRDB データソースとしてActionista! から利用できるので、「RDB」を選択します。
- 設定情報にAzure Analysis Services への接続に必要なプロパティを入れます:
- RDB の種類:には、上のステップでdisplayName で指定した名前をドロップダウンで選びます。
- 接続URL:Azure Analysis Services に接続するための認証情報をセミコロン区切りで入力します。
Azure Analysis Services(AAS)接続プロパティの取得・設定方法
接続するには、認証に加えて、Url プロパティを有効なAzure Analysis Services
サーバー(例えばasazure://southcentralus.asazure.windows.net/server)に設定します。必要に応じて、Database
プロパティを設定して、サーバー上のどのAzure データベースに接続するかを指定できます。
Azure Analysis Services はOAuth 認証標準を使用します。CData 製品では組込みOAuth が利用できるので、接続プロパティを設定することなく接続を試行するだけで、ブラウザ経由でAAS
に認証できます。詳しい設定方法については、ヘルプドキュメントの「Azure Analysis
Services への認証」セクションを参照してください。
jdbc:aas:URL=asazure://REGION.asazure.windows.net/server;InitiateOAuth=REFRESH
- ユーザー名:接続するアカウントのユーザー名(URL に含めることも可)
- パスワード:接続するアカウントのパスワード(URL に含めることも可)
![Actionista! のキューブにAzure Analysis Services を設定(Salesforce is shown.)]()
- 「接続」ボタンを押してAzure Analysis Services に接続します。
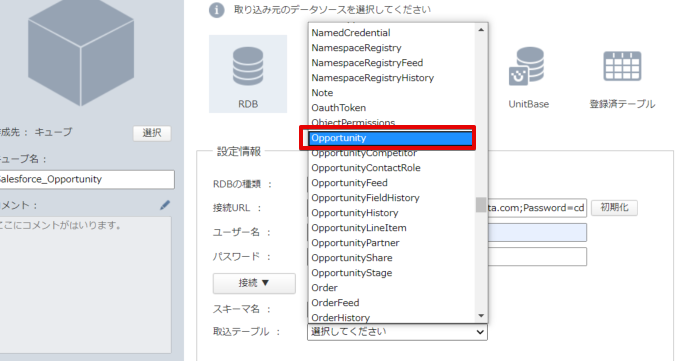
- Azure Analysis Services への接続が完了すると、JDBC Driver がAzure Analysis Services のスキーマを取得して、テーブル・ビューをプルダウンメニューに表示します。分析キューブで使用するテーブル・ビューを選択して、OK ボタンを押します。
![Azure Analysis Services のテーブルを選択(Salesforce is shown.)]()
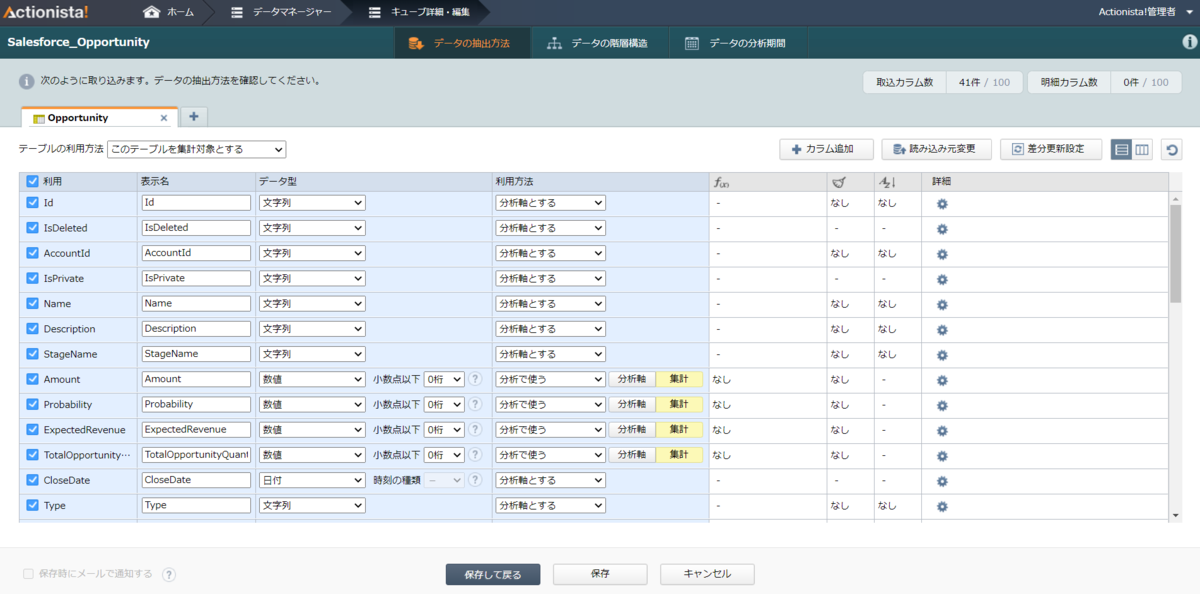
- 選択したオブジェクトのカラムが表示されます。JDBC Driver は、Azure Analysis Services データのスキーマを検出してActionista! に渡すので、カラム名だけでなく、データ型の推定がすでになされています。ここで細かい型修正やデータの抽出条件を必要があれば設定して保存します。
![Azure Analysis Services オブジェクトを選択してスキーマ修正(Salesforce is shown.)]()
- データマネージャー画面でAzure Analysis Services データを選択して、「+取り込み」ボタンを押すとデータがキューブに保存されます。これでキューブへのデータ登録が完了です。
Actionista! 上にAzure Analysis Services データのダッシュボードを作成する
それでは簡単なダッシュボードを作成していきます。
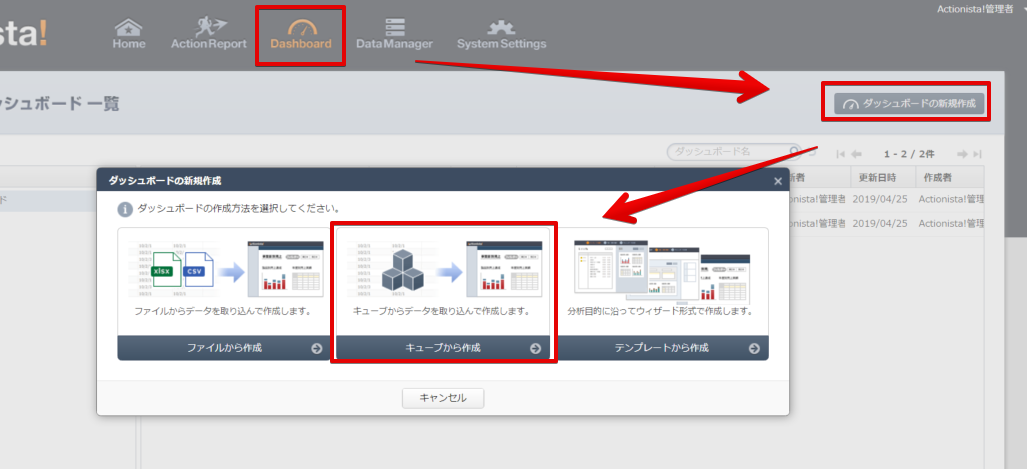
- 「Dashboard」-> 「ダッシュボードの新規作成」-> 「キューブから作成」をクリックします。
![Azure Analysis Services キューブを選択(Salesforce is shown.)]()
- 先ほど作成したAzure Analysis Services データのキューブを選択して、ダッシュボード名を任意で入力して、OK を押します。
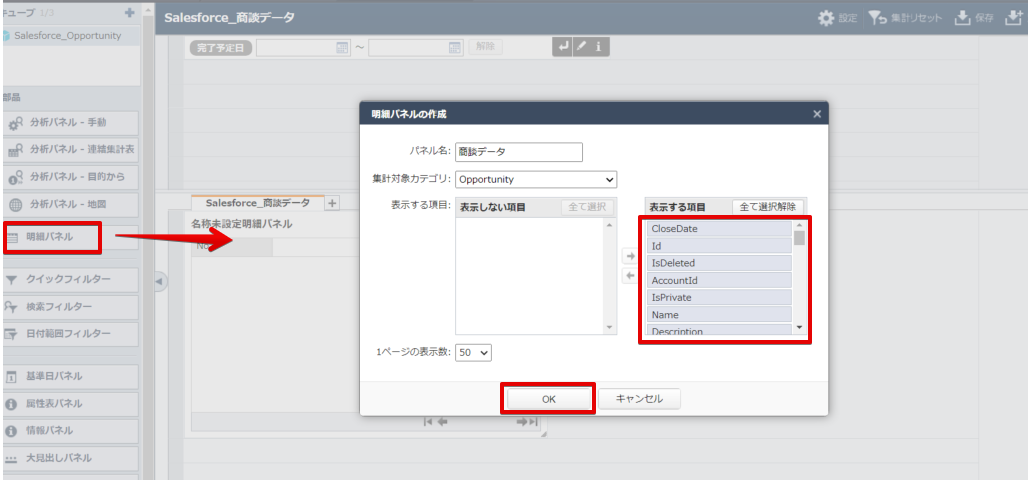
- 左側にある明細パネルを右側のエリアにドラッグ&ドロップしますと、明細パネルの作成ウィンドウが表示されるので、Azure Analysis Services キューブから表示させる項目を選択します。
![Azure Analysis Services キューブから分析で使用するカラムを選択(Salesforce is shown.)]()
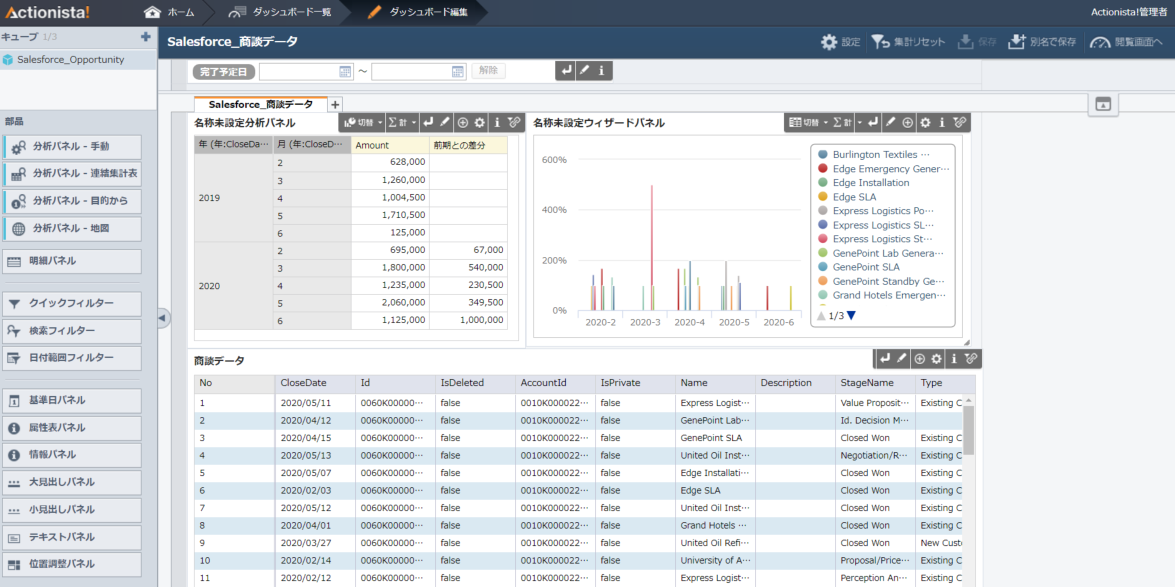
- そのままキューブのデータが表示することができます。ドリルダウンなどを行いたい場合は、サイドメニューにある分析パネルで作成してください。
![Azure Analysis Services データをActionista! でビジュアライズ(Salesforce is shown.)]()
CData JDBC Driver for AAS をActionista! で使うことで、ノーコードでAzure Analysis Services データをビジュアライズできました。ぜひ、30日の無償評価版をお試しください。
関連コンテンツ


