製品をチェック

無償トライアル:

無償トライアルへ

製品の情報と無償トライアルへ:

Azure Data Lake Storage JDBC Driver

Azure Data Lake Storage データに連携するJava アプリケーションを素早く、簡単に開発できる便利なドライバー。

データ連携でお困りですか?

お問い合わせ

Java のAzure Data Lake Storage データエンティティを使用したObject-Relational Mapping (ORM)


Object-relational mapping (ORM) 技術により、リレーショナルデータソースの操作が容易になり、論理的なビジネスモデルと物理的なストレージモデルを橋渡しすることができます。このチュートリアルに従って、Azure Data Lake Storage への接続をJava ベースのORM フレームワークであるHibernate に連携します。


azuredatalake ロゴ画像
jdbc ロゴ画像

JDBC

Hibernate ロゴ画像

Hibernate を使用することで、オブジェクト指向のドメインモデルを従来のリレーショナルデータベースにマッピングすることができます。以下のチュートリアルでは、CData JDBC Driver for ADLS を使用し、Hibernate でAzure Data Lake Storage リポジトリのORM を生成する方法を説明します。

この記事を通してEclipse がIDE として選択されていますが、CData JDBC Driver for ADLS はJava Runtime Environment をサポートするすべての 製品で機能します。Knowledge Base には、IntelliJ IDEA やNetBeans からAzure Data Lake Storage に接続するためのチュートリアルがあります。

Hibernate をインストール

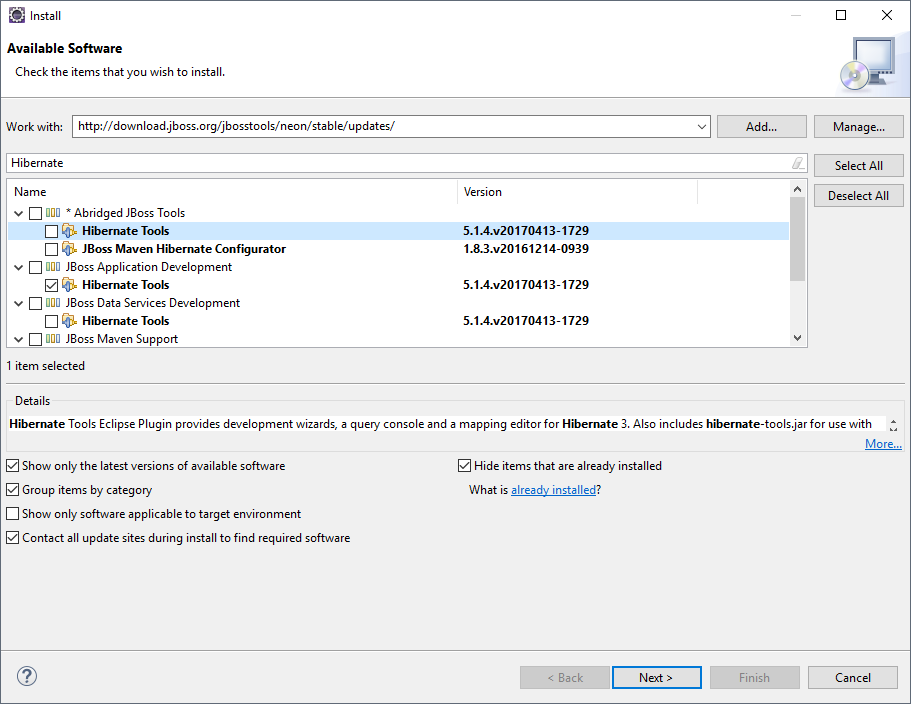
以下のステップに従って、Eclipse にHibernate プラグインをインストールします。

  1. Eclipse で、[Help]->[Install New Software]と進みます。
  2. Work With ボックスに[http://download.jboss.org/jbosstools/neon/stable/updates/] と入力します。
  3. フィルタボックスに、[Hibernate]と入力します。
  4. [Hibernate Tools]を選択します。
Installing the Hibernate Framework in Eclipse.

新しいプロジェクトを開始

以下のステップに従って、新しいプロジェクトにドライバーJARs を追加します。

  1. 新しいプロジェクトを作成します。プロジェクトタイプとして[Java Project]を選択し、[Next]をクリックします。プロジェクト名を入力し、[Finish]をクリックします。
  2. [project]を右クリックし、[Properties]を選択します。[Java Build Path]をクリックし、[Libraries]タブを開きます。
  3. [Add External JARs]をクリックし、インストールディレクトリのlib サブフォルダにあるcdata.jdbc.adls.jar ライブラリを追加します。

Hibernate 構成ファイルを追加

以下のステップに従って、Azure Data Lake Storage に接続プロパティを構成します。

  1. [new project]で右クリックし、[New]->[Hibernate]->[Hibernate Configuration File (cfg.xml)]と進みます。
  2. 親フォルダとして[src]を選択し、[Next]をクリックします。
  3. 以下の値をインプットします。

    • Hibernate version:5.2
    • Database dialect:Derby
    • Driver class: cdata.jdbc.adls.ADLSDriver
    • Connection URL:jdbc:adls: で始まり、セミコロンで区切られた接続プロパティのリストが続くJDBC URL

      Authenticating to a Gen 1 DataLakeStore Account

      Gen 1 uses OAuth 2.0 in Azure AD for authentication.

      For this, an Active Directory web application is required. You can create one as follows:

      1. Sign in to your Azure Account through the .
      2. Select "Azure Active Directory".
      3. Select "App registrations".
      4. Select "New application registration".
      5. Provide a name and URL for the application. Select Web app for the type of application you want to create.
      6. Select "Required permissions" and change the required permissions for this app. At a minimum, "Azure Data Lake" and "Windows Azure Service Management API" are required.
      7. Select "Key" and generate a new key. Add a description, a duration, and take note of the generated key. You won't be able to see it again.

      To authenticate against a Gen 1 DataLakeStore account, the following properties are required:

      • Schema: Set this to ADLSGen1.
      • Account: Set this to the name of the account.
      • OAuthClientId: Set this to the application Id of the app you created.
      • OAuthClientSecret: Set this to the key generated for the app you created.
      • TenantId: Set this to the tenant Id. See the property for more information on how to acquire this.
      • Directory: Set this to the path which will be used to store the replicated file. If not specified, the root directory will be used.

      Authenticating to a Gen 2 DataLakeStore Account

      To authenticate against a Gen 2 DataLakeStore account, the following properties are required:

      • Schema: Set this to ADLSGen2.
      • Account: Set this to the name of the account.
      • FileSystem: Set this to the file system which will be used for this account.
      • AccessKey: Set this to the access key which will be used to authenticate the calls to the API. See the property for more information on how to acquire this.
      • Directory: Set this to the path which will be used to store the replicated file. If not specified, the root directory will be used.

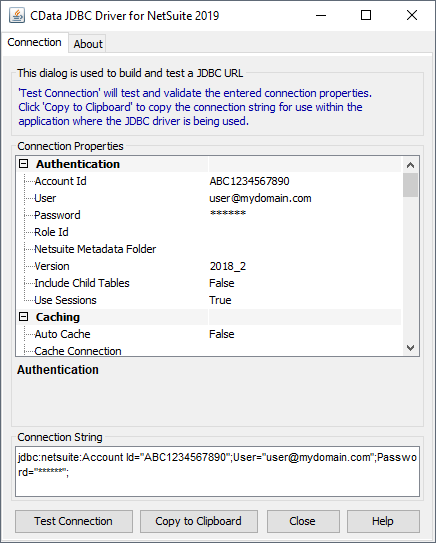
      ビルトイン接続文字列デザイナ

      JDBC URL の構成については、Azure Data Lake Storage JDBC Driver に組み込まれている接続文字列デザイナを使用してください。JAR ファイルのダブルクリック、またはコマンドラインからJAR ファイルを実行します。

      java -jar cdata.jdbc.adls.jar

      接続プロパティを入力し、接続文字列をクリップボードにコピーします。

      Using the built-in connection string designer to generate a JDBC URL (Salesforce is shown.)

      以下は一般的なJDBC URL です。

      jdbc:adls:Schema=ADLSGen2;Account=myAccount;FileSystem=myFileSystem;AccessKey=myAccessKey;InitiateOAuth=GETANDREFRESH

Hibernate のAzure Data Lake Storage データへの接続

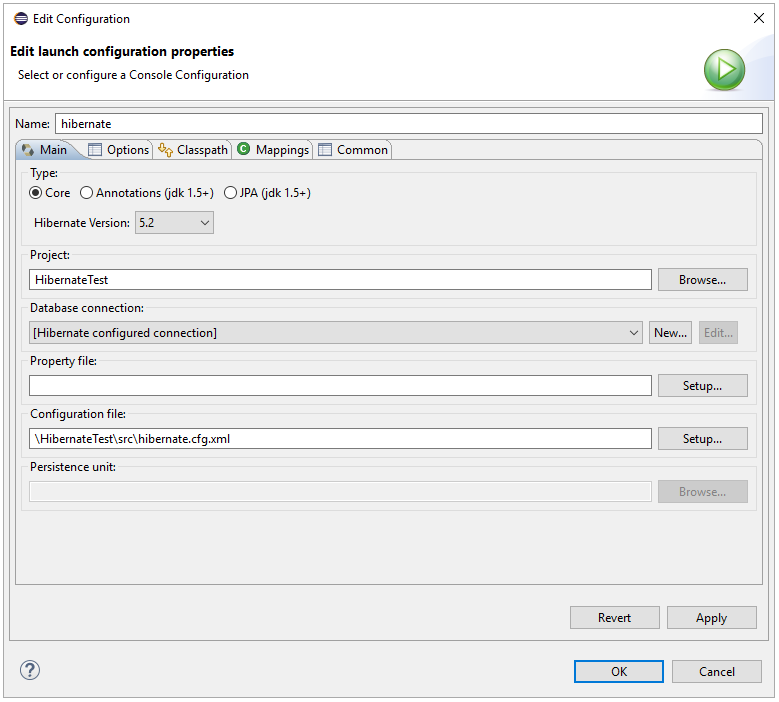
以下のステップに従って、前の手順で作成した構成を選択します。

  1. [Window]->[Open Perspective]->[Hibernate]と進み、Hibernate Configurations パースペクティブに切り替えます。
  2. [Hibernate Configurations]パネルで右クリックし、[Add Configuration]を選択します。
  3. Hibernate version を5.2に設定します。
  4. [Browse]ボタンをクリックし、[project]を選択します。
  5. [Configuration file]フィールドで、[Setup]->[Use Existing]とクリックし、(このデモのsrc フォルダー内にある)hibernate.cfg.xml ファイルを選択します。
  6. [Classpath tab]で、[User Entries]の下に何もなかった場合、[Add External JARS]をクリックしてドライバーjar をもう一度追加します。構成が完了したら、[OK]をクリックします。
  7. 新しく作成されたHibernate 構成ファイルのDatabase node を展開します。
Hibernate configuration properties.(NetSuite is shown.)

Azure Data Lake Storage データをリバースエンジニアリング

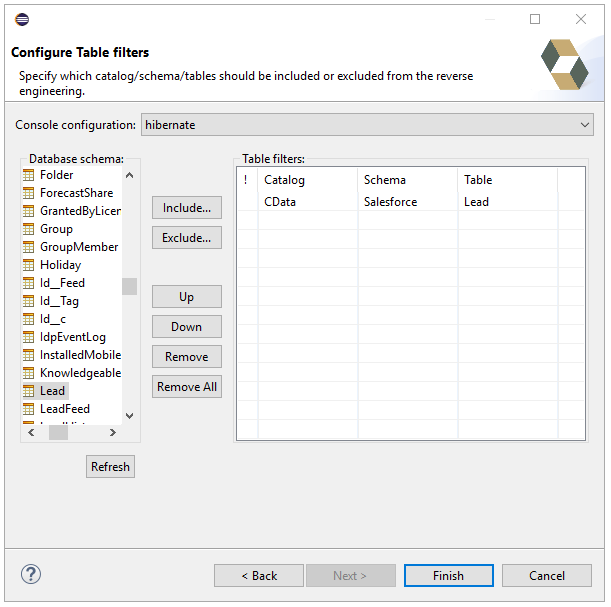
以下のステップに従って、reveng.xml 構成ファイルを生成します。アクセスするテーブルをオブジェクトとして指定します。

  1. Package Explorer に戻ります。
  2. プロジェクトを右クリックし、[New]->[Hibernate]->[Hibernate Reverse Engineering File (reveng.xml)]と進みます。[Next]をクリックします。
  3. 親フォルダとして[src]を選択し、[Next]をクリックします。
  4. [Console configuration drop-down]メニューで、上で作成した[Hibernate configuration]ファイルを選択し、[Refresh]をクリックします。
  5. ノードを展開し、リバースエンジニアリングするテーブルを選択します。完了したら、[Finish]をクリックします。
Tables to be reverse engineered.(NetSuite is shown.)

実行するためのHibernate を構成

以下のステップに従って、plain old Java objects (POJO) をAzure Data Lake Storage テーブルに生成します。

  1. メニューバーから、[Run]->[Hibernate Code Generation]->[Hibernate Code Generation Configurations]と進みます。
  2. [Console configuration drop-down]メニューで、前のセクションで作成した[Hibernate configuration]ファイルを選択します。Output ディレクトリで[Browse]をクリックし、src を選択します。
  3. [JDBC Connection]チェックボックスから[Reverse Engineer]を有効にします。[Setup]ボタンをクリックし、[Use Existing]をクリックして(このデモのsrcフォルダ内にある) hibernate.reveng.xml ファイルの場所を選択します。
  4. [Exporters]タブで[Domain code (.java)]と[Hibernate XML Mappings (hbm.xml)]をチェックします。
  5. [Run]をクリックします。

POJO は、前のステップのリバースエンジニアリング設定に基づいて作成されます。

マッピングタグを挿入

生成したマッピングごとにhibernate.cfg.xml にマッピングタグを作成し、Hibernate がマッピングリソースを指定するようにする必要があります。hibernate.cfg.xml を開き、次のようにマッピングタグを挿入します。

cdata.adls.ADLSDriver jdbc:adls:Schema=ADLSGen2;Account=myAccount;FileSystem=myFileSystem;AccessKey=myAccessKey;InitiateOAuth=GETANDREFRESH org.hibernate.dialect.SQLServerDialect

SQLを実行

前の手順で作成したエンティティを使用して、Azure Data Lake Storage のsearchを行うことができます。 import java.util.*; import org.hibernate.Session; import org.hibernate.cfg.Configuration; import org.hibernate.query.Query; public class App { public static void main(final String[] args) { Session session = new Configuration().configure().buildSessionFactory().openSession(); String SELECT = "FROM Resources R WHERE Type = :Type"; Query q = session.createQuery(SELECT, Resources.class); q.setParameter("Type","FILE"); List<Resources> resultList = (List<Resources>) q.list(); for(Resources s: resultList){ System.out.println(s.getFullPath()); System.out.println(s.getPermission()); } } }