製品をチェック
IBM Cloud Object Storage Driver の30日間無償トライアルをダウンロード
30日間の無償トライアルへ
JBoss のコネクションプールからIBM Cloud Object Storage データに連携
IBM Cloud Object Storage をJava サーブレットに統合します。JBoss のManagement Console を使用して、CData JDBC Driver for IBMCloudObjectStorage をインストールします。
加藤龍彦
デジタルマーケティング
最終更新日:2022-09-12
CData

こんにちは!ウェブ担当の加藤です。マーケ関連のデータ分析や整備もやっています。
CData JDBC ドライバーは、コネクションプールの標準手順に従ってJBoss で構成できます。この記事では、JBoss アプリケーションのコネクションプールからSalesforce データにアクセスする方法について詳しく説明します。また、JBoss Management Interface を使用してCData JDBC Driver for IBMCloudObjectStorage を設定する方法についても詳しく説明します。最後には、コネクションプールからIBM Cloud Object Storage にアクセスできるようになります。
Management Console からJDBC Data Source for IBMCloudObjectStorage を作成
以下のステップに従ってドライバーJAR を追加し、必要な接続プロパティを定義します。
- [Runtime]メニューで、展開先がマネージドドメインかスタンドアロンサーバーかに応じて[Domain]または[Server]メニューを選択し、[Manage deployments]をクリックして[Deployments]ページを開きます。
- [Add]をクリックします。表示されるウィザードで、インストールディレクトリのlib サブフォルダにあるドライバーのJAR ファイルとライセンスを追加します。ウィザードをデフォルトで終了し、ドライバーを選択して[Enable]をクリックします。
![The deployed JAR.(Salesforce is shown.)]()
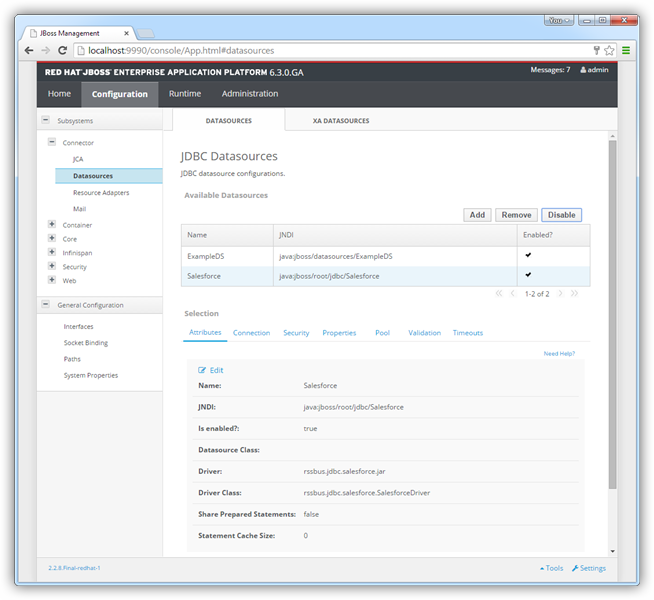
- [Configuration]メニューで[Subsystems]->[Connector]->[Datasources]と進みます。これにより、JDBC データソースページが開きます。
- [Add]をクリックし、表示されるウィザードでドライバーとJNDI の名前を入力します。例:
java:jboss/root/jdbc/IBMCloudObjectStorage
- 上で追加したドライバーを選択します。
- JDBC URL、ユーザー名、パスワードを入力します。JDBC URL の構文は、jdbc:ibmcloudobjectstorage: の後にセミコロンで区切られた接続プロパティのリストが続きます。
Cloud Object Storage 接続プロパティの取得・設定方法
Cloud Object Storage に接続する前に、Cloud Object Storage インスタンスを登録してCloud Object Storage API キーとCRN を取得していきます。
Cloud Object Storage の新規インスタンスの登録
IBM Cloud アカウントにCloud Object Storage がまだない場合は、以下の手順に従ってアカウントにSQL Query のインスタンスをインストールできます。
- IBM Cloud アカウントにログインします。
- Cloud Object Storage
ページに移動して、インスタンス名を指定して「作成」をクリックします。Cloud Object Storage の新規インスタンスにリダイレクトされます。
API キー
API キーは以下の手順で取得できます。
- まずは、IBM Cloud アカウントにログインします。
- API キーページに移動します。
- 中央右隅のIBM Cloud APIキーの作成 をクリックして、新しいAPI キーを作成します。
- ポップアップウィンドウが表示されたら、API キーの名前を指定して作成をクリックします。ダッシュボードからはアクセスできなくなるため、API Key を控えておきましょう。
Cloud Object Storage CRN
デフォルトでは、CData 製品はCloud Object Storage CRN を自動で取得します。ただし、複数のアカウントがある場合は、CloudObjectStorageCRN
を明示的に指定する必要があります。この値は、次の2つの方法で取得できます。
- Services ビューをクエリする。これにより、IBM Cloud Object Storage インスタンスとそれぞれのCRN がリストされます。
- IBM Cloud で直接CRN を見つける。これを行うには、IBM Cloud
のダッシュボードに移動します。リソースリストで、ストレージからCloud Object Storage リソースを選択してCRN
を取得します。
IBM Cloud Object Storage への接続
これで準備は完了です。以下の接続プロパティを設定してください。
- InitiateOAuth:GETANDREFRESH に設定。InitiateOAuth を使うと、OAuth
認証を繰り返す必要がなく、さらに自動でアクセストークンを設定できます。
- ApiKey:セットアップ中に控えたAPI キーを指定。
- CloudObjectStorageCRN(オプション):控えておいたCloud Object Storage のCRN に設定。Cloud Object
Storage アカウントが複数ある場合のみ設定する必要があります。
プロパティを設定したら、これで接続設定は完了です。
以下は一般的な接続文字列です。
jdbc:ibmcloudobjectstorage:ApiKey=myApiKey;CloudObjectStorageCRN=MyInstanceCRN;Region=myRegion;OAuthClientId=MyOAuthClientId;OAuthClientSecret=myOAuthClientSecret;
接続を確認したらウィザードを終了します。IBM Cloud Object Storage のデータソースを選択し、[Enable]をクリックします。
![The enabled data source.(Salesforce is shown.)]()
その他のJBoss 統合
上記のステップは、単純なコネクションプールのシナリオでドライバーを構成する方法を示しています。より詳しい情報については、JBoss EAP ドキュメントの[Data Source Management]の章を参照してください。
関連コンテンツ