ノーコードでクラウド上のデータとの連携を実現。
詳細はこちら →Azure Data Lake Storage Driver の30日間無償トライアルをダウンロード
30日間の無償トライアルへ製品の詳細
Azure Data Lake Storage データに連携するJava アプリケーションを素早く、簡単に開発できる便利なドライバー。
CData


こんにちは!ウェブ担当の加藤です。マーケ関連のデータ分析や整備もやっています。
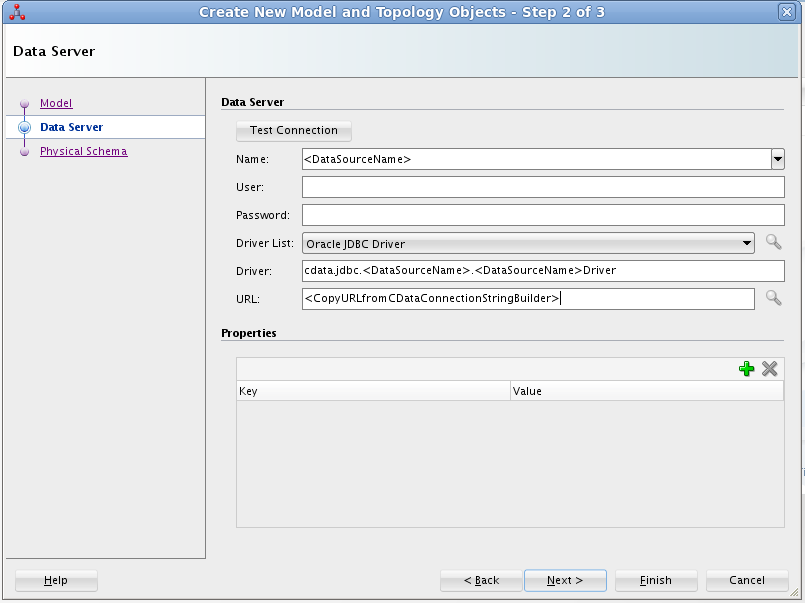
Oracle Data Integrator(ODI)はOracle エコシステムのハイパフォーマンスなデータ統合プラットフォームです。CData JDBC Driver for ADLS を使えば、OCI をはじめとするETL ツールからAzure Data Lake Storage データにJDBC 経由で簡単に接続を実現できます。リアルタイムAzure Data Lake Storage データをデータウェアハウス、BI・帳票ツール、CRM、基幹システムなどに統合すれば、データ活用もぐっと楽に。
CData のコネクタを使えば、Azure Data Lake Storage API にリアルタイムで直接接続して、ODI 上で通常のデータベースと同じようにAzure Data Lake Storage データを操作できます。Azure Data Lake Storage エンティティのデータモデルを構築、マッピングを作成し、データの読み込み方法を選択するだけの簡単なステップでAzure Data Lake Storage データのETL が実現できます。
ドライバーをインストールするには、インストールフォルダにあるドライバーのJAR ファイルと.lic ファイルをODI の適切なディレクトリにコピーします。
ODI を再起動してインストールを完了します。
ODI の機能を使ってモデルをリバースエンジニアリングすることで、ドライバー側で取得したAzure Data Lake Storage データのリレーショナルビューに関するメタデータが取得できます。リバースエンジニアリング後、リアルタイムAzure Data Lake Storage データにクエリを実行してAzure Data Lake Storage テーブルのマッピングを作成できます。
Gen 1 DataLakeStorage アカウントに接続するには、はじめに以下のプロパティを設定します。
Gen 1 は、認証方法としてAzure Active Directory OAuth(AzureAD)およびマネージドサービスID(AzureMSI)をサポートしています。認証方法は、ヘルプドキュメントの「Azure DataLakeStorage Gen 1 への認証」セクションを参照してください。
Gen 2 DataLakeStorage アカウントに接続するには、はじめに以下のプロパティを設定します。
Gen 2は、認証方法としてアクセスキー、共有アクセス署名(SAS)、Azure Active Directory OAuth(AzureAD)、マネージドサービスID(AzureMSI)など多様な方法をサポートしています。AzureAD、AzureMSI での認証方法は、ヘルプドキュメントの「Azure DataLakeStorage Gen 2 への認証」セクションを参照してください。
アクセスキーを使用して接続するには、AccessKey プロパティを取得したアクセスキーの値に、AuthScheme を「AccessKey」に設定します。
Azure ポータルからADLS Gen2 ストレージアカウントのアクセスキーを取得できます。
共有アクセス署名を使用して接続するには、SharedAccessSignature プロパティを接続先リソースの有効な署名に設定して、AuthScheme を「SAS」に設定します。 共有アクセス署名は、Azure Storage Explorer などのツールで生成できます。
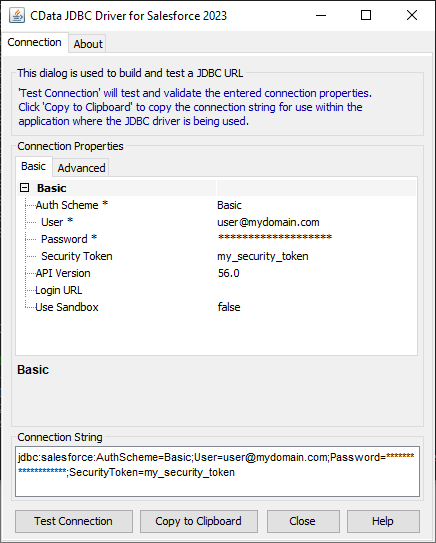
JDBC URL の作成の補助として、Azure Data Lake Storage JDBC Driver に組み込まれている接続文字列デザイナーが使用できます。JAR ファイルをダブルクリックするか、コマンドラインからjar ファイルを実行します。
java -jar cdata.jdbc.adls.jar
接続プロパティを入力し、接続文字列をクリップボードにコピーします。
一般的な接続文字列は次のとおりです。
jdbc:adls:Schema=ADLSGen2;Account=myAccount;FileSystem=myFileSystem;AccessKey=myAccessKey;
リバースエンジニアリング後、ODI でAzure Data Lake Storage データを操作できるようになります。
Azure Data Lake Storage データを表示するには、Designer ナビゲーターでモデルアコーディオンを展開し、テーブルを右クリックして「View data」をクリックします。

次の手順に従って、Azure Data Lake Storage からETL を作成します。Resources エンティティをODI Getting Started VM に含まれているサンプルデータウェアハウスにロードします。
SQL Developer を開き、Oracle データベースに接続します。Connections ぺインでデータベースのノードを右クリックし、「New SQL Worksheet」をクリックします。
もしくは、SQLPlus を使用することもできます。コマンドプロンプトから、以下のように入力します。
sqlplus / as sysdba
CREATE TABLE ODI_DEMO.TRG_RESOURCES (PERMISSION NUMBER(20,0),FullPath VARCHAR2(255));
これで、マッピングを実行してAzure Data Lake Storage データをOracle にロードできます。