CData JDBC Driver for ADP を使って、各種ツールからADP データにアクセスすることが可能になります。本記事では、ADP データにRazorSQL のウィザードから連携利用する方法を紹介します。
ADP JDBC Data Source の設定
- RazorSQL アプリケーションを開いて、Connections メニューから、Add Connection Profile -> Other -> JDBC にナビゲートします。
- Connection Wizard で、以下を設定します:
- Driver Location:JDBC Driver のインストールディレクトリのlib サブフォルダに設定します。
- Driver Class: ドライバークラスを cdata.jdbc.adp.ADPDriver に設定します。
- Username:ユーザー名。(ユーザー名をブランクにして、JDBC URL 内で設定することも可能です。)
- Password:パスワード。(ユーザー名をブランクにして、JDBC URL 内で設定することも可能です。)
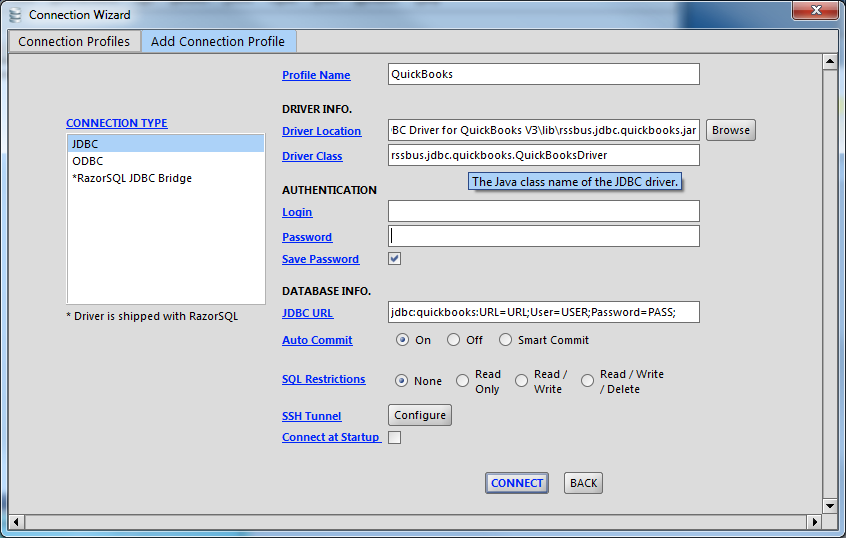
JDBC URL:接続パラメータを入力します:jdbc:adp: から始まるJDBC URL を入力します。接続プロパティをカンマ区切りで書きます。
Connect to ADP by specifying the following properties:
- SSLClientCert: Set this to the certificate provided during registration.
- SSLClientCertPassword: Set this to the password of the certificate.
- UseUAT: The connector makes requests to the production environment by default. If using a developer account, set UseUAT = true.
- RowScanDepth: The maximum number of rows to scan for the custom fields columns available in the table. The default value will be set to 100. Setting a high value may decrease performance.
The connector uses OAuth to authenticate with ADP. OAuth requires the authenticating user to interact with ADP using the browser. For more information, refer to the OAuth section in the Help documentation.
一般的なURL ::
jdbc:adp:OAuthClientId=YourClientId;OAuthClientSecret=YourClientSecret;SSLClientCert='c:\cert.pfx';SSLClientCertPassword='admin@123'
-
Connect to ADP by specifying the following properties:
- SSLClientCert: Set this to the certificate provided during registration.
- SSLClientCertPassword: Set this to the password of the certificate.
- UseUAT: The connector makes requests to the production environment by default. If using a developer account, set UseUAT = true.
- RowScanDepth: The maximum number of rows to scan for the custom fields columns available in the table. The default value will be set to 100. Setting a high value may decrease performance.
The connector uses OAuth to authenticate with ADP. OAuth requires the authenticating user to interact with ADP using the browser. For more information, refer to the OAuth section in the Help documentation.
ADP からテーブルを選択してクエリを実行
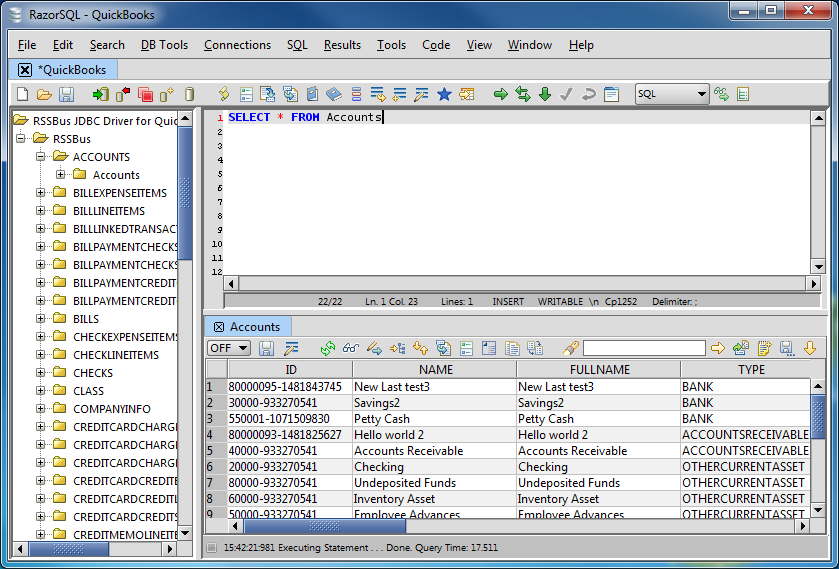
接続を確立後、Wizard が閉じ、接続はコネクションパネルで接続が利用可能になります。テーブルをクエリしてみます。