ノーコードでクラウド上のデータとの連携を実現。
詳細はこちら →Jira Service Management Driver の30日間無償トライアルをダウンロード
30日間の無償トライアルへ製品の詳細
Jira Service Desk データに連携するJava アプリケーションを素早く、簡単に開発できる便利なドライバー。
CData


こんにちは!ウェブ担当の加藤です。マーケ関連のデータ分析や整備もやっています。
JRuby はRuby プログラミング言語の高性能で安定した、完全にスレッド化されたJava 実装です。CData JDBC Driver for JiraServiceDesk を使用すると、JRuby からリアルタイムJira Service Management へのデータ連携を簡単に実装できます。ここでは、Jira Service Management に接続し、クエリを実行して結果を表示する簡単なJRuby アプリを作成する方法を説明します。
アプリを作成する前に、JDBC Driver のJAR ファイルのインストール場所をメモします。 (通常はC:\Program Files\CDatat\CData JDBC Driver for JiraServiceDesk\libにあります。)
JRuby は、JDBC をネイティブにサポートしているため、簡単にJira Service Management に接続してSQL クエリを実行できます。java.sql.DriverManager クラスのgetConnection 関数を使用してJDBC 接続を初期化します。
任意のJira Service Management Cloud またはJira Service Management Server インスタンスへの接続を確立できます。接続するにはURL プロパティを設定します。
デフォルトでは、CData 製品はシステムフィールドのみを表示します。Issues のカスタムフィールドにアクセスするには、IncludeCustomFields を設定します。
ローカルサーバーアカウントで認証するためには、次の接続プロパティを指定します。
Cloud アカウントに接続するには、APIToken を取得する必要があります。API トークンを生成するには、Atlassian アカウントにログインして「API トークン」 -> 「API トークンの作成」をクリックします。生成されたトークンが表示されます。
データに接続するには以下を設定します。
ちなみに、Cloud アカウントへの接続でパスワード認証を使うことも可能ですが、非推奨となっています。
この場合、AuthSchemeをすべてのOAuth フローでOAuth に設定する必要があります。また、すべてのシナリオでカスタムOAuth アプリケーションを作成して構成する必要があります。詳しくは、ヘルプドキュメントの「OAuth」セクションを参照してください。
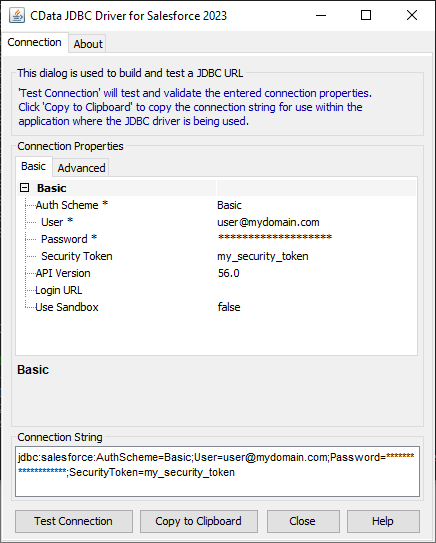
JDBC URL の構成については、Jira Service Management JDBC Driver に組み込まれている接続文字列デザイナーを使用してください。JAR ファイルのダブルクリック、またはコマンドラインからJAR ファイルを実行します。
java -jar cdata.jdbc.jiraservicedesk.jar
接続プロパティを入力し、接続文字列をクリップボードにコピーします。
以下はJira Service Management の一般的なJDBC 接続文字列です。
jdbc:jiraservicedesk:ApiKey=myApiKey;User=MyUser;InitiateOAuth=GETANDREFRESH
新しいRuby ファイル(例: JiraServiceDeskSelect.rb) を作成してテキストエディタで開き、次のコードをファイルにコピーします。
require 'java'
require 'rubygems'
require 'C:/Program Files/CData/CData JDBC Driver for JiraServiceDesk 2018/lib/cdata.jdbc.jiraservicedesk.jar'

url = "jdbc:jiraservicedesk:ApiKey=myApiKey;User=MyUser;InitiateOAuth=GETANDREFRESH"
conn = java.sql.DriverManager.getConnection(url)
stmt = conn.createStatement
rs = stmt.executeQuery("SELECT RequestId, ReporterName FROM Requests")
while (rs.next) do
  puts rs.getString(1) + ' ' + rs.getString(2)
end
ファイルが完成したら、コマンドラインからファイルを実行するだけでJRuby でJira Service Management を表示できるようになります。
jruby -S JiraServiceDeskSelect.rb
SQL-92 クエリをJira Service Management に書き込むと、Jira Service Management を独自のJRuby アプリケーションに素早く簡単に組み込むことができます。今すぐ無料トライアルをダウンロードしましょう。