ノーコードでクラウド上のデータとの連携を実現。
詳細はこちら →Workday Driver の30日間無償トライアルをダウンロード
30日間の無償トライアルへCData

こんにちは!ウェブ担当の加藤です。マーケ関連のデータ分析や整備もやっています。
PostgreSQL には多くの対応クライアントがあります。標準のドライバーからBI、アナリティクスツールまで、PostgreSQL はデータ接続の人気のインターフェースです。JDBC ドライバーを使用することで、簡単に任意の標準クライアントから接続できるPostgreSQL エントリポイントを作成できます。
Workday にPostgreSQL データベースとしてアクセスするには、CData JDBC Driver for Workday とJDBC foreign data wrapper (FDW) を使用します。この記事ではFDW をコンパイルしてインストールし、PostgreSQL サーバーからWorkday にクエリを実行します。
JDBC データソースとしてWorkday に接続するには、以下が必要です。
Driver クラス
cdata.jdbc.workday.WorkdayDriver
ここでは、4つのWorkday API の接続パラメータを設定する方法、およびTenant とBaseURL を取得する方法について説明します。必要なAPI のパラメータが設定され、カスタムOAuth および / またはAzure AD API クライアントを作成したら、接続の準備は完了です。
API / 前提条件 / 接続パラメータ
WQL / WQL サービスを有効化(下記参照) / ConnectionType: WQL
Reports as a Service / カタログレポートの設定(ヘルプドキュメントの「データアクセスのファインチューニング」参照) / ConnectionType:
Reports
REST / 自動で有効化 / ConnectionType: REST
SOAP / 自動で有効化 / ヘルプドキュメントのWorkday SOAP API への認証を参照
BaseURL およびTenant プロパティを取得するため、Workday にログインしてView API Clients を検索します。 この画面では、Workday はBaseURL とTenant の両方を含むURL であるWorkday REST API Endpoint を表示します。
REST API Endpoint のフォーマットは、
https://domain.com/subdirectories/mycompany です。ここで、
例えば、REST API エンドポイントがhttps://wd3-impl-services1.workday.com/ccx/api/v1/mycompany の場合、 BaseURL はhttps://wd3-impl-services1.workday.com であり、Tenant はmycompany です。
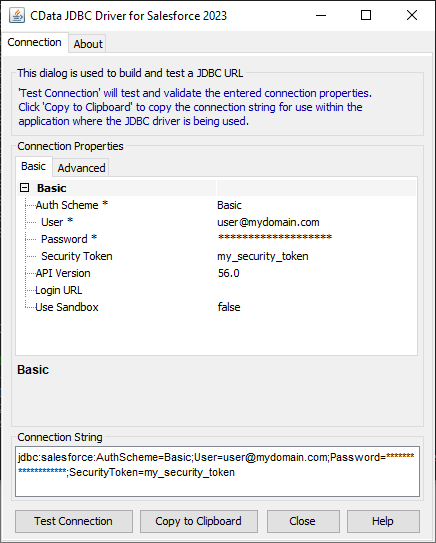
JDBC URL の構成については、Workday JDBC Driver に組み込まれている接続文字列デザイナを使用できます。JAR ファイルのダブルクリック、またはコマンドラインからJAR ファイルを実行します。
java -jar cdata.jdbc.workday.jar
接続プロパティを入力し、接続文字列をクリップボードにコピーします。
以下は一般的なJDBC URL です。
jdbc:workday:User=myuser;Password=mypassword;Tenant=mycompany_gm1;Host=https://wd3-impl-services1.workday.com
FDW は、PostgreSQL を再コンパイルせずに、PostgreSQL の拡張機能としてインストールできます。例としてjdbc2_fdw 拡張子を使用します。
ln -s /usr/lib/jvm/java-6-openjdk/jre/lib/amd64/server/libjvm.so /usr/lib/libjvm.so
make install USE_PGXS=1
拡張機能をインストールした後、以下のステップに従ってWorkday へのクエリの実行を開始します。
CREATE EXTENSION jdbc2_fdw;
CREATE SERVER Workday
FOREIGN DATA WRAPPER jdbc2_fdw OPTIONS (
drivername 'cdata.jdbc.workday.WorkdayDriver',
url 'jdbc:workday:User=myuser;Password=mypassword;Tenant=mycompany_gm1;Host=https://wd3-impl-services1.workday.com',
querytimeout '15',
jarfile '/home/MyUser/CData/CData\ JDBC\ Driver\ for\ Salesforce MyDriverEdition/lib/cdata.jdbc.workday.jar');
CREATE USER MAPPING for postgres SERVER Workday OPTIONS (
username 'admin',
password 'test');
postgres=# CREATE FOREIGN TABLE workers (
workers_id text,
workers_Worker_Reference_WID text,
workers_Legal_Name_Last_Name numeric)
SERVER Workday OPTIONS (
table_name 'workers');
postgres=# SELECT * FROM workers;
このようにCData JDBC Driver for Workday を使って簡単にWorkday データを取得して検索対象にすることができました。ぜひ、30日の無償評価版 をお試しください。