Discover how a bimodal integration strategy can address the major data management challenges facing your organization today.
Get the Report →Transfer Google Contacts to Dynamics CRM
Never manually copy your Google contacts into CRM again! Centralizing your customer history into CRM gives you the ability to track customer interactions, gauge marketing campaigns, and fuel analysis. However, tracking customer information across your social, accounting, and ERP systems often requires rekeying data from these sources into CRM.
With the CData SSIS components, you can automatically synchronize Dynamics CRM with your customer and lead information no matter where it resides, without copying the data. The CData SSIS components enable you to use the data integration tools in SSIS to work with nontraditional data sources and destinations.

In SSIS, you can work with data sources like Dynamics CRM and Google just as you would SQL Server, without copying the data into a database. Modeling the business logic of CRM and even Google calendars in a database is nontrivial and expensive. CData drivers for Dynamics CRM and Google preserve business logic by giving you a relational view of the Dynamics CRM and Google APIs.

No matter how disparate the data sources, connectivity to any API is transparent and accomplished through the same standard interfaces in SSIS. You can follow the same procedure to connect to any CData SSIS components. After installing the CData SSIS components for Dynamics CRM and Google Apps, as well as SQL Server Data Tools, you can set up a simple transfer to Dynamics CRM in 10 steps.
- In Visual Studio, click File -> New -> Project. Expand the Business Intelligence node and click Integration Services Project.
- Drag a Data Flow task from the SSIS Toolbox onto the Control Flow.
- Drag the CData Source Component for GoogleApps from the SSIS Toolbox onto the Data Flow.
Double-click the source component to open the source editor. Click New. In the resulting dialog, enter the credentials required to connect to Google APIs. Google uses the OAuth authentication standard. To obtain the OAuth values, see the guide in the component help.
![Credentials and other connection properties in the Connection Manager for GoogleApps.]()
- In the Table Or View menu, select the Contacts table.
![Tables for Google apps in the source editor.]()
- Drag the CData Destination Component for Dynamics CRM from the SSIS Toolbox onto the Data Flow.
- Drag the blue arrow from the Google source to the Dynamics CRM destination.
![A simple SSIS workflow to load Google contacts into Dynamics CRM.]()
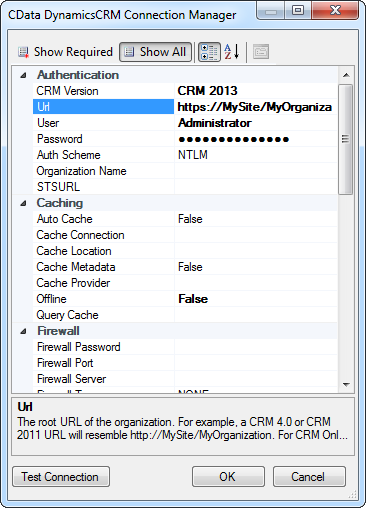
- Double-click the destination component to open the destination editor. Enter the credentials required to connect to Dynamics CRM. To connect to CRM Online, CRM 4.0, 2011, 2013, and 2015, the following properties are required:
- URL: The URL to the on-premise Dynamics CRM installation or Office 365 URL.
- User: Your Dynamics CRM username.
- Password: Your Dynamics CRM password.
![Credentials and other connection properties in the Connection Manager for Dynamics CRM.]()
- In the Use a Table menu, select Contact. In the Action menu, select Insert for a simple transfer.
![Dynamics CRM tables in the destination editor.]()
- Click Mappings to modify the column mappings. SSIS automatically maps columns with the same name. In the Input Column list, select the Ignore option for the Id column.
![Mapping contact fields from Google to Dynamics CRM.]()
With the CData SSIS Components for Dynamics CRM, you can automate the process of tracking customers and leads across your social, accounting, and ERP systems. By connecting to your customer information as a database, wherever it resides, you can use powerful tools like SSIS to automate the process of getting contact data into CRM.


