Discover how a bimodal integration strategy can address the major data management challenges facing your organization today.
Get the Report →


Bill an Invoice with the CData Excel Add-In for QuickBooks
The CData Excel Add-In for QuickBooks makes it easy to transfer data in and out of QuickBooks. In this article, you will use the Excel Add-In to send an Invoice to your customer as an Excel file. The Invoice data can then be inserted as a Bill.
Establish a Connection
Before getting started, you will need to establish a connection to QuickBooks. Click the From QuickBooks button on the CData tab to launch the Data Selection wizard. To enable updates for the connection, add a connection to QuickBooks with the "Update" option checked.
See the "Getting Started" chapter in the help documentation for a step-by-step guide to establish a connection to local and remote company files and QuickBooks Online companies.
Create an Invoice Spreadsheet
Follow the steps below to create a spreadsheet that will show the customer all unpaid invoices:
- Connect to your QuickBooks company file and select the information that you would like to send. This example uses the InvoiceLineItems table to retrieve the information useful to create a Bill.
- The CData Excel Add-In for QuickBooks lets us use a simple SQL syntax to query the company file or company on QuickBooks Online. This is a powerful mechanism to search for data in various ways. The query below retrieves all unpaid Invoices belonging to the customer 'Allard, Robert:Remodel'. It also retrieves only the columns that are required to create a Bill:
SELECT InvoiceId, Date, CustomerName, ReferenceNumber, Memo, Amount,
  DueDate, IsPaid, ItemName, ItemQuantity
FROM InvoiceLineItems
WHERE IsPaid = 'False' AND CustomerName = 'Allard, Robert:Remodel'
![]()
Once you have retrieved the Invoices in Excel, you can save the Excel file and send it to your customer. Even if your customer does not have the CData Excel Add-In for QuickBooks, they will still be able to open the Excel file and read the Invoice data.

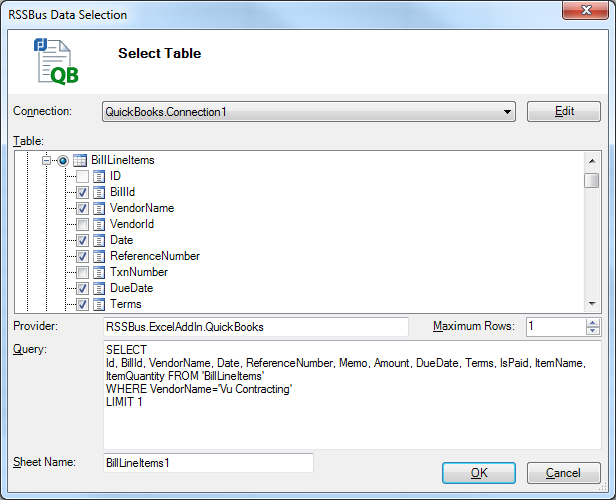
Create a BillLineItems Spreadsheet
If your customers have the Excel Add-In for QuickBooks, they can easily import the Invoices you sent them as Bills. To insert the Invoices as Bills, create a BillLineItems spreadsheet with the following command:
SELECT Id, BillId, VendorName, Date, CustomerName, ReferenceNumber, Memo,
  Amount, Terms, IsPaid, ItemName, ItemQuantity
FROM BillLineItems
WHERE VendorName = 'Vu Contracting' LIMIT 1
"LIMIT 1" restricts the data to a single row, which is all that is needed: The customer can insert data by filling in fields after this row.
Insert Bill Line Items
You can follow the steps below to copy Invoice data into a new Bill and insert Bill Line Items to QuickBooks:
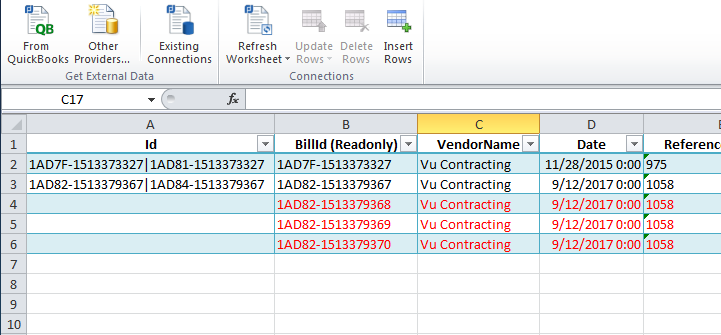
- After the customer has created a spreadsheet for the BillLineItems table, they can copy the Invoices you sent them and paste the data to the bottom of the BillLineItems sheet. Care must be taken to match the columns as needed.
![]()
Keep in mind that many rows may be part of the same Invoice. Each row represents an individual Line Item. Use the InvoiceId column to see which rows belong to the same Invoice. There will be a different unique Id associated with each Invoice, just as there is a unique BillId assigned to each Bill.
- Once all the Invoice data has been appended to the end of the BillLineItems sheet, you can begin insert the data: Select the first row in red and press the Insert Rows button.
- After inserting the first row for the Bill, a BillId will be returned. To add line items to this bill, copy the BillId to any of the remaining rows associated with the same Bill. Then select these same rows and click Insert Rows button again. The rows you copied the BillId to will be appended to the same Bill as Line Items.

Data Connectors
ETL/ ELT Solutions
Cloud & API Connectivity
OEM & Custom Drivers