Discover how a bimodal integration strategy can address the major data management challenges facing your organization today.
Get the Report →Connect to Sybase Data in DigitalSuite Studio through RunMyProcess DSEC
Use Arkobi Digital's low-code cloud native platform RunMyProcess's DigitalSuite EnterpriseConnect (DSEC) to connect to Sybase.
The CData JDBC Driver for Sybase implements JDBC Standards and enables a applications ranging from BI to IDE to connect with Sybase. In this article, we describe how to connect to Sybase data from Arkobi Digital RunMyProcess's DSEC and connect to Sybase in RunMyProcess.
Setting up EnterpriseConnect Agent
Configure the EnterpriseConnect Agent following the EnterpriseConnect page in the RunMyProcess documentation.
Setting up JDBC Adapter
The JDBC Adapter section describes the steps to connect to RDBMS through JDBC. Follow the steps and open the JDBC.config file.
- Create a JSON entry for the CData JDBC Driver for Sybase, e.g.
Sybase = { "sqlDriver" : "...", "sqlSource" : "...", "sqlDriverPath" : "..." } - Set the "sqlDriver" field to the Class name for the CData JDBC Driver, e.g.
cdata.jdbc.sybase.SybaseDriver - Set the "sqlSource" field to a JDBC URL for connecting to Sybase, e.g.
jdbc:sybase:User=myuser;Password=mypassword;Server=localhost;Database=mydatabase;Charset=iso_1;Built-in Connection String Designer
For assistance in constructing the JDBC URL, use the connection string designer built into the Sybase JDBC Driver. Either double-click the JAR file or execute the jar file from the command-line.
java -jar cdata.jdbc.sybase.jarFill in the connection properties and copy the connection string to the clipboard.
To connect to Sybase, specify the following connection properties:
- Server: Set this to the name or network address of the Sybase database instance.
- Database: Set this to the name of the Sybase database running on the specified Server.
Optionally, you can also secure your connections with TLS/SSL by setting UseSSL to true.
Sybase supports several methods for authentication including Password and Kerberos.
Connect Using Password Authentication
Set the AuthScheme to Password and set the following connection properties to use Sybase authentication.
- User: Set this to the username of the authenticating Sybase user.
- Password: Set this to the username of the authenticating Sybase user.
Connect using LDAP Authentication
To connect with LDAP authentication, you will need to configure Sybase server-side to use the LDAP authentication mechanism.
After configuring Sybase for LDAP, you can connect using the same credentials as Password authentication.
Connect Using Kerberos Authentication
To leverage Kerberos authentication, begin by enabling it setting AuthScheme to Kerberos. See the Using Kerberos section in the Help documentation for more information on using Kerberos authentication.
You can find an example connection string below:
Server=MyServer;Port=MyPort;User=SampleUser;Password=SamplePassword;Database=MyDB;Kerberos=true;KerberosKDC=MyKDC;KerberosRealm=MYREALM.COM;KerberosSPN=server-name![Using the built-in connection string designer to generate a JDBC URL (Salesforce is shown.)]()
- Set the "sqlDriverPath" field to the name of the CData JDBC Driver JAR file, e.g.
cdata.jdbc.sybase.jar
Sample JDBC.config File
#DBAgent Configuration
Sybase = {"sqlDriver" : "cdata.jdbc.sybase.SybaseDriver", "sqlSource" = "jdbc:sybase:User=myuser;Password=mypassword;Server=localhost;Database=mydatabase;Charset=iso_1;","sqlDriverPath" = "cdata.jdbc.sybase.jar" }
Put the JDBC driver JAR file (cdata.jdbc.sybase.jar) into the same directory as unified-adapter-[version].jar.
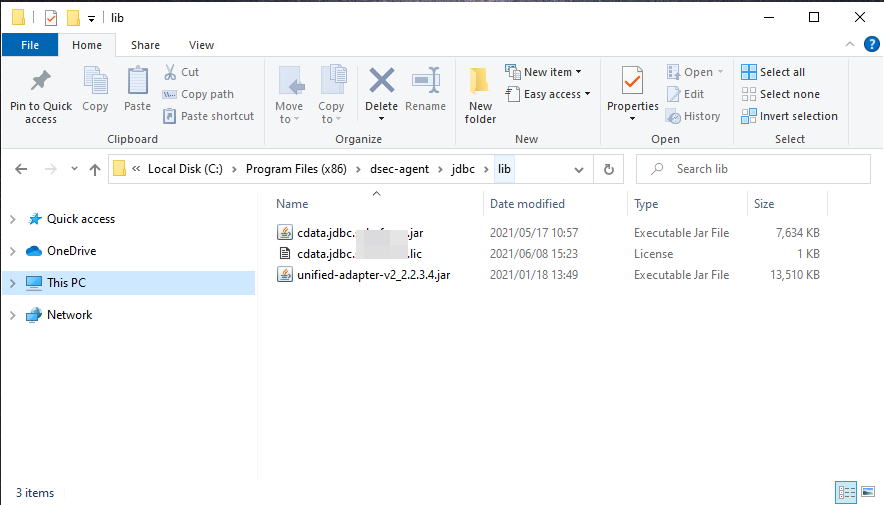
Note: Make sure to put the CData license file (cdata.jdbc.sybase.lic) into the same directory. Since the license is generated based on the unique identifier of the machine where the product in installed, you will need an offline activation if you want to put the file on another machine.
Starting DigitalSuite EnterpriseConnect Agent
In Windows, start RunMyProcess DigitalSuite EnterpriseConnect Agent in Windows services. To start the application through command line, see Starting the EnterpriseConnect Agent in the RunMyProcess documents.
Starting the JDBC Adapter
Start the JDBC Adapter from runAdapter.bat. Once the Adapter is running, you can access the application through the agent address (e.g. 127.0.0.1:8080). Below is an example executing the command in Windows.
... > java -Djava.util.logging.config.file=./log.properties -cp lib/* org.runmyprocess.sec2.AdapterHandler :
2021-06-09 14:37:58|INFO|correlationId=|Searching for config file...
2021-06-09 14:37:58|INFO|correlationId=|Adapter Handler started with [JDBC] configuration
2021-06-09 14:37:59|INFO|correlationId=|agent address: 127.0.0.1:8080
2021-06-09 14:38:00.251:INFO::ConnectionThread: Logging initialized @1820ms to org.eclipse.jetty.util.log.StdErrLog
2021-06-09 14:38:00|INFO|correlationId=|onConnect() websocket connection between Agent and Adapter established
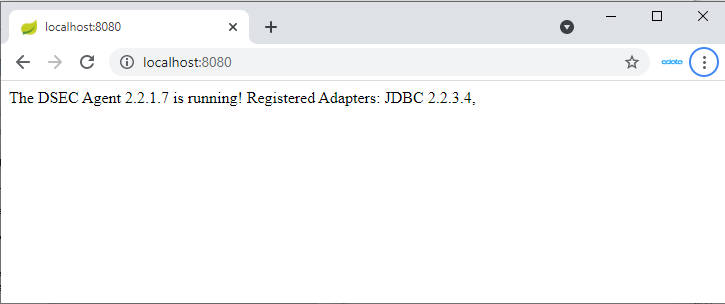
Once the DigitalSuite EnterpriseConnect Agent and JDBC Adapter are running, access http://localhost:(specified-port-number)/ through your browser to open the page shown below.
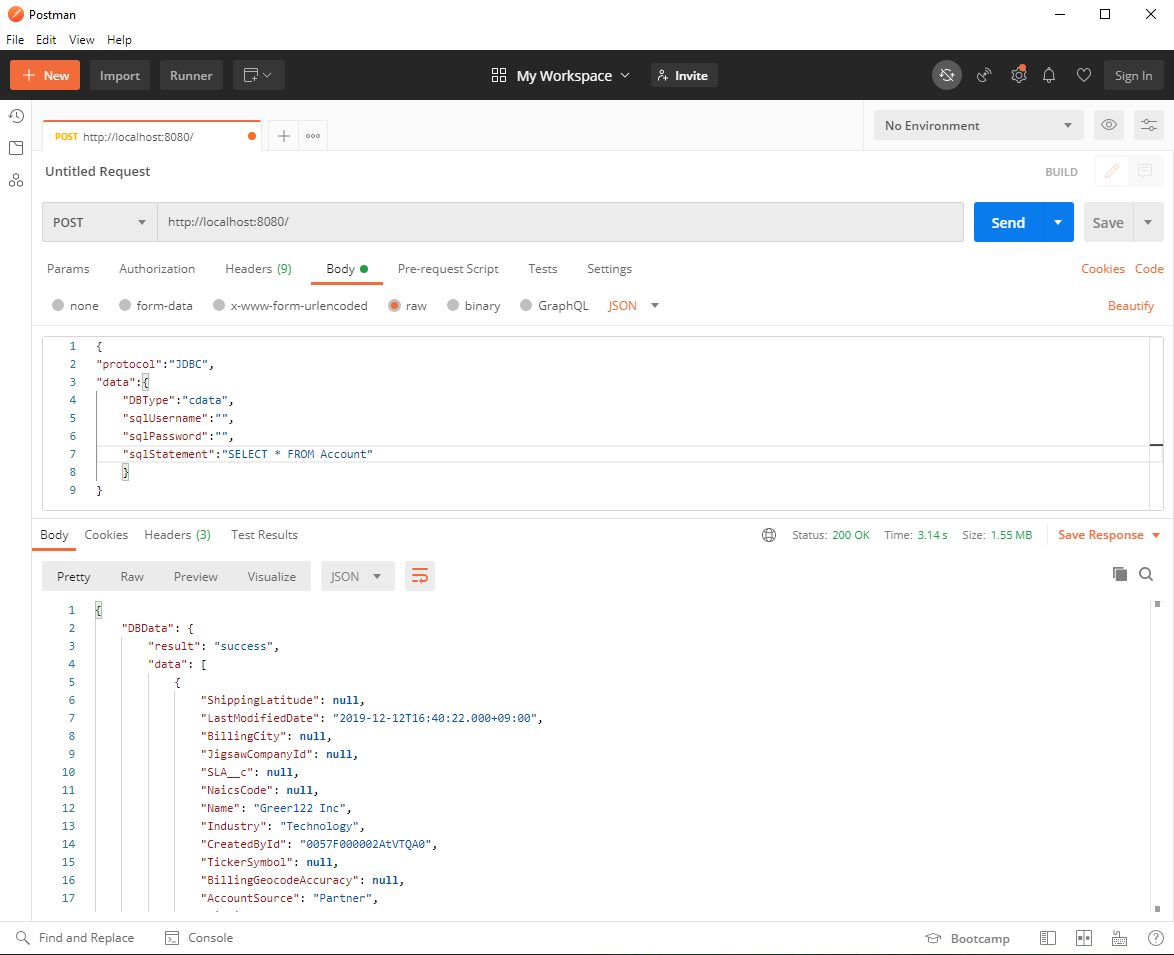
Check the availability of the JDBC Adapter using tools such as Postman or cURL. Here, we use Postman to send the HTTP POST request.
Configure the RequestHeader as follows:
Content-Type application/json
Configure the RequestBody as follows:
{
	"protocol":"JDBC",
	"data":{
		"DBType":"Sybase",
		"sqlUsername":"",
		"sqlPassword":"",
		"sqlStatement":"SELECT * FROM Products"
	}
}
If the JDBC.config file contains credential information, sqlUsername and sqlPassword can be left empty. If you are not sure of the table name, you can retrieve the list of tables using the request SELECT * FROM sys_tables
The request is successful if the Status is 200 and the Body contains Sybase data in JSON format.
Connect to Sybase through DSEC Agent in DigitalSuite Studio
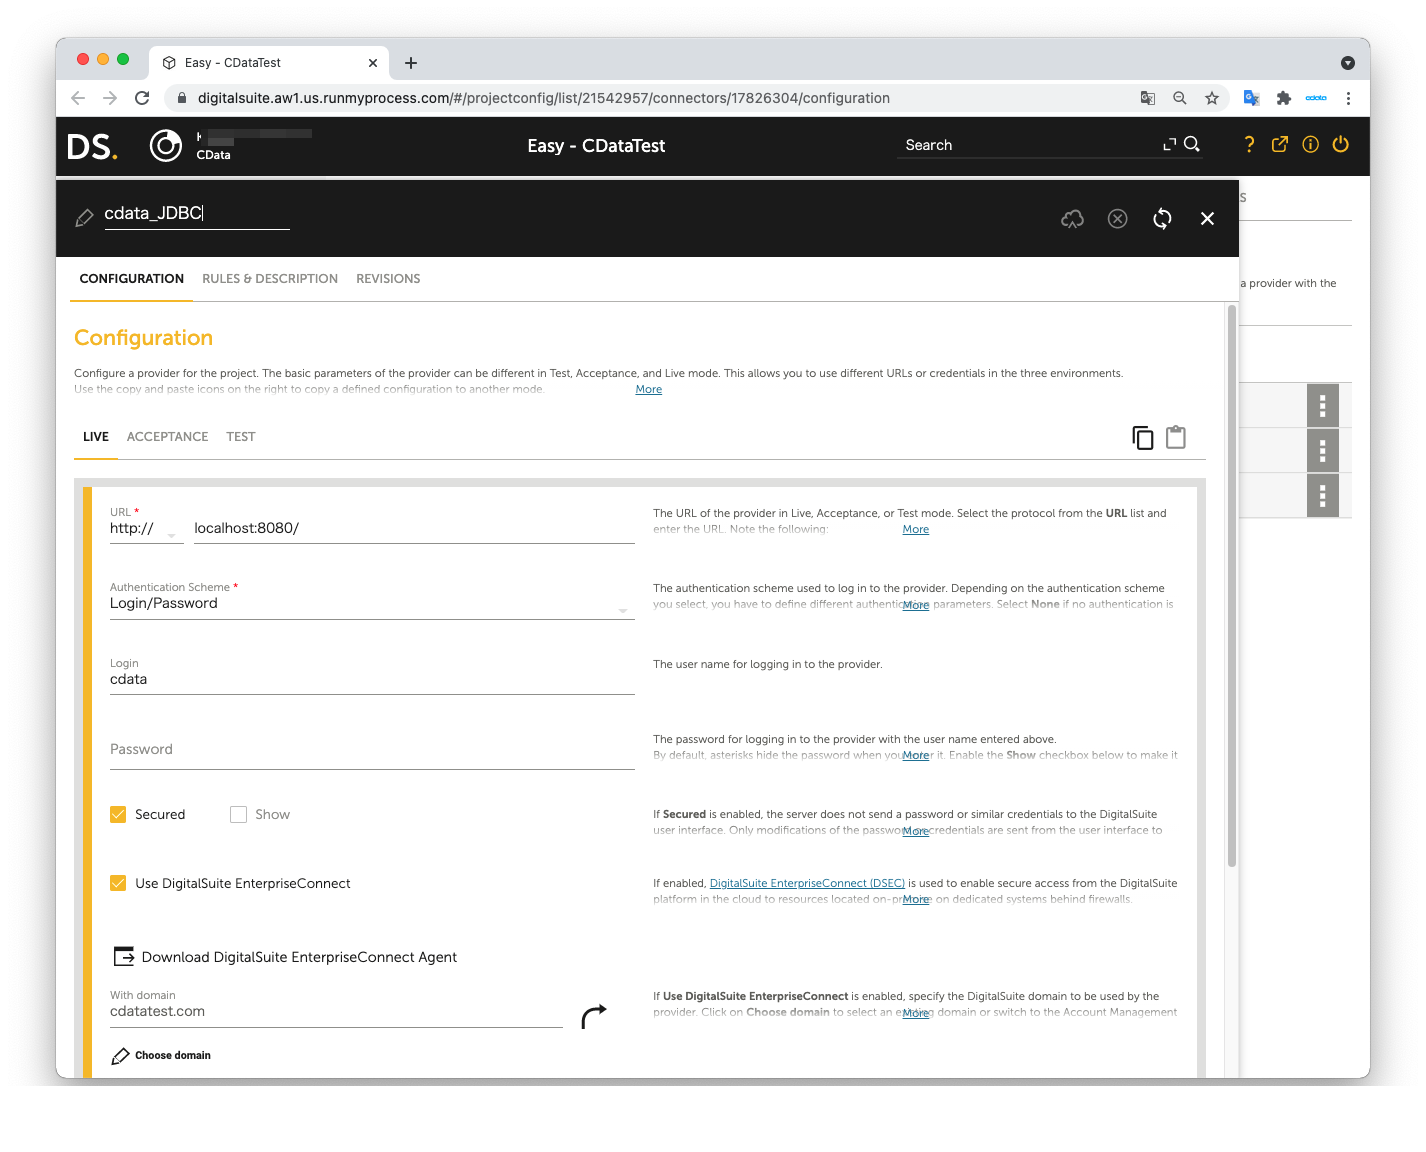
Create a DigitalSuite Studio project and then create a Provider in the project.
- URL: The URL for accessing JDBC Agent (e.g. http:localhost:8080/)
- Authentication Scheme: Login/password
- Login: The value from agent.user in the application.properties file
- Password: agent.password in the application.properties file
- Secured: Checked
- Use DigitalSuite EnterpriseConnect: Checked
- With domain: The value from agent.domain in application.properties file
Next, create a Connector in the Provider.
- Connector URL: Leave this empty
- Architecture: REST/XML-RPC
- Method: POST
- Result format: JSON
- Accept media type: application/json
- Character set: Automatic
- Content: Same as the Request body used in the JDBC Adapter
- Content type: application/json
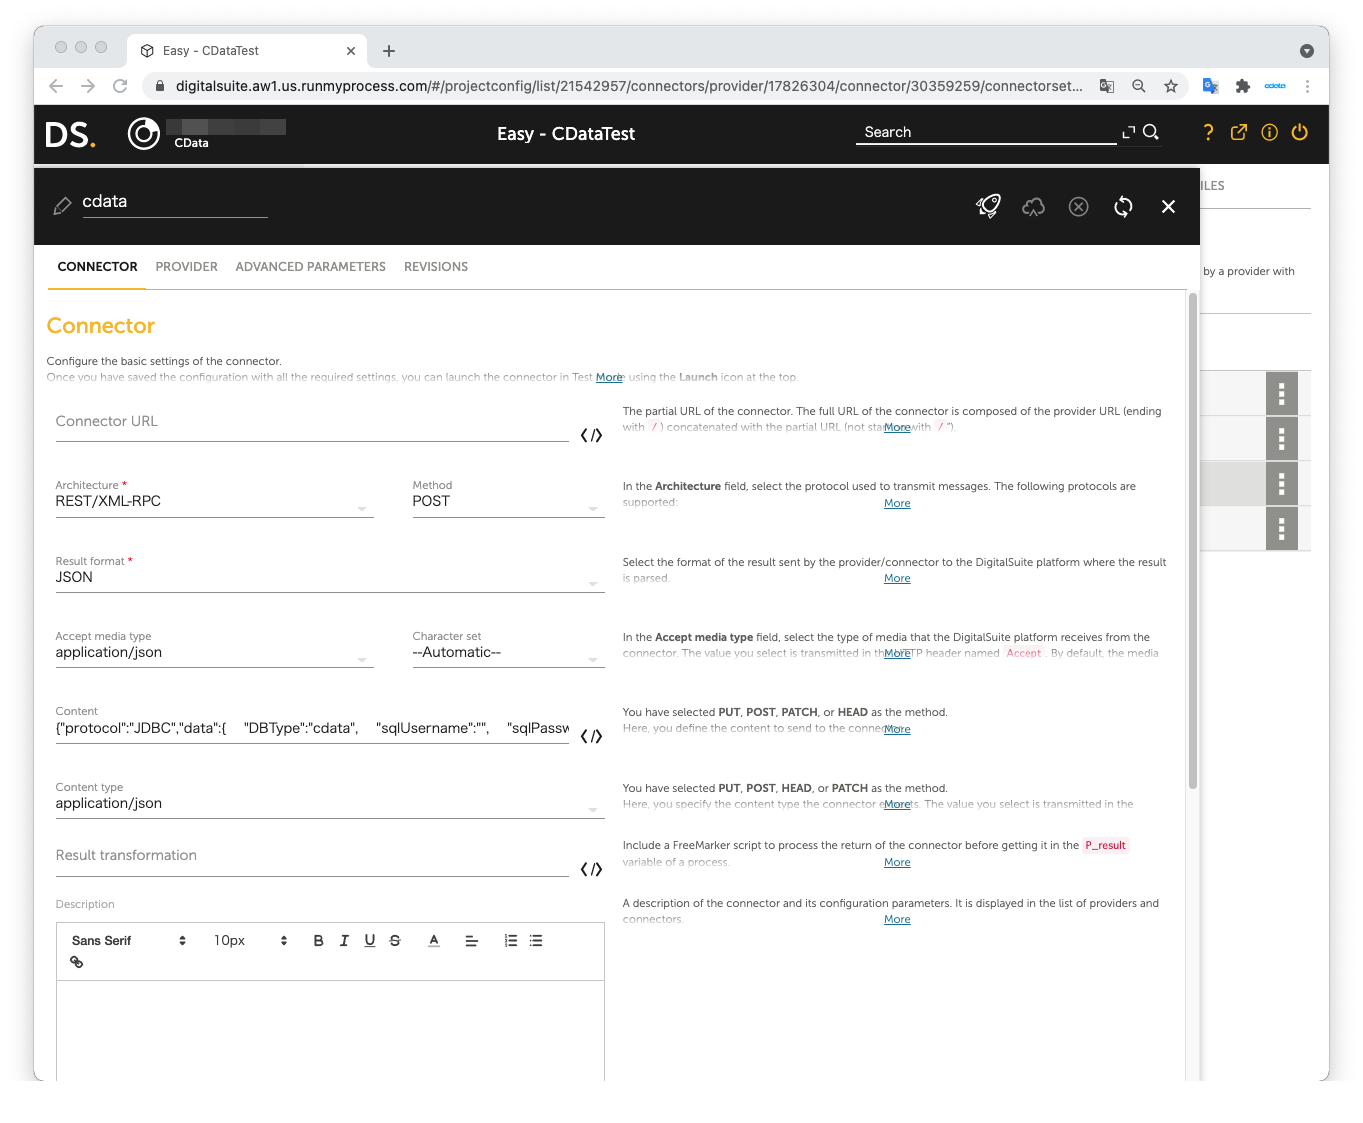
The JSON data we used as the Request body in JDBC Adapter:
{
	"protocol":"JDBC",
	"data":{
		"DBType":"Sybase",
		"sqlUsername":"",
		"sqlPassword":"",
		"sqlStatement":"SELECT * FROM Products"
	}
}
Open Launch Test to perform the test. The test is successful if Sybase data is shown in Result on the right pane.
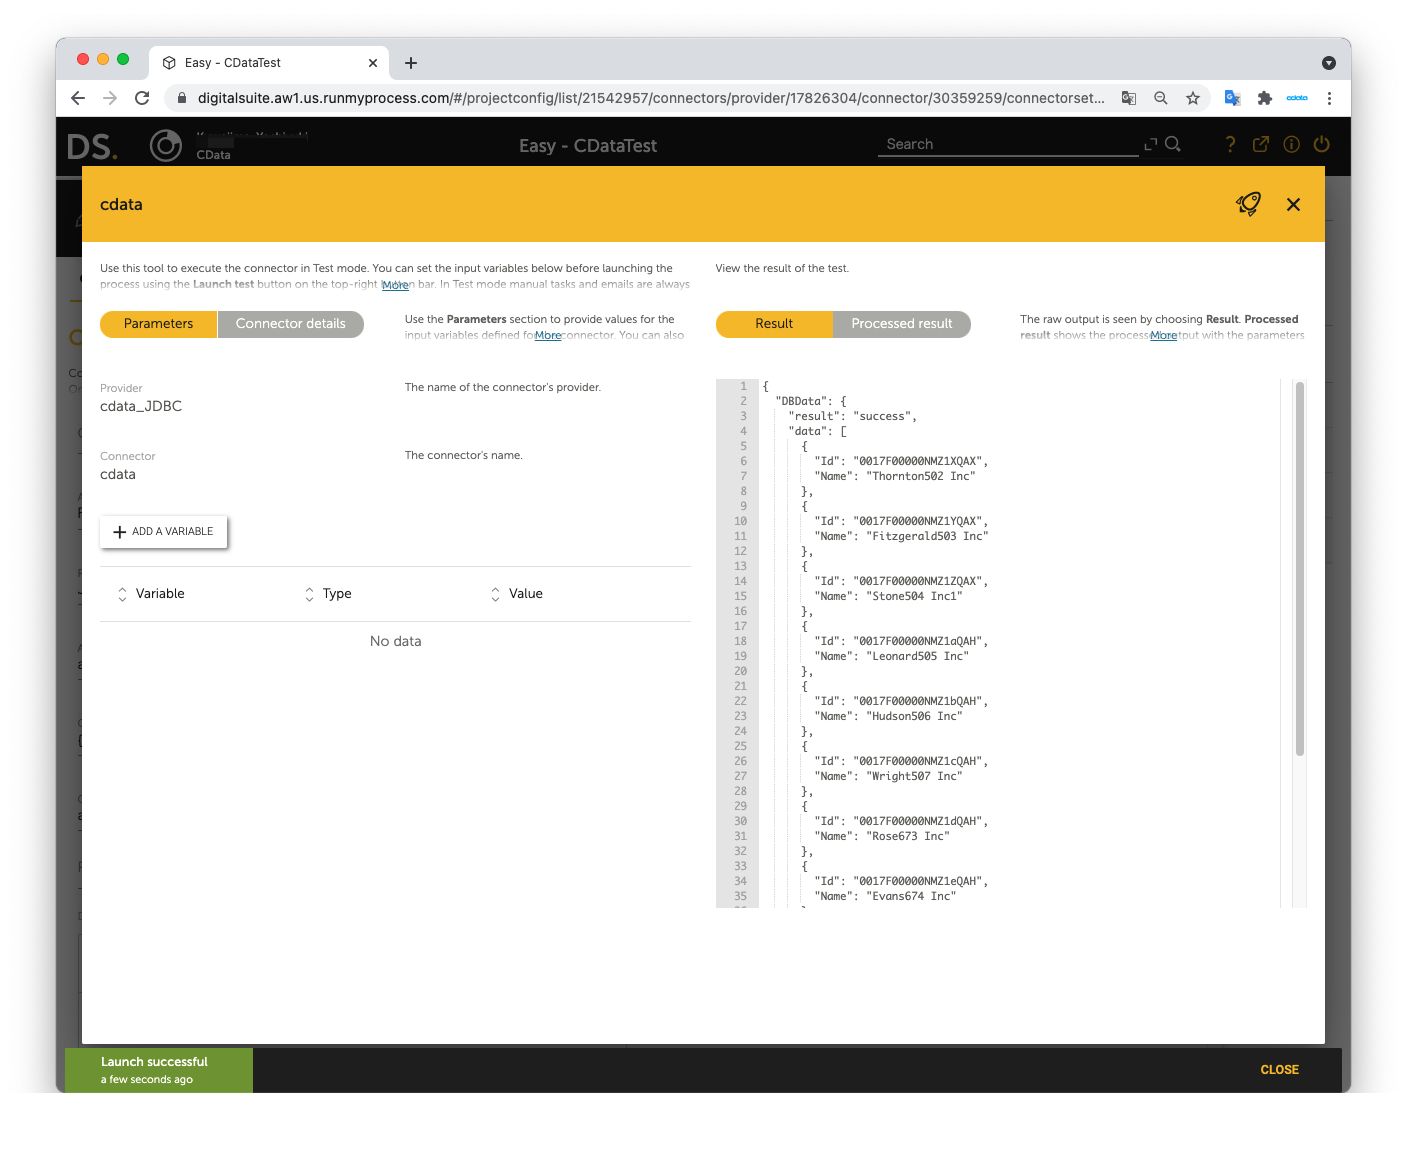
Now you can use Sybase data in RunMyProcess DigitalSuite Studio through DSEC.
For the detailed information on supported SQL commands, refer to the SQL Compliance section in our help documentation. For information on tables, refer to the Data Model section.


