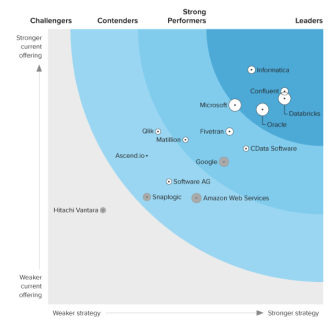
Discover how a bimodal integration strategy can address the major data management challenges facing your organization today.
Get the Report →


Automated Continuous Todoist Replication to Databricks
Use CData Sync for automated, continuous, customizable Todoist replication to Databricks.
Always-on applications rely on automatic failover capabilities and real-time data access. CData Sync integrates live Todoist data into your Databricks instance, allowing you to consolidate all of your data into a single location for archiving, reporting, analytics, machine learning, artificial intelligence and more.
Configure Databricks as a Replication Destination
Using CData Sync, you can replicate Todoist data to Databricks. To add a replication destination, navigate to the Connections tab.
- Click Add Connection.
- Select Databricks as a destination.

- Enter the necessary connection properties. To connect to a Databricks cluster, set the properties as described below.
Note: The needed values can be found in your Databricks instance by navigating to Clusters, and selecting the desired cluster, and selecting the JDBC/ODBC tab under Advanced Options.
- Server: Set to the Server Hostname of your Databricks cluster.
- HTTPPath: Set to the HTTP Path of your Databricks cluster.
- Token: Set to your personal access token (this value can be obtained by navigating to the User Settings page of your Databricks instance and selecting the Access Tokens tab).
- Click Test Connection to ensure that the connection is configured properly.

- Click Save Changes.


Configure the Todoist Connection
You can configure a connection to Todoist from the Connections tab. To add a connection to your Todoist account, navigate to the Connections tab.
- Click Add Connection.
- Select a source (Todoist).
- Configure the connection properties.
Start by setting the Profile connection property to the location of the Todoist Profile on disk (e.g. C:\profiles\Todoist.apip). Next, set the ProfileSettings connection property to the connection string for Todoist (see below).
Todoist API Profile Settings
To authenticate to Todoist, and connect to your own data or to allow other users to connect to their data, you can use the OAuth standard.
First, you will need to register an OAuth application with Todoist. To do so, go to App Management Console, create a new application and configure a valid OAuth redirect URL. Your Oauth application will be assigned a client id and a client secret.
After setting the following connection properties, you are ready to connect:
- AuthScheme: Set this to OAuth.
- InitiateOAuth: Set this to GETANDREFRESH. You can use InitiateOAuth to manage the process to obtain the OAuthAccessToken.
- OAuthClientId: Set this to the client_id that is specified in you app settings.
- OAuthClientSecret: Set this to the client_secret that is specified in you app settings.
- CallbackURL: Set this to the Redirect URI that is specified in your app settings
.")
- Click Connect to ensure that the connection is configured properly.
- Click Save Changes.
.")
Configure Replication Queries
CData Sync enables you to control replication with a point-and-click interface and with SQL queries. For each replication you wish to configure, navigate to the Jobs tab and click Add Job. Select the Source and Destination for your replication.

Replicate Entire Tables
To replicate an entire table, click Add Tables in the Tables section, choose the table(s) you wish to replicate, and click Add Selected Tables.
.")
Customize Your Replication
You can use the Columns and Query tabs of a task to customize your replication. The Columns tab allows you to specify which columns to replicate, rename the columns at the destination, and even perform operations on the source data before replicating. The Query tab allows you to add filters, grouping, and sorting to the replication.
Schedule Your Replication
In the Schedule section, you can schedule a job to run automatically, configuring the job to run after specified intervals ranging from once every 10 minutes to once every month.

Once you have configured the replication job, click Save Changes. You can configure any number of jobs to manage the replication of your Todoist data to Databricks.
Data Connectors
ETL/ ELT Solutions
Cloud & API Connectivity
OEM & Custom Drivers