




CData API Server v26.1: Install, Connect, Publish, and Test a REST API with Postman
CData API Server is a no-code platform that turns any database into a standards-compliant OData REST API. Point it at your data source, select the tables you want to expose, and get secure REST endpoints that any application, BI tool, or low-code platform can consume - without writing a line of code.
v26.1 runs on a Java runtime (Eclipse Jetty) and installs as a .exe on Windows or a .tar.gz on Linux and macOS. Connectors load on demand from the admin UI - the footprint stays small and you pull in only the drivers you need. The steps below walk through the complete setup, from installation and connecting SQL Server to creating and testing the REST endpoints in Postman.
What you will build
- A running CData API Server instance on Windows
- A live connection to a SQL Server database
- A secured REST/OData endpoint exposing one or more SQL Server tables
- Working GET, POST, PUT, and DELETE requests in Postman
- An OpenAPI (Swagger) definition you can import into other tools
Prerequisites
- Windows Server 2016+ or Windows 10/11
- A SQL Server instance reachable from the API Server host, with a user that can read the tables you want to expose
- Administrator rights on the Windows machine where you install API Server
- Postman (or any REST client) for testing
Step 1: Download and install API Server
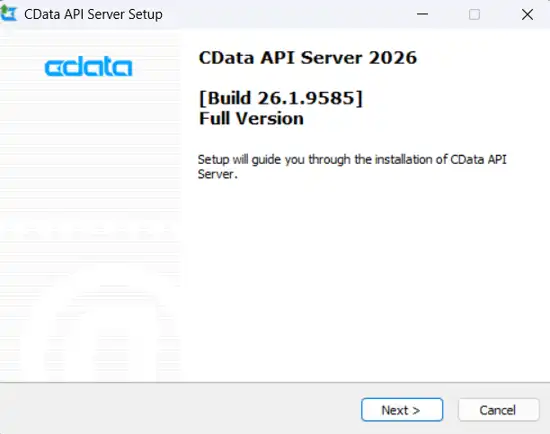
Download the API Server v26.1 installer from the CData API Server page. For a trial, enter your email and click Free Trial - a download link is sent through email. Run the .exe and follow the setup wizard to finish the installation.
Step 2: Log in and activate
Once the installation finishes, open a browser and navigate to http://localhost:8080/. API Server redirects to the sign-in page.
- In the Username field, enter admin (the default admin account)
- In the Password field, enter the admin password you set during installation
- Click Sign In
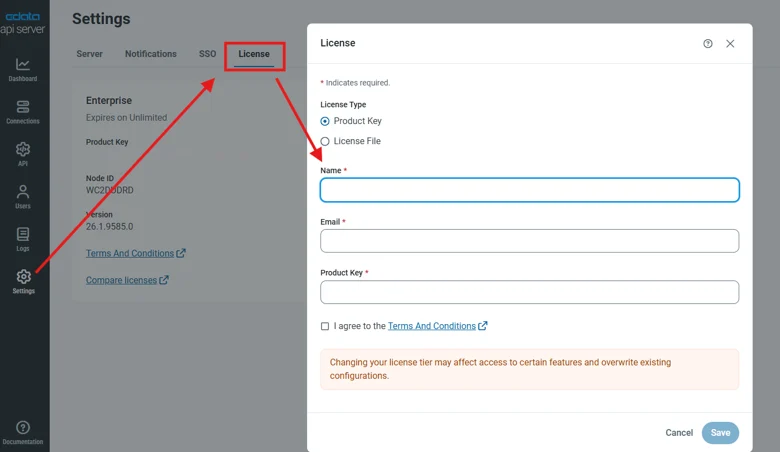
- After signing in, on the left navigation, select Settings, then License to activate your license or start your trial.
Step 3: Install the connector and create a connection
API Server installs connectors on demand from the admin UI. Install the SQL Server connector first, then configure the connection to your database.
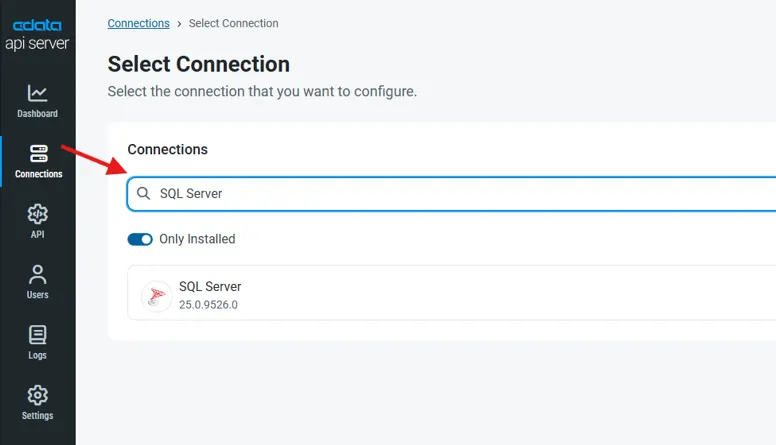
- In the admin UI, click Connections on the left navigation and then click Add Connection
- Locate SQL Server in the connector list and click the install icon at the end of the row. The Install Connector dialog opens.
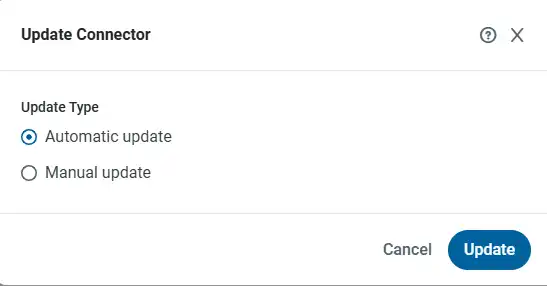
- Select Automatic installation (recommended), or select Manual if your environment cannot reach the connector repository. Wait for the installation to finish
- Click the Configure Connection arrow that appears at the end of the SQL Server row
-
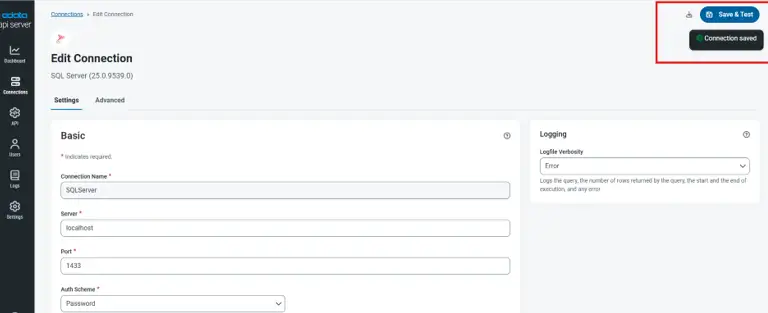
On the Settings tab, fill in the connection properties:
- Server: the SQL Server host name or IP address
- Database: the database that holds the tables you want to expose
- Auth Scheme: SqlServer for SQL authentication, or NTLM/Kerberos for Windows authentication
- User and Password: your SQL Server credentials
- Click Save & Test. API Server validates the connection and saves it
Step 4: Publish tables as REST APIs
Choose which tables to expose and which columns each resource returns. HTTP method permissions - GET, POST, PUT, DELETE are set per user in Step 5.
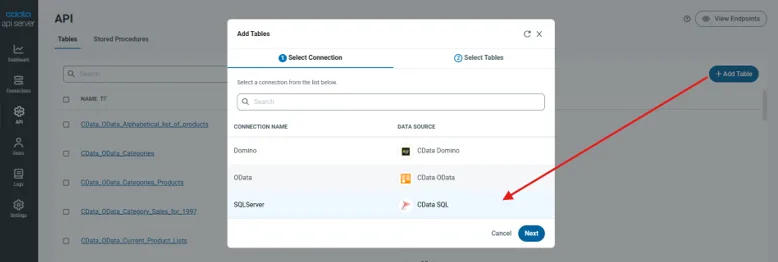
- Click API in the left navigation
- Select your SQL Server connection from the list
- Choose the tables you want to publish (for example, Customers and Orders) and add them as resources
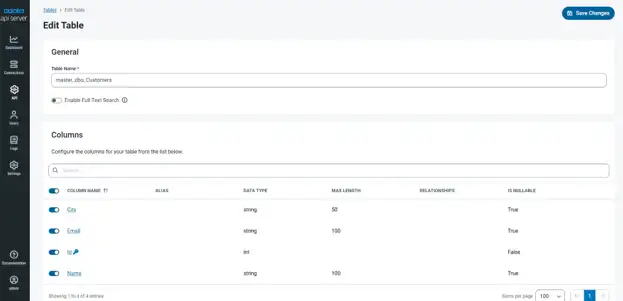
- For each resource, select the columns to expose. Uncheck any sensitive columns
- Click Save
Step 5: Create a user and get the auth token
API Server authenticates every request with a per-user auth token. Pass the token in the x-cdata-authtoken header, or as the password in HTTP Basic Auth in every API call.
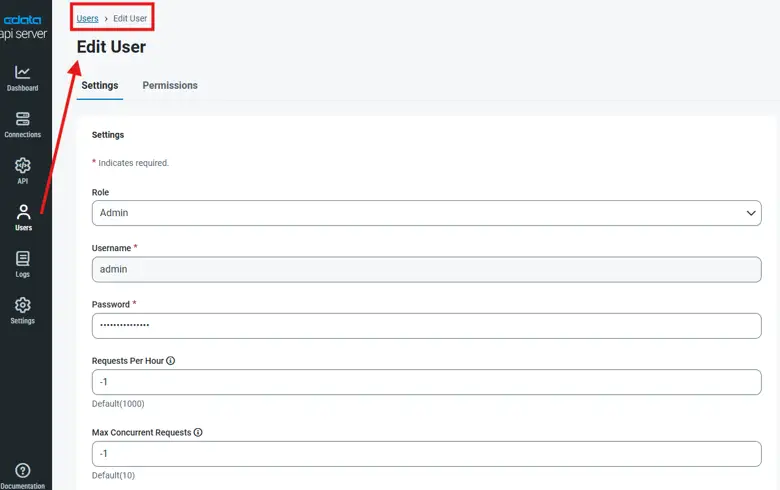
- Click Users in the left navigation, then click Add User. The Edit User page opens with two tabs: Settings and Permissions.
-
On the Settings tab, fill in the required fields:
- Role: choose Admin (full control of the application) or Query (API calls only, and is the right choice for most application users)
- Username and Password: the credentials this user will authenticate with
- Requests Per Hour: default is 1000; set -1 for unlimited
- Switch to the Permissions tab and check the HTTP methods this user is allowed to call: GET (read), POST (insert), PUT/MERGE/PATCH (update), and DELETE (delete)
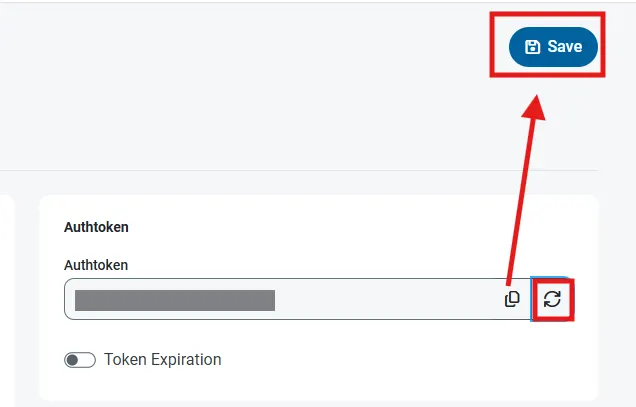
- Return to the Settings tab. In the Authtoken panel on the right, click the refresh icon to reveal the token, then copy it. You can now include it in every API call
- Click Save in the top-right corner
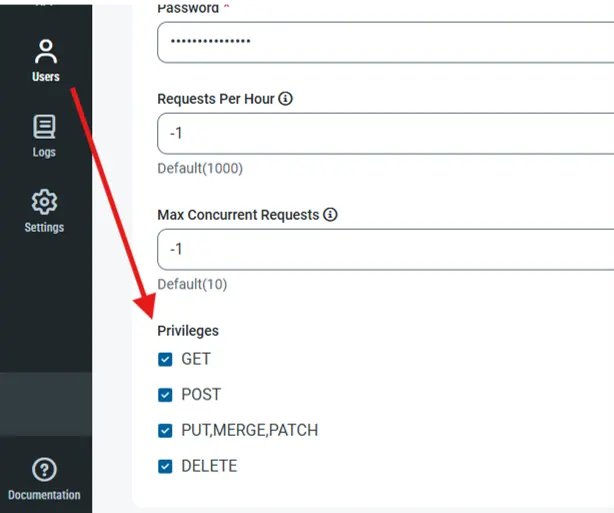
Note: for a read-only application user, check only GET.
Step 6: Test the API with Postman
Open the API tab in the admin UI and click View Endpoints (top-right) to find the base URL for your endpoints. Every request follows the same pattern:
GET    http://localhost:8080/api.rsc/master_dbo_Customers
POST   http://localhost:8080/api.rsc/master_dbo_Customers
PUT    http://localhost:8080/api.rsc/master_dbo_Customers(Id)
DELETE http://localhost:8080/api.rsc/master_dbo_Customers(Id)
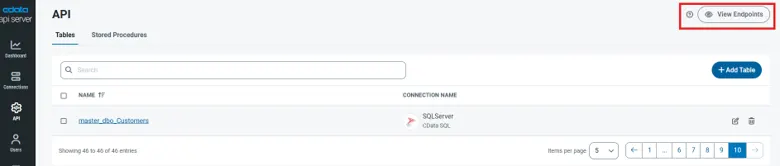
All four methods require a single header: x-cdata-authtoken: <your token>. Alternatively, you can use HTTP Basic Auth; Authorization: Basic <base64(username:authtoken)>, where the password is the user's auth token.
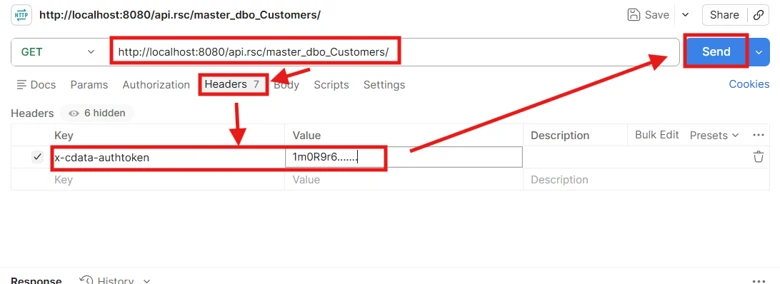
Note: Combine your username and the auth token in the format username:authtoken, base64 encode the combined string, and prefix it with Basic. For example, given [email protected]:ABC123...XYZ789, the Authorization header value becomes something like: Basic dXNlckBkb21haW4uY29tOkFCQzEyjc4OQ==
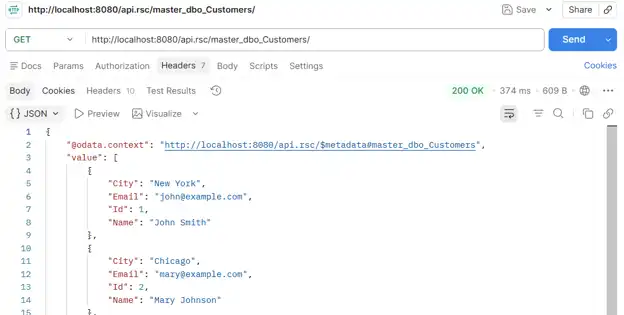
GET - read rows
Set the method to GET and the URL to /api.rsc/master_dbo_Customers, add the x-cdata-authtoken header, and click Send. API Server returns OData JSON. Query options to filter or shape the result:
- $top=10: returns only the first 10 rows
- $filter=City eq 'New York': server-side filtering
- $select=Id,Name,City: return only specific columns
- $orderby=Name desc: sort the result set
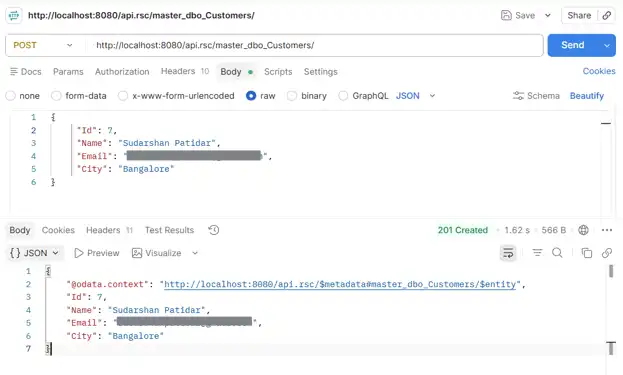
POST - insert a row
Set the method to POST, set the URL to /api.rsc/master_dbo_Customers, set Content-Type to application/json, and pass the new record as a JSON body. The response includes the created row with any server-generated keys.
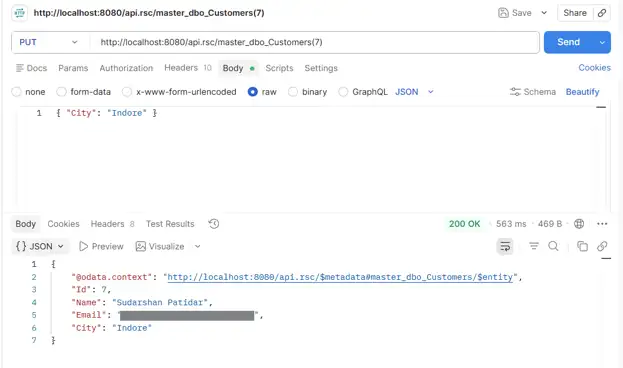
PUT - update a row
Set the method to PUT and the URL to /api.rsc/master_dbo_Customers(1), where 1 is the primary key. Pass only the fields you want to change as a JSON body.
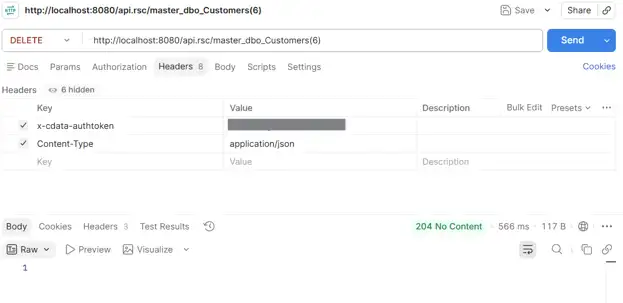
DELETE - remove a row
Set the method to DELETE and the URL to /api.rsc/master_dbo_Customers(1); no body needed. A 204 No Content response means the delete succeeded.
Step 7: Explore the discovery endpoints
API Server publishes machine-readable descriptions of your API at two discovery endpoints:
http://localhost:8080/api.rsc/$metadata    (OData CSDL metadata - XML)
http://localhost:8080/api.rsc/$swagger     (OpenAPI / Swagger definition - JSON)
Both can be scoped to a single resource by appending the resource name to the path. To find the exact URLs for your installation, click API in the left navigation, then click View Endpoints. The modal shows the OData Endpoint URL and the Open API Endpoint URL side by side.
Note: earlier versions of API Server (such as v25.1) exposed the OpenAPI definition at /api.rsc/$oas. v26.1 uses /api.rsc/$swagger. Always copy the URL from the View Endpoints modal to be sure.
Postman, Salesforce External Services, Power Platform, AppSheet, and most code generators can read this definition and generate a working client.
Step 8: Import the OpenAPI definition into Postman
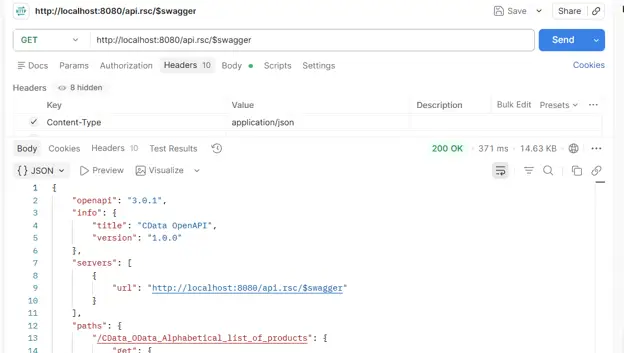
- In Postman, open a new request tab. Set the method to GET and paste the Open API Endpoint URL from Step 7
- On the Headers tab, add the x-cdata-authtoken header with your auth token and click Send. A 200 OK response returns the OpenAPI JSON
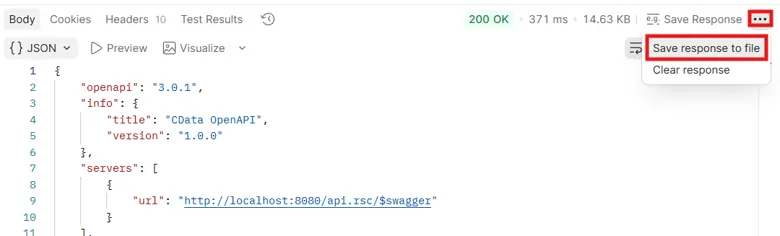
- In the response panel, click the three dots (...), select Save response to file, and save it as openapi.json
- In Postman's left sidebar, click Import, drag and drop openapi.json, and click Import when the preview appears
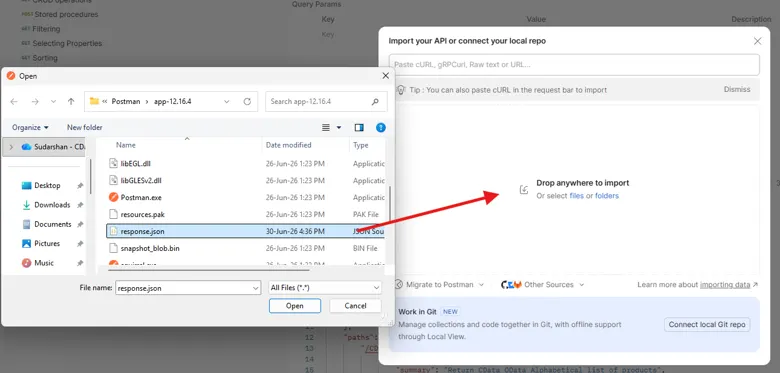
Postman imports the definition as a collection with every endpoint, method, and request body pre-populated. Set the x-cdata-authtoken header at the collection level under Authorization so all requests inherit it.
Next steps
- Put API Server behind HTTPS using a proper certificate before going to production
- Switch from localhost to a real DNS name and bind to a production-friendly port
- Wire up additional connectors. API Server supports hundreds of data sources beyond SQL Server
- Use the OpenAPI definition to register the API as a Salesforce External Data Source (the linked walkthrough uses NetSuite, but the same steps apply to any API Server source), a Power Platform custom connector, or an AppSheet data source
- Review the API Server documentation for advanced topics such as SSO, caching, and tunneling
Get CData API Server
With API Server v26.1, you can expose any of CData's hundreds of data sources as a secure REST/OData API in minutes and no code is required. Start a free 30-day trial, and our Support Team is available to help with any questions you may have.