




How to Connect CData Connect AI to QuickBooks Desktop Using the Private Cloud Connector
QuickBooks Desktop holds financial data that most AI tools cannot reach directly. The application runs on a Windows machine inside your network, and cloud AI services have no direct path to it. CData Connect AI solves this with the Private Cloud Connector, a lightweight Docker container that creates a secure, outbound-only tunnel from your network to Connect AI, without opening any inbound ports to the internet.
This article walks through the complete setup, from installing the QuickBooks Desktop Gateway on your Windows machine to asking your AI tool questions in plain English against live QuickBooks data.
How the connection works
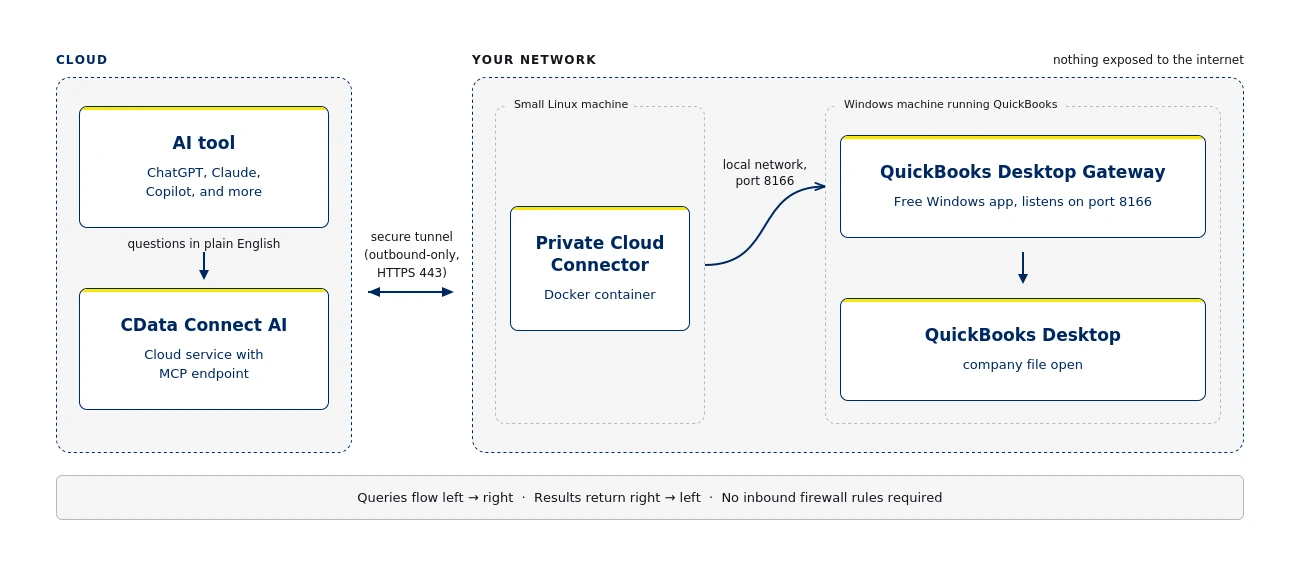
Four components work together in a chain. QuickBooks Desktop runs on your Windows machine or server with your company file open. The CData QuickBooks Desktop Gateway is a free Windows application installed on that same machine; it lets other software communicate with QuickBooks securely on port 8166 by default. The Private Cloud Connector runs as a Docker container on a Linux machine inside your network and creates a secure, outbound-only tunnel to Connect AI. Connect AI is the cloud service your AI tools connect to: it sends queries down the tunnel, through the QuickBooks Gateway, into QuickBooks, and returns the results.
The full path looks like this:
AI tool > Connect AI (cloud) > Private Cloud Connector (Docker, inside your network) > QuickBooks Gateway > QuickBooks Desktop
Prerequisites
Before you begin, ensure you have:
- A CData Connect AI account. A free trial works.
- The Windows machine where QuickBooks Desktop runs, with administrator access and your company file available.
- A Linux machine that can run Docker, on the same network as the QuickBooks machine. Modest specs work well: 2 CPUs, 2 to 4 GB of RAM, and 20 GB of disk. The gateway itself typically uses under 300 MB of memory.
- Outbound HTTPS access on port 443 from the Linux machine to these hostnames: *.cdata.com, *.azurecr.io, and *.servicebus.windows.net. No inbound internet access is required.
- A network path from the Linux machine to the QuickBooks machine on the Gateway port, 8166 by default, which usually means one Windows Firewall rule.
Note: Docker Desktop is the graphical tool for Windows and Mac developer machines, and it is not supported on Windows Server. Docker Engine is the standard server version that runs natively on Linux, and that is what this guide uses. If your QuickBooks machine runs Windows Server, run the Private Cloud Connector on a separate Linux machine rather than on the QuickBooks server itself.
Note: If your network inspects SSL/TLS traffic, ask your network team to add an inspection bypass for the three hostnames above. Without the bypass, the gateway will connect and disconnect repeatedly.
Part 1: Set up the QuickBooks Desktop Gateway
This section covers the Windows machine where QuickBooks Desktop runs.
Step 1: Download and install the free CData QuickBooks Desktop Gateway. It installs like any standard Windows program and places an icon in the system tray.
Step 2: Open QuickBooks Desktop and log in as an administrator with the target company file open.
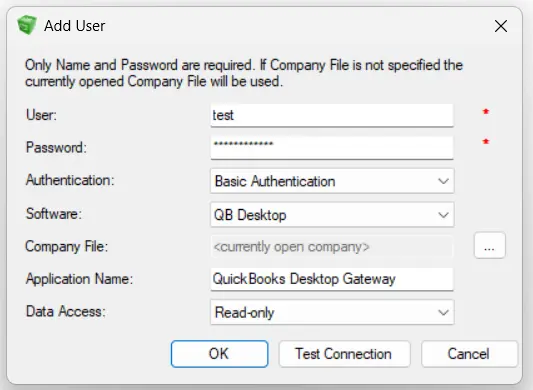
Step 3: Open the QuickBooks Gateway from the system tray. Go to the Users tab and click Add. Create a username and password. These are the credentials Connect AI will use later, so save them. If you want a read-only connection, set this user's Data Access to Read Only.
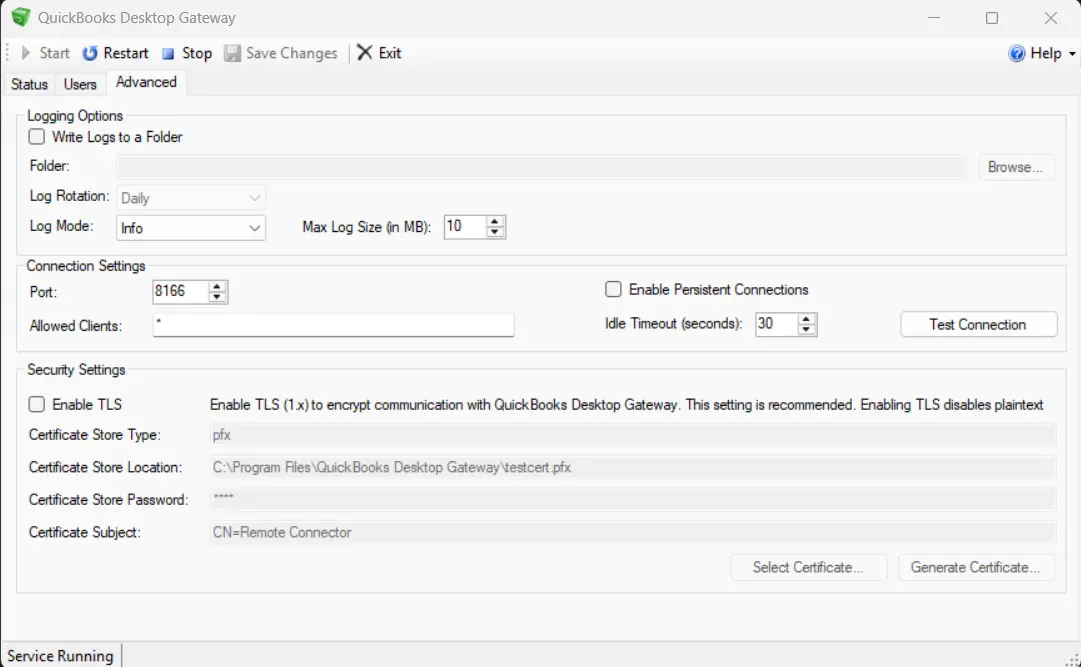
Step 4: Check the port. The Gateway listens on port 8166 by default. If another application on the machine uses that port, open the Gateway's Advanced tab, change the port to any free port such as 8167, and restart the Gateway. Note whichever port you use because you will need it later.
Step 5: Create a Windows Firewall rule on the QuickBooks machine to allow that port. Your IT team can scope the rule to allow only the Linux machine's IP address for additional security.
Step 6: The first time a connection comes in, QuickBooks shows an authorization dialog asking whether to allow the application. Approve it. To keep things running unattended afterward, go to Edit > Preferences > Integrated Applications > Company Preferences, select the Gateway entry, click Properties, and tick Allow this application to login automatically.
Part 2: Install Docker Engine on the Linux machine
The commands below are for Ubuntu. Enter them in the terminal one at a time.
Step 1: Refresh the list of available software:
sudo apt-get update
Step 2: Install two helper tools:
sudo apt-get install -y ca-certificates curl
Step 3: Create the folder for trusted software keys:
sudo install -m 0755 -d /etc/apt/keyrings
Step 4: Download Docker's official signing key:
sudo curl -fsSL https://download.docker.com/linux/ubuntu/gpg -o /etc/apt/keyrings/docker.asc
Step 5: Register Docker's official download source:
echo "deb [signed-by=/etc/apt/keyrings/docker.asc] https://download.docker.com/linux/ubuntu $(. /etc/os-release && echo $VERSION_CODENAME) stable" | sudo tee /etc/apt/sources.list.d/docker.list
Step 6: Refresh the software list and install Docker Engine:
sudo apt-get update
sudo apt-get install -y docker-ce docker-ce-cli containerd.io
Step 7: Verify Docker works:
sudo docker run hello-world
If you see "Hello from Docker!", the installation succeeded. If the service is not running, start it first with sudo systemctl start docker and run the command again.
Step 8: Verify the machine can reach Connect AI:
curl -v https://cloud.cdata.com/api
A successful certificate check and any HTTP response confirms the network path and encryption work. An HTTP 404 here is a pass - the endpoint is reachable and that specific path simply does not exist.
Step 9: Verify IP forwarding is on:
sudo sysctl net.ipv4.ip_forward
This should return net.ipv4.ip_forward = 1. If it returns 0, make it permanent with these two commands:
echo 'net.ipv4.ip_forward = 1' | sudo tee /etc/sysctl.d/99-ip-forward.conf
sudo sysctl --system
Part 3: Register the gateway in Connect AI
This section takes place in your browser at Connect AI.
Step 1: Log in to Connect AI, open Sources in the left menu, click + Add Connection, search for QuickBooks, and select it. If you have already created the connection, open it for editing.
Step 2: Open the Connect Gateway tab of the connection and click + Add Gateway.
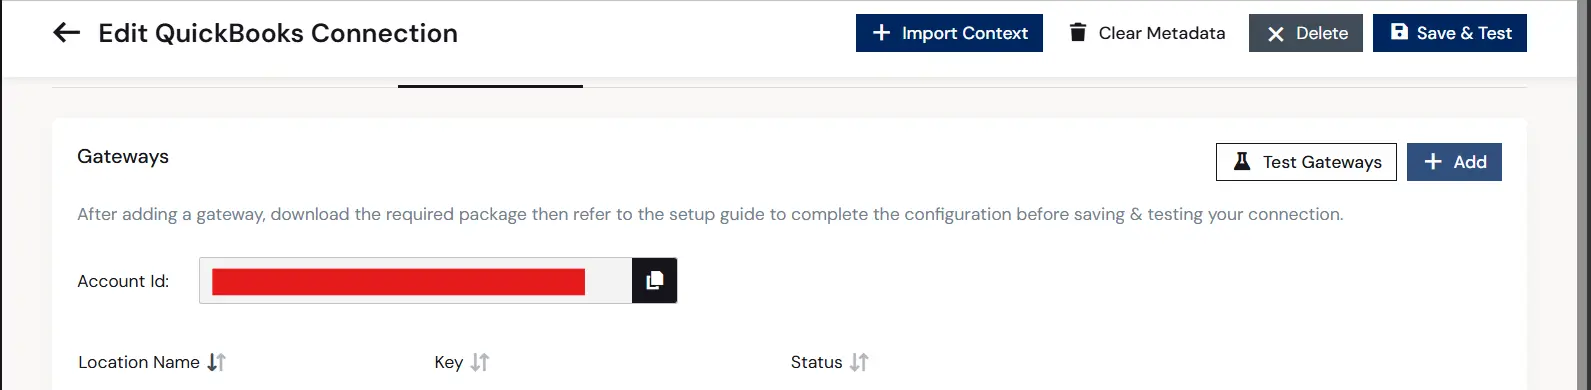
Step 3: Enter a Location Name that describes where the gateway runs, such as "Main Office" or "QuickBooks Server." Click Confirm.
Step 4: Your new location appears in the list with a Pending status along with three values to copy: Account Id, Location Id, and Key. Use the copy icons to capture each one and click the eye icon to reveal the Key. Treat the Key like a password.
Part 4: Start the Private Cloud Connector container
Back on the Linux machine, run the following command, replacing the three placeholders with the values you copied in Part 3. Copy all five lines together as a single command:
sudo docker run -d --restart unless-stopped --name onprem-gateway \
 -e GATEWAY_LOCATION_ID=<your location id> \
 -e GATEWAY_API_KEY=<your key> \
 -e ACCOUNT_ID=<your account id> \
 connectaipublic.azurecr.io/connectgateway:latest
The --restart unless-stopped flag makes the gateway start automatically after machine reboots, so patch-night restarts do not leave it down.
Watch the gateway start up:
sudo docker logs -f onprem-gateway
Press Ctrl+C to stop watching; the gateway keeps running in the background. Within about 10 seconds you should see these three lines, which confirm the secure tunnel is active:
Tunneling configuration retrieved successfully ...
Azure Relay listener connected successfully ...
Starting connection accept loop...
Back in the browser, the gateway's status changes from Pending to green Success.
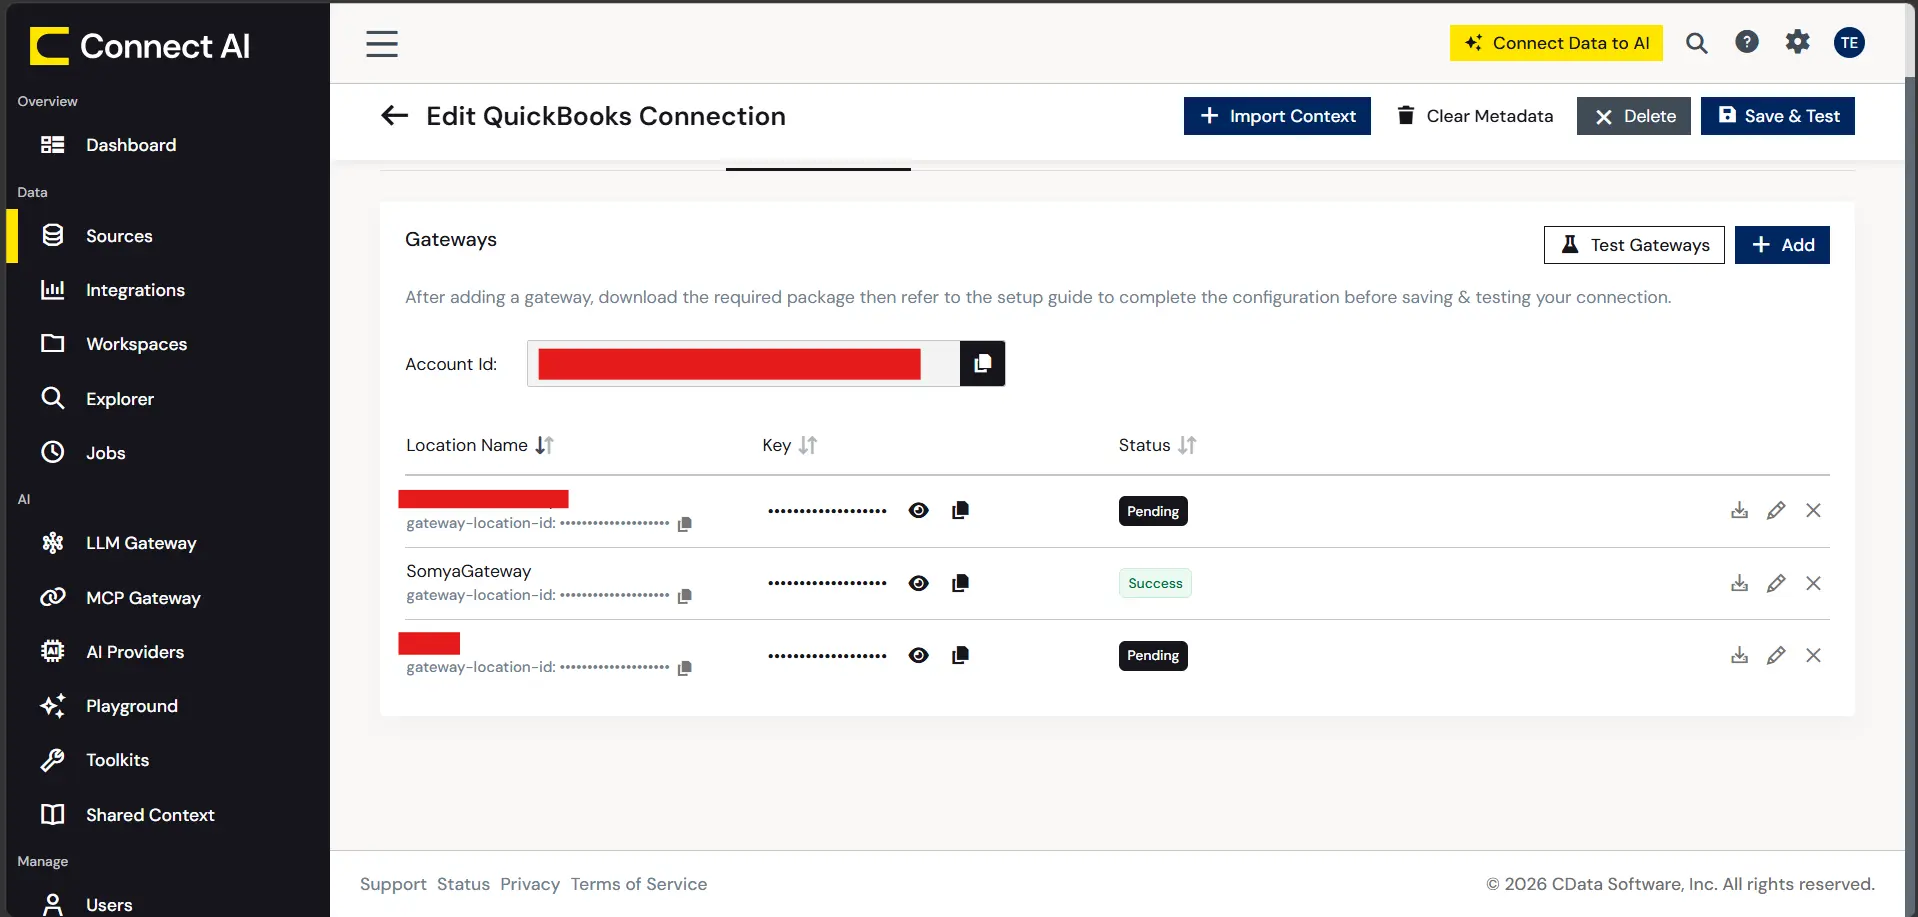
Click Test Gateways to confirm the round-trip passes.
Part 5: Complete and test the QuickBooks connection
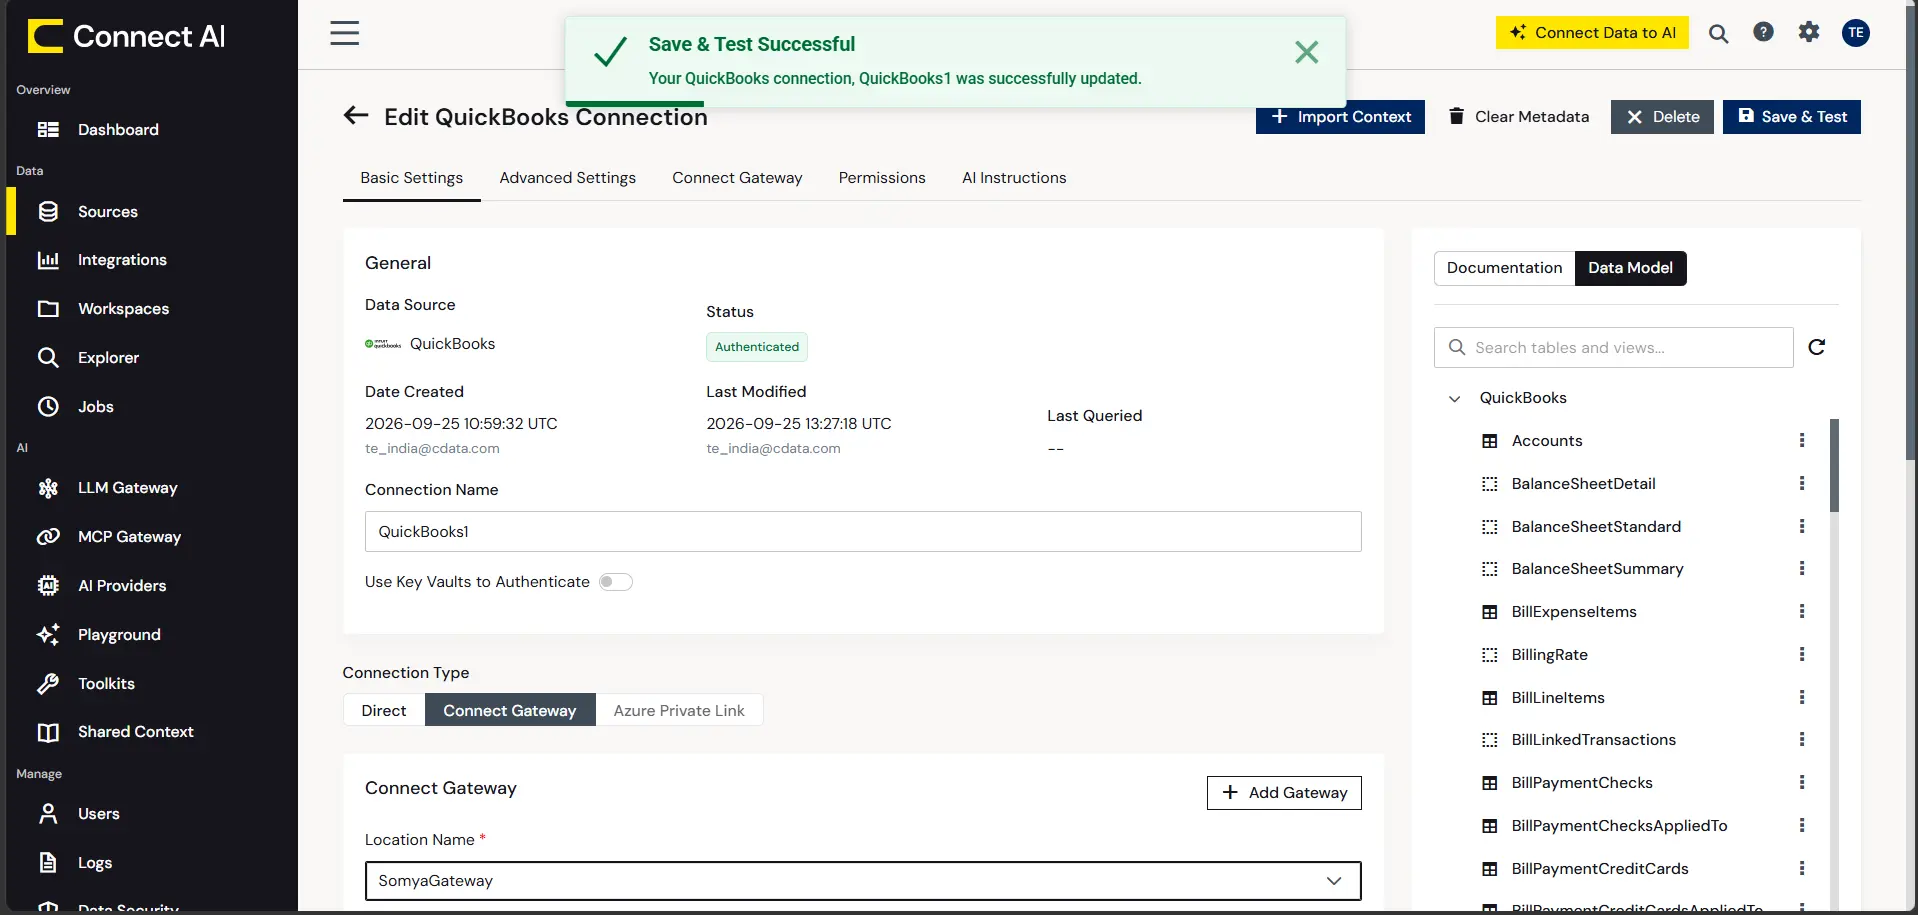
Step 1: On the connection's Basic Settings tab, set Connection Type to Connect Gateway.
Step 2: Select your Location Name from the dropdown.
Step 3: Fill in authentication. User and Password are the QuickBooks Gateway credentials you created in Part 1. URL is where the QuickBooks Gateway is reachable from the Linux machine, in the form http://machine:port, for example:
http://192.168.1.50:8166Use the QuickBooks machine's name or IP address rather than localhost. From inside a Docker container, localhost refers to the container itself, not the QuickBooks machine.
Step 4: Click Save and Test. On success, a green banner confirms the connection, the status changes to Authenticated, and the Data Model panel populates with your live QuickBooks tables including Accounts, Invoices, and Bills.
Step 5: For a read-only connection, open the Permissions tab and confirm only SELECT is granted. Removing INSERT, UPDATE, and DELETE permissions ensures nothing can change your books through this connection.
Step 6: Connect your AI tool. Your Connect AI account provides an MCP endpoint that works with any MCP-enabled tool, including ChatGPT, Claude, and Microsoft Copilot Studio. Follow the tool-specific guide in the Connect AI documentation to add it, then start asking questions about your QuickBooks data in plain English.
Troubleshooting common issues
The test fails and the container log shows "Connection timed out"
The tunnel is working but the container cannot reach the QuickBooks Desktop Gateway. Three things must agree: the port the QuickBooks Desktop Gateway listens on, the port in your connection URL, and the port allowed through Windows Firewall. From any Windows machine on the network, test the port with PowerShell:
Test-NetConnection <QuickBooks machine IP> -Port 8166
TcpTestSucceeded: True means the port is open and reachable. False means nothing is listening there or a firewall is blocking it.
Error: "fffffffc - Action impossible while not connected"
Connect AI could not reach the gateway because it is not currently connected. Check that the container is running with sudo docker ps, then read its log with sudo docker logs onprem-gateway for errors. Restart it if needed, wait for the "Starting connection accept loop" line, then test again.
Container log shows "SslHandshakeTimeoutException: handshake timed out"
Something on the network, usually an SSL inspection appliance, a proxy, or a VPN client, is intercepting the gateway's encrypted traffic. The fix is a TLS inspection bypass for *.cdata.com, *.azurecr.io, and *.servicebus.windows.net.
The gateway disconnects after reboots or patch cycles
Security hardening baselines commonly reset IP forwarding to 0, which silently breaks container connectivity. Apply the persistent setting from Part 2, Step 9, and ask your hardening team to add a documented exception for net.ipv4.ip_forward = 1 on this machine.
QuickBooks-specific errors after a successful connection test
Confirm that QuickBooks Desktop is running on the QuickBooks machine with the correct company file open, that the Gateway was authorized inside QuickBooks, and that a single dedicated Windows session is running QuickBooks. Multiple users logged into the same machine each running QuickBooks can confuse the integration layer, so a dedicated, always-on session works best.
Connect your AI tools to live QuickBooks data
Once the setup is complete, your AI tools can query QuickBooks data through a secure, governed connection without any direct exposure to the internet. Finance teams can ask questions in plain English, receive answers from live data, and maintain read-only controls that protect the integrity of their books.
CData Connect AI provides the connection layer that makes this possible. Start a free trial and connect your AI tools to QuickBooks Desktop today.