Link ApprovalMax with FileMaker Pro

This article shows how to use the CData JDBC Driver for ApprovalMax to integrate with the External SQL Sources (ESS) feature in FileMaker Pro, which allows you to link records in FileMaker Pro with related records in your other operational data stores.
You will use the MySQL Remoting feature to access ApprovalMax as a remote MySQL database. The CData JDBC Driver for ApprovalMax implements both the JDBC and MySQL standards to integrate with applications like FileMaker Pro that support connections to traditional databases like MySQL but not generic JDBC connections.
Selecting a FileMaker Pro Integration
Use the JDBC the JDBC driver to create an external SQL source (ESS). The remote data can be modified in FileMaker Pro and tables can be used in the relationships graph like standard FileMaker Pro tables.
Outlining the ESS Setup
The JDBC driver is part of a data access chain. Compared to a native ODBC integration, FileMaker Pro integrations that use MySQL remoting have several additional components. This article shows how to link each of the following components with FileMaker Pro:
- The CData JDBC driver.
- The CData MySQL Remoting daemon (included with the driver).
- An ODBC driver for MySQL.
On Windows, FileMaker Pro requires the official MySQL driver, the MySQL Connector\ODBC (currently, the best option is Connector\ODBC 8.0.11).
On macOS, FileMaker Pro requires the Actual Technologies Open Databases ODBC driver.
An ODBC driver manager.
On Windows, the driver manager is built in. On macOS, you will need to install a driver manager before installing the ODBC driver; install the iODBC driver manager.
Start the Remoting Daemon
Follow the steps below to enable the MySQL Remoting feature:
-
Open Terminal and change to the lib subfolder in the installation folder.
$ cd "/Applications/CData/CData JDBC Driver for ApprovalMax/lib" - Edit the configuration file (cdata.jdbc.api.remoting.ini by default):
- Update the [databases] section with the JDBC Connection URL for ApprovalMax:
api = "Profile=C:\profiles\ApprovalMax.apip;AuthScheme=OAuth;InitiateOAuth=GETANDREFRESH;OAuthClientId=your_client_id;OAuthClientSecret=your_client_secret;CallbackURL=your_callback_url;"Start by setting the Profile connection property to the location of the ApprovalMax Profile on disk (e.g. C:\profiles\ApprovalMax.apip). Next, set the ProfileSettings connection property to the connection string for ApprovalMax (see below).
ApprovalMax API Profile Settings
To authenticate to ApprovalMax and connect to your own data or to allow other users to connect to their data, the ApprovalMax Public API requires the OAuth 2.0 authorization code flow.
First, you will need to register an OAuth application with ApprovalMax. Sign in to the ApprovalMax Developer Portal (https://developer.approvalmax.com/applications) and create a new application. Your OAuth application will be assigned a Client ID and a Client Secret, and you must register at least one Redirect URI (Callback URL).
A Premium ApprovalMax subscription (or active trial) is required to use the Public API.
After setting the following connection properties, you are ready to connect:
- AuthScheme: Set this to OAuth.
- InitiateOAuth: Set this to GETANDREFRESH. You can use InitiateOAuth to manage the process to obtain the OAuthAccessToken.
- OAuthClientId: Set this to the Client ID that is shown in your application settings on the ApprovalMax Developer Portal.
- OAuthClientSecret: Set this to the Client Secret that is shown in your application settings on the ApprovalMax Developer Portal.
- CallbackURL: Set this to the Redirect URI that is registered in your application settings.
- Scope: (Optional) Override the default OAuth scopes. The default value openid offline_access https://www.approvalmax.com/scopes/public_api/read grants read-only access to all tables in this profile and enables refresh tokens. Use the principle of least privilege when narrowing this scope.
The OAuth Authorization URL is https://identity.approvalmax.com/connect/authorize and the Token URL is https://identity.approvalmax.com/connect/token. Both authorization_code and refresh_token grant types are supported.
See the help documentation for more information about the available connection properties and other configuration options for remoting.
- Update the [databases] section with the JDBC Connection URL for ApprovalMax:
Start the MySQL daemon by specifying the configuration file or settings on the command line. The example below uses the included sample configuration file.
$ java -jar cdata.jdbc.api.jar -f "cdata.jdbc.api.remoting.ini"
Create the DSN
After connecting successfully to ApprovalMax and starting the MySQL daemon, create a MySQL ODBC data source. When working with ODBC data sources, you specify connection properties in a DSN (data source name).
If you have not already obtained an ODBC driver and driver manager, refer to "Outlining the ESS Setup" to determine the components supported for your platform.
macOS
Follow the steps below to use the iODBC graphical administrator tool:
- Open iODBC by searching in the launchpad.
- On the System DSN tab, click Add and select Actual Open Source Databases.
- Provide the following information to complete the wizard:
- Name: Enter the DSN.
- Server: Enter 127.0.0.1 or the address of the machine where the MySQL daemon is running.
- Port: Enter the port that the daemon is listening on. For example, 3306.
- Database: Enter the name of a database specified in the config file for the daemon. For example, API.
- In the Metadata tab, check the boxes for:
- "Ignore schema in column specifications"
- "Don't use INFORMATION_SCHEMA for metadata"
- Click Test Connection and enter your credentials in the dialog.
Windows
You can use the built-in Microsoft ODBC Data Source Administrator to create the ODBC DSN.
- From the Control Panel, select Set Up Data Sources (ODBC). The ODBC Data Source Administrator is displayed.
- On the System DSN tab, click Add and select the MySQL ODBC driver.
- Provide the following information to complete the wizard:
- Name: Enter the DSN.
- Server: Enter 127.0.0.1 or the address of the machine where the MySQL daemon is running.
- Port: Enter the port that the daemon is listening on. For example, 3306.
- Database: Enter the name of a database specified in the config file for the daemon. For example, API.
- In the Metadata tab, check the boxes for:
- "Ignore schema in column specifications"
- "Don't use INFORMATION_SCHEMA for metadata"
- Click Test Connection and enter your credentials in the dialog.
Create ApprovalMax Shadow Tables
Shadow tables exist in an external SQL source but can be used in much the same way as other tables in your FileMaker database; you can add them in the relationships graph, browse data, and create layouts on them.
- Click File -> Manage -> Database.
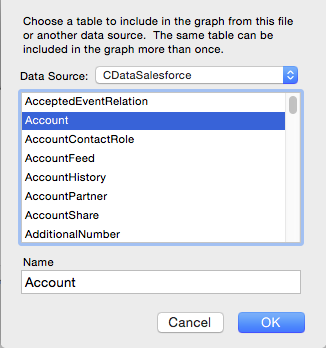
- On the Relationships tab of the resulting dialog, click the Add a Table button in the Table/Relationships section.
- In the Data Source menu, select Add ODBC Data Source and then select the DSN you created in the previous section.
After specifying the username and password for the DSN, you can add ApprovalMax tables to the relationships graph. You can now scroll through, sort, and summarize ApprovalMax data by clicking View -> Browse Mode, just as you would a remote MySQL database.