




Using the CData ODBC Driver for Clarifai in PyCharm

The CData ODBC Drivers can be used in any environment that supports loading an ODBC Driver. In this tutorial we will explore using the CData ODBC Driver for Clarifai from within PyCharm. Included are steps for adding the CData ODBC Driver as a data source, as well as basic PyCharm code to query the data source and display results.
To begin, this tutorial will assume that you have already installed the CData ODBC Driver for Clarifai as well as PyCharm.
Add Pyodbc to the Project
Follow the steps below to add the pyodbc module to your project.
- Click File -> Settings to open the project settings window.
- Click Project Interpreter from the Project: YourProjectName menu.
- To add pyodbc, click the + button and enter pyodbc.
- Click Install Package to install pyodbc.
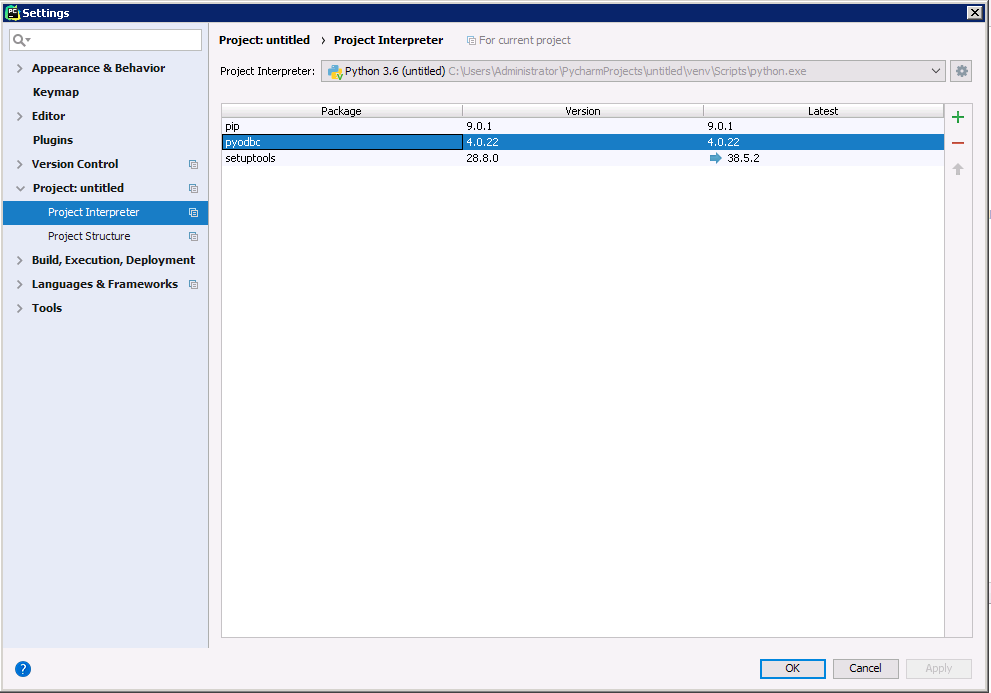
Connect to Clarifai
You can now connect with an ODBC connection string or a DSN. See the Getting Started section in the CData driver documentation for a guide to creating a DSN on your OS.
Start by setting the Profile connection property to the location of the Clarifai Profile on disk (e.g. C:\profiles\Clarifai.apip). Next, set the ProfileSettings connection property to the connection string for Clarifai (see below).
Clarifai API Profile Settings
Clarifai uses Personal Access Tokens (PATs) for authentication. To obtain a PAT:
- Log in to your Clarifai account at https://clarifai.com.
- Navigate to your profile settings and select Security.
- Click Create Personal Access Token.
- Select the required scopes and click Create Token.
- Copy the generated token (it will only be shown once).
After obtaining your Personal Access Token, set the following connection properties:
- AuthScheme: Set this to APIKey.
Set the following in the ProfileSettings connection property:
- APIKey: Set this to your Clarifai Personal Access Token (PAT).
Below is the syntax for a DSN:
[CData API Source]
Driver = CData ODBC Driver for Clarifai
Description = My Description
Profile = C:\profiles\Clarifai.apip
AuthScheme = APIKey
ProfileSettings = 'APIKey = your_personal_access_token'
Execute SQL to Clarifai
Instantiate a Cursor and use the execute method of the Cursor class to execute any SQL statement.
import pyodbc

cnxn = pyodbc.connect('DRIVER={CData ODBC Driver for API};Profile = C:\profiles\Clarifai.apip;AuthScheme = APIKey;ProfileSettings = 'APIKey = your_personal_access_token';')
cursor = cnxn.cursor()
cursor.execute("SELECT Id, Name FROM Apps WHERE UserId = 'my-user-id'")
rows = cursor.fetchall()
for row in rows:
  print(row.Id, row.Name)
After connecting to Clarifai in PyCharm using the CData ODBC Driver, you will be able to build Python apps with access to Clarifai data as if it were a standard database. If you have any questions, comments, or feedback regarding this tutorial, please contact us at [email protected].