




Integrate with Claude Compliance Data using Apache Camel2

Apache Camel is an open source integration framework that allows you to integrate various systems consuming or producing data. When paired with the CData JDBC Driver for Claude Compliance, you can write Java apps that use Camel routes that integrate with live Claude Compliance data. This article explains how to create an app in NetBeans that connects, queries, and routes Claude Compliance data to a JSON file.
With built-in optimized data processing, the CData JDBC Driver offers unmatched performance for interacting with live Claude Compliance data. When you issue complex SQL queries to Claude Compliance, the driver pushes supported SQL operations, like filters and aggregations, directly to Claude Compliance and utilizes the embedded SQL engine to process unsupported operations client-side (often SQL functions and JOIN operations). Its built-in dynamic metadata querying allows you to work with and analyze Claude Compliance data using native data types.
Creating A New Maven/Java Project
Follow the steps below to create a new Java project and add the appropriate dependencies:
- Open NetBeans and create a new project.
- Select Maven from the categories list and Java Application from the projects list, then click Next.
- Name the project (and adjust any other properties) and click Finish.
- In the source package, create a new Java class (we used App.java for this article) and add the main method to the class.
Adding Project Dependencies
With the project created, we can start adding the dependencies needed to work with live Claude Compliance data from our App. If you have not already done so, install Maven in your environment, as it is required to add the JAR file for the CData JDBC Driver to your project.
Installing the CData JDBC Driver for Claude Compliance with Maven
- Download the CData JDBC Driver for Claude Compliance installer, unzip the package, and run the JAR file to install the driver.
- Use Maven to install the JDBC Driver as a connector.
mvn install:install-file
	-Dfile="C:\Program Files\CData\CData JDBC Driver for Claude Compliance 2019\lib\cdata.jdbc.claudecompliance.jar"
	-DgroupId="org.cdata.connectors"
	-DartifactId="cdata-claudecompliance-connector"
	-Dversion="19"
	-Dpackaging=jar
Once the JDBC Driver is installed, we can add dependencies to our project. To add a dependency, you can either edit the pom.xml file or right-click the dependencies folder and click Add Dependency. The properties for each dependency follow, but you can search through the available libraries by typing the name of the dependency in the Query box in the Add Dependency wizard.
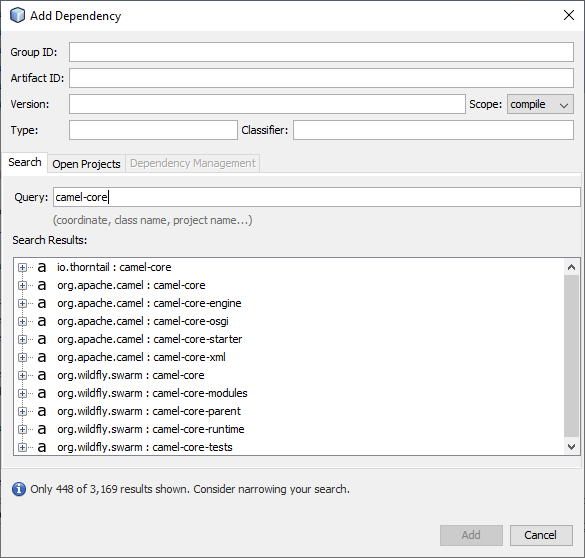
Required Dependencies
| Dependency | Group ID | Artifact ID | Version |
|---|---|---|---|
| camel-core | org.apache.camel | camel-core | 3.0.0 |
| camel-jackson | org.apache.camel | camel-jackson | 3.0.0 |
| camel-jdbc | org.apache.camel | camel-jdbc | 3.0.0 |
| camel-jsonpath | org.apache.camel | camel-jsonpath | 3.0.0 |
| cdata-claudecompliance-connector | org.cdata.connectors | cdata-salesforce-connector | 19 |
| commons-dbcp2 | org.apache.commons | commons-dbcp2 | 2.7.0 |
| slf4j-log4j12 | org.slf4j | slf4j-log4j12 | 1.7.30 |
| log4j | org.apache.logging.log4j | log4j | 2.12.1 |
Accessing Claude Compliance Data in Java Apps with Camel
After adding the required dependencies, we can use the Java DSL (Domain Specific Language) to create routes with access to live Claude Compliance data. Code snippets follow. Download the sample project (zip file) to follow along (make note of the TODO comments).
Start by importing the necessary classes into our main class.
import org.apache.camel.CamelContext;
import org.apache.camel.builder.RouteBuilder;
import org.apache.camel.impl.DefaultCamelContext;
import org.apache.camel.support.SimpleRegistry;
import org.apache.commons.dbcp2.BasicDataSource;
import org.apache.log4j.BasicConfigurator;
Then in the main method, we configure logging, create a new BasicDataSource and add it to the registry, create a new CamelContext, and finally add a route to the context. In this sample, we route Claude Compliance data to a JSON file.
Configure Logging
BasicConfigurator.configure();
Create a BasicDataSource
Create a BasicDataSource and set the driver class name (cdata.jdbc.salesforce.SalesforceDriver) and URL (using the required connection properties).
The driver connects to Claude Compliance using a Compliance Access Key, the only supported authentication method. Set the following connection property:
- APIKey: The Compliance Access Key you created.
Creating a Compliance Access Key
- Enable the Compliance API for your organization.
- Sign in to claude.ai as a primary owner or organization owner and open Organization settings > API > Keys.
- Select Create Key and assign only the scopes your integration needs:
- read:compliance_activities for Activities and the typed activity views.
- read:compliance_org_data for organizations, roles, groups, and settings.
- read:compliance_user_data for users, chats, files, projects, and downloads.
- delete:compliance_user_data for the explicit Delete stored procedures.
- Create the key and copy it when it appears. The key starts with sk-ant-api01- and is shown only once.
Optionally, set OrganizationUUID to limit organization-scoped views (such as OrganizationUsers and ComplianceRoles) to a single linked organization. If it is left empty, those views default to the first available organization and do not include data from all linked organizations.
BasicDataSource basic = new BasicDataSource();
basic.setDriverClassName("cdata.jdbc.claudecompliance.ClaudeComplianceDriver");
basic.setUrl("jdbc:claudecompliance:APIKey=your_compliance_access_key;");
The CData JDBC Driver includes a built-in connection string designer to help you configure the connection URL.
Built-in Connection String Designer
For assistance in constructing the JDBC URL, use the connection string designer built into the Claude Compliance JDBC Driver. Either double-click the JAR file or execute the jar file from the command line.
java -jar cdata.jdbc.claudecompliance.jar
Fill in the connection properties and copy the connection string to the clipboard.

Add the BasicDataSource to the Registry and Create a CamelContext
SimpleRegistry reg = new SimpleRegistry();
reg.bind("myDataSource", basic);

CamelContext context = new DefaultCamelContext(reg);
Add Routing to the CamelContext
The routing below uses a timer component to run one time and passes a SQL query to the JDBC Driver. The results are marshaled as JSON (and formatted for pretty print) and passed to a file component to write to disk as a JSON file.
context.addRoutes(new RouteBuilder() {
	@Override
	public void configure() {
		from("timer://foo?repeatCount=1")
			.setBody(constant("SELECT * FROM Account LIMIT 10"))
			.to("jdbc:myDataSource")
			.marshal().json(true)
			.to("file:C:\\Users\\USER\\Documents?fileName=account.json");
	}
});
Managing the CamelContext Lifecycle
With the route defined, start the CamelContext to begin the lifecycle. In this example, we wait 10 seconds and then shut down the context.
context.start();
Thread.sleep(10000);
context.stop();
Free Trial, Sample Project & Technical Support
Now, you have a working Java application that uses Camel to route data from Claude Compliance to a JSON file. Download a free, 30-day trial of the CData JDBC Driver for Claude Compliance and the sample project (make note of the TODO comments) and start working with your live Claude Compliance data in Apache Camel. Reach out to our Support Team if you have any questions.
Ready to get started?
Download a free trial of the Claude Compliance Driver to get started:
Download NowLearn more:
 Claude Compliance JDBC Driver
Rapidly create and deploy powerful Java applications that integrate with Claude Compliance data including Activities, Chats, ChatMessages, CodeArtifacts, ComplianceRoles, Organizations, OrganizationUsers, Projects, and more!