




Using the CData ODBC Driver for JD Edwards in PyCharm

The CData ODBC Drivers can be used in any environment that supports loading an ODBC Driver. In this tutorial we will explore using the CData ODBC Driver for JD Edwards from within PyCharm. Included are steps for adding the CData ODBC Driver as a data source, as well as basic PyCharm code to query the data source and display results.
To begin, this tutorial will assume that you have already installed the CData ODBC Driver for JD Edwards as well as PyCharm.
Add Pyodbc to the Project
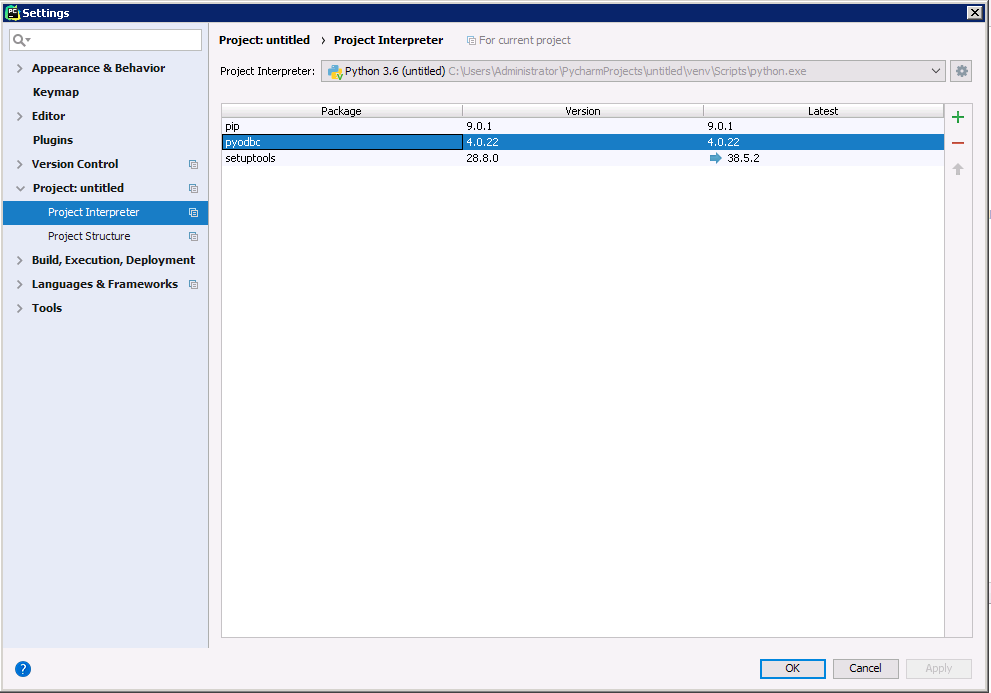
Follow the steps below to add the pyodbc module to your project.
- Click File -> Settings to open the project settings window.
- Click Project Interpreter from the Project: YourProjectName menu.
- To add pyodbc, click the + button and enter pyodbc.
- Click Install Package to install pyodbc.
Connect to JD Edwards
You can now connect with an ODBC connection string or a DSN. See the Getting Started section in the CData driver documentation for a guide to creating a DSN on your OS.
The driver connects to JD Edwards through your Application Interface Services (AIS) Server. Set the following connection properties:
- URL: The base HTTPS URL of your AIS Server (e.g., https://jde-ais.example.com:8300).
- User: Your JD Edwards username.
- Password: Your JD Edwards password.
- Environment (optional): The JD Edwards environment to use (e.g., PD920 for production or DV920 for development). If not specified, the AIS Server's default environment is used.
- Role (optional): The JD Edwards role for the session. If not specified, the AIS Server's default role is used.
- DeviceName (optional): An identifier for the connecting device or application, used for auditing and logging on the AIS Server.
- Jasserver (optional): The specific Java Application Server (JAS) instance to route requests through, useful in clustered environments.
Choosing Which Data Is Exposed
JD Edwards organizes tables and business views by System Code, and the driver exposes each System Code as its own schema. Use these properties to control which schemas are available:
- DataModel: One or more ERP modules (comma-separated) whose System Codes are exposed as schemas, or All to expose every System Code in the connected instance. Defaults to FinancialManagement.
- SystemCodes: A comma-separated list of additional System Codes to expose alongside those from DataModel (e.g., 42,43).
When you connect, the driver sends your credentials to the AIS Server to obtain a session token and caches it. The driver requests a new token automatically before the session expires.
Below is the syntax for a DSN:
[CData JDEdwards Source]
Driver = CData ODBC Driver for JD Edwards
Description = My Description
URL = https://your-jde-environment-app.example.com
User = admin
Password = myPassword
Execute SQL to JD Edwards
Instantiate a Cursor and use the execute method of the Cursor class to execute any SQL statement.
import pyodbc

cnxn = pyodbc.connect('DRIVER={CData ODBC Driver for JDEdwards};URL = https://your-jde-environment-app.example.com;User = admin;Password = myPassword;')
cursor = cnxn.cursor()
cursor.execute("SELECT DocumentNumber, Amount FROM AccountsPayable.AccountLedger WHERE BusinessUnit = '100'")
rows = cursor.fetchall()
for row in rows:
  print(row.DocumentNumber, row.Amount)
After connecting to JD Edwards in PyCharm using the CData ODBC Driver, you will be able to build Python apps with access to JD Edwards data as if it were a standard database. If you have any questions, comments, or feedback regarding this tutorial, please contact us at [email protected].
Ready to get started?
Download a free trial of the JD Edwards ODBC Driver to get started:
Download NowLearn more:
 JD Edwards ODBC Driver
The JD Edwards ODBC Driver is a powerful tool that allows you to connect with live data from JD Edwards, directly from any applications that support ODBC connectivity.
Access JD Edwards data like you would a database - read JD Edwards AccountLedger, ProposalofPayment, ContractRevenueSummary, EmployeeEnrollment, RentIncreaseAmounts, etc. through a standard ODBC Driver interface.