




Create JD Edwards Dataflows on PowerBI.com

The CData Power BI Connector for JD Edwards seamlessly integrates with the tools and wizards in Power BI, including the real-time data workflows on PowerBI.com. Follow the steps below to pull data directly into DataFlows on PowerBI.com and use the Power BI Gateway to configure automatic refresh.
Create a DSN
Installing the Power BI Connector creates a DSN (data source name) called CData Power BI JD Edwards. This the name of the DSN that Power BI uses to request a connection to the data source. Configure the DSN by filling in the required connection properties.
You can use the Microsoft ODBC Data Source Administrator to create a new DSN or configure (and rename) an existing DSN: From the Start menu, enter "ODBC Data Sources." Ensure that you run the version of the ODBC Administrator that corresponds to the bitness of your Power BI Desktop installation (32-bit or 64-bit).
The driver connects to JD Edwards through your Application Interface Services (AIS) Server. Set the following connection properties:
- URL: The base HTTPS URL of your AIS Server (e.g., https://jde-ais.example.com:8300).
- User: Your JD Edwards username.
- Password: Your JD Edwards password.
- Environment (optional): The JD Edwards environment to use (e.g., PD920 for production or DV920 for development). If not specified, the AIS Server's default environment is used.
- Role (optional): The JD Edwards role for the session. If not specified, the AIS Server's default role is used.
- DeviceName (optional): An identifier for the connecting device or application, used for auditing and logging on the AIS Server.
- Jasserver (optional): The specific Java Application Server (JAS) instance to route requests through, useful in clustered environments.
Choosing Which Data Is Exposed
JD Edwards organizes tables and business views by System Code, and the driver exposes each System Code as its own schema. Use these properties to control which schemas are available:
- DataModel: One or more ERP modules (comma-separated) whose System Codes are exposed as schemas, or All to expose every System Code in the connected instance. Defaults to FinancialManagement.
- SystemCodes: A comma-separated list of additional System Codes to expose alongside those from DataModel (e.g., 42,43).
When you connect, the driver sends your credentials to the AIS Server to obtain a session token and caches it. The driver requests a new token automatically before the session expires.
Pulling JD Edwards Data Directly Into Your Dataflow
With the data source configured, follow the steps below to load data from JD Edwards tables into your DataFlow.
Set Up the Power BI Gateway
Follow the steps below to configure the gateway on your machine:
- Run the CData Power BI Connector installer. If you have not already done so, download the Power BI Gateway.
- Select the on-premises data gateway (recommended) option.
- Sign into the gateway.
- Name the gateway and specify a recovery key.
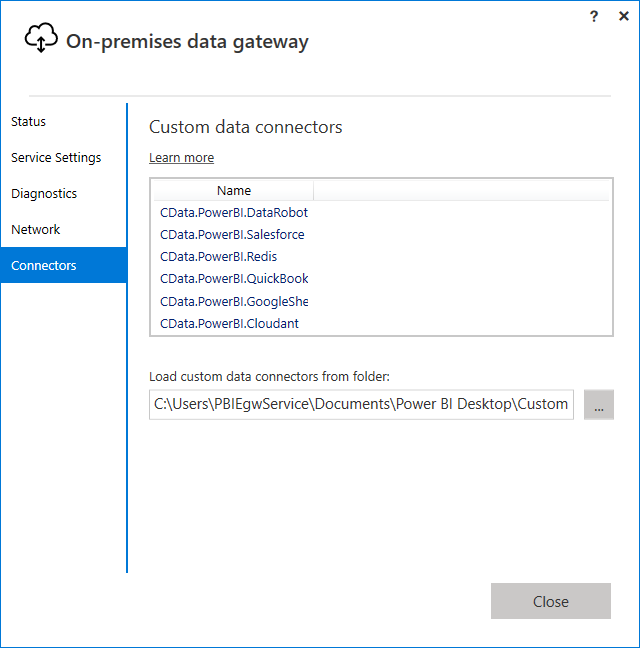
In the Connectors step, choose a folder where the gateway will look for the CData Power BI Connector. This article uses C:\Users\PBIEgwService\Documents\Power BI Desktop\Custom Connectors\. Copy the .pqx files for the CData Connector (found in C:\Users\USERNAME\Documents\Power BI Desktop\Custom Connectors\) to the folder you configured.
NOTE: The account configured for the service (NT SERVICE\PBIEgwService) needs to be able to access the folder chosen for the gateway. If needed, you can change the service account in the Service Settings section of the gateway installer.
- Confirm that the entry CData.PowerBI.JDEdwards is displayed in the list in the Connectors section.
Set up Power BI Online for a Dataflow
- In Power BI Online, create a new workspace, which is also known as an app, if you do not already have one. Note that this is only available with Power BI Pro or higher.
- Set up your On-Premises Gateway. The steps for this are in the Configuring the Gateway section of this article.
-
Go back to Power BI Online. In settings, go to 'Manage Gateways', and add a new data source to your Gateway
- Enter the Data Source Name, the name that the data source will be referred to within Power BI Online
- Select the Data Source Type, (e.g. CData Power BI Connector for JD Edwards) and set the Data Source Name (e.g. CData Power BI JD Edwards)
- Set Authentication Method to "Anonymous"
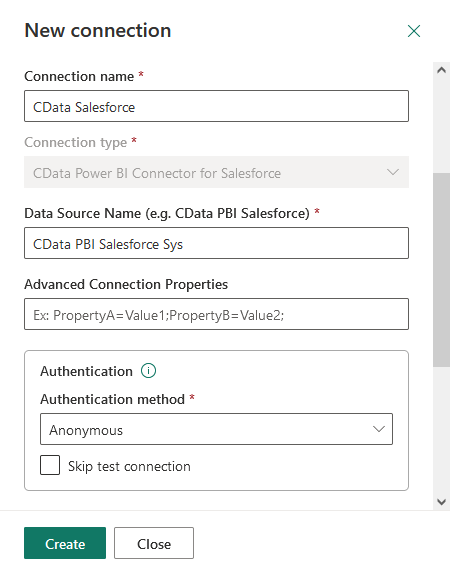
- Set Privacy Level as needed
-
Click Add to finish the configuration (do not skip the test connection as it is important to know if a successful connection was made).
If you would like to manage the users that have access to this data source, you can go to the Users tab.
Set up your Dataflow and pull the JD Edwards data
- In the new workspace, go to Create > Dataflow > Add New Entities.
-
Choose the ODBC data source and enter the correct connection properties.
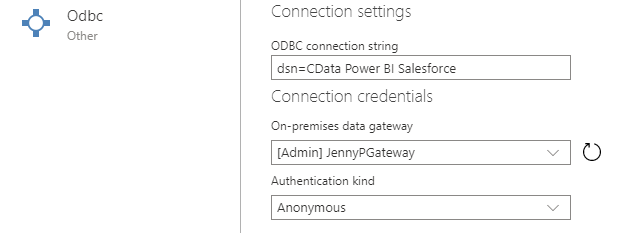 Enter your DSN name in the ODBC connection string section, dsn=CData Power BI JDEdwards. Choose your gateway and set the authentication type to Anonymous.
-
Choose the table(s) you want to work with and click Transform data.
If you want to make any changes to the query, you can right click on the query and click on Advanced Editor.
Configure Data Refresh on PowerBI.com
Refresh your dataflow to have the most up to date data.
- To refresh manually, open the dataflow options menu from your workspace -> Dataflows and click Refresh Now.
- To schedule refreshes, open the dataflow options menu from your workspace -> Dataflows and click Schedule Refresh. Enable the option to keep your data up to date. Specify the refresh frequency in the menus.

At this point, you will have a Dataflow built on top of live JD Edwards data. Learn more about the CData Power BI Connectors for JD Edwards and download a free trial from the CData Power BI Connector for JD Edwards page. Let our Support Team know if you have any questions.
Ready to get started?
Download a free trial of the JD Edwards Power BI Connector to get started:
Download NowLearn more:
 JD Edwards Power BI Connector
The fastest and easiest way to connect Power BI to JD Edwards data. Includes comprehensive high-performance data access, real-time integration, extensive metadata discovery, and robust SQL-92 support.