


Access Live Outlook Data in AWS Lambda (with IntelliJ IDEA)

AWS Lambda is a compute service that lets you build applications that respond quickly to new information and events. AWS Lambda functions can work with live Outlook data when paired with the CData API Driver for JDBC. This article describes how to connect to and query Outlook data from an AWS Lambda function built with Maven in IntelliJ.
With built-in optimized data processing, the CData JDBC Driver offers unmatched performance for interacting with live Outlook data. When you issue complex SQL queries to Outlook, the driver pushes supported SQL operations, like filters and aggregations, directly to Outlook and utilizes the embedded SQL engine to process unsupported operations client-side (often SQL functions and JOIN operations). In addition, its built-in dynamic metadata querying allows you to work with and analyze Outlook data using native data types.
Step 1: Gather connection properties and build a connection string
Download the CData API Driver for JDBC installer, unzip the package, and run the JAR file to install the driver. Then gather the required connection properties.
Using OAuth Authentication
Microsoft Graph API uses OAuth 2.0 for authentication. You must register an application in the Microsoft Azure Portal to obtain OAuth credentials (Client ID and Client Secret).
Obtaining OAuth Credentials
- Log in to the Azure Portal.
- Navigate to Azure Active Directory > App registrations.
- Click New registration to create a new application.
- Enter an application name and select the appropriate account types.
- Set the Redirect URI to your application's callback URL (e.g., http://localhost:33333 for desktop apps).
- Click Register to create the application.
- On the application overview page, copy the Application (client) ID - this is your OAuthClientId.
- Navigate to Certificates & secrets and create a new client secret.
- Copy the client secret value - this is your OAuthClientSecret.
- Navigate to API permissions and add the required Microsoft Graph API permissions:
- Mail.Read - For accessing email messages
- Contacts.Read - For accessing contacts
- Calendars.Read - For accessing calendar events
- Tasks.Read - For accessing To Do tasks
- offline_access - For obtaining refresh tokens
- Click Grant admin consent to grant these permissions.
Connecting with OAuth
After setting the following connection properties, you are ready to connect:
- AuthScheme: Set this to OAuth.
- InitiateOAuth: Set this to GETANDREFRESH. The CData API Profile for Outlook will automatically walk through the OAuth process in order to obtain the access token.
- OAuthClientId: Set this to the Application (client) ID from Azure Portal.
- OAuthClientSecret: Set this to the client secret value from Azure Portal.
- TenantId: Set this to your Azure AD tenant identifier (GUID or domain name like 'contoso.onmicrosoft.com').
- CallbackURL: Set this to the Redirect URI you specified in your app registration (e.g., http://localhost:33333 for desktop apps).
Example connection string
Profile=C:\profiles\Outlook.apip;AuthScheme=OAuth;InitiateOAuth=GETANDREFRESH;OAuthClientId=your_client_id;OAuthClientSecret=your_client_secret;TenantId=your_tenant_id;CallbackUrl=http://localhost:33333;
NOTE: To use the JDBC driver in an AWS Lambda function, you will need a license (full or trial) and a Runtime Key (RTK). For more information on obtaining this license (or a trial), contact our sales team.
Built-in Connection String Designer
For assistance constructing the JDBC URL, use the connection string designer built into the Outlook JDBC Driver. Double-click the JAR file or execute the jar file from the command line.
java -jar cdata.jdbc.api.jar
")
Fill in the connection properties (including the RTK) and copy the connection string to the clipboard.
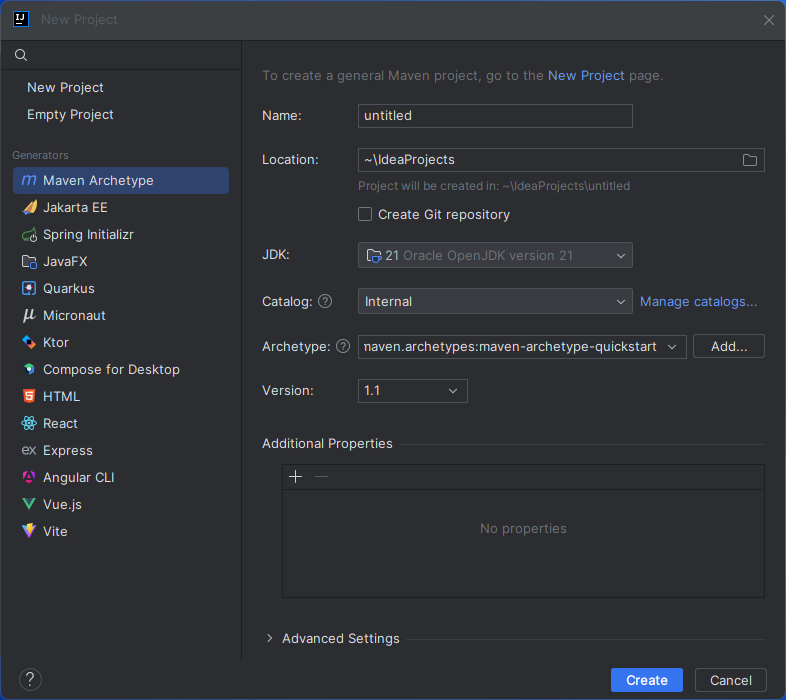
Step 2: Create a project in IntelliJ
- In IntelliJ IDEA, click New Project.
- Select "Maven Archetype" from the Generators
- Name the project and select "maven.archetypes:maven-archetype-quickstart" Archetype.
- Click "Create"
Install the CData API Driver for JDBC JAR File
Use the following Maven command from the project's root folder to install JAR file in the project.
mvn install:install-file -Dfile="PATH/TO/CData API Driver for JDBC 20XX/lib/cdata.jdbc.api.jar" -DgroupId="org.cdata.connectors" -DartifactId="cdata-api-connector" -Dversion="23" -Dpackaging=jar
Add Dependencies
Within the Maven project's pom.xml file, add AWS and the CData API Driver for JDBC] as dependencies (within the <dependencies> element) using the following XML.
- AWS
<dependency>
   <groupId>com.amazonaws</groupId>
   <artifactId>aws-lambda-java-core</artifactId>
   <version>1.2.2</version> <!--Replace with the actual version-->
</dependency>
- CData API Driver for JDBC
<dependency>
   <groupId>org.cdata.connectors</groupId>
   <artifactId>cdata-api-connector</artifactId>
   <version>25</version> <!--Replace with the actual version-->
</dependency>
- Maven Shade Plugin to create a fat JAR
<build>
  <plugins>
    <plugin>
      <groupId>org.apache.maven.plugins</groupId>
      <artifactId>maven-shade-plugin</artifactId>
      <version>3.4.1</version>
      <executions>
        <execution>
          <phase>package</phase>
          <goals>
            <goal>shade</goal>
          </goals>
          <configuration>
            <createDependencyReducedPom>false</createDependencyReducedPom>
            <transformers>
              <transformer implementation="org.apache.maven.plugins.shade.resource.ManifestResourceTransformer">
                <mainClass>com.example.CDataLambda</mainClass>
                  <!-- Change to your actual Lambda handler class -->
              </transformer>
            </transformers>
          </configuration>
        </execution>
      </executions>
    </plugin>
  </plugins>
</build>
Create an AWS Lambda Function
For this sample project, we create two source files: CDataLambda.java and CDataLambdaTest.java.
Lambda Function Definition
- Update CDataLambda to implement the RequestHandler interface from the AWS Lambda SDK. You will need to add the handleRequest method, which performs the following tasks when the Lambda function is triggered:
- Constructs a SQL query using the input
- Sets up AWS credentials and S3 configuration to store OAuth credentials.
- Registers the CData API Driver for JDBC
- Establishes a connection to Outlook using JDBC
- Executes the SQL query on Outlook
- Prints the results to the console
- Returns an output message
-
Use the complete Lambda class below, which includes the imports, class definition, and handleRequest method. Be sure to fill in your connection string values in the DriverManager.getConnection call.
package com.example;

import com.amazonaws.services.lambda.runtime.Context;
import com.amazonaws.services.lambda.runtime.RequestHandler;

import java.sql.Connection;
import java.sql.DriverManager;
import java.sql.ResultSet;
import java.sql.ResultSetMetaData;
import java.sql.SQLException;
import java.sql.Statement;
public class CDataLambda implements RequestHandler < Object, String > {

  @Override
  public String handleRequest(Object input, Context context) {
    String query = "SELECT * FROM " + input;

    String bucketName = "MY_AWS_BUCKET";
    String oauthSettings = "s3://" + bucketName + "/oauth/OAuthSettings.txt";
    String oauthConnection =
      "InitiateOAuth=REFRESH;" +
      "OAuthSettingsLocation=" + oauthSettings + ";";
    try {
      Class.forName("cdata.jdbc.api.APIDriver");
      cdata.jdbc.api.APIDriver driver = new cdata.jdbc.api.APIDriver();
      DriverManager.registerDriver(driver);
    } catch (SQLException ex) {
      // Registering the driver failed
      throw new RuntimeException("Failed to register JDBC driver", ex);
    } catch (ClassNotFoundException e) {
      // The driver class was not found in the classpath
      throw new RuntimeException("JDBC Driver class not found", e);

    }
    Connection connection = null;
    try {
      connection = DriverManager.getConnection("jdbc:cdata:api:RTK=52465...;Profile=C:\profiles\Outlook.apip;AuthScheme=OAuth;InitiateOAuth=GETANDREFRESH;OAuthClientId=your_client_id;OAuthClientSecret=your_client_secret;TenantId=your_tenant_id;CallbackUrl=http://localhost:33333;" + oauthConnection + "");
    } catch (SQLException ex) {
      context.getLogger().log("Error getting connection: " + ex.getMessage());
    } catch (Exception ex) {
      context.getLogger().log("Error: " + ex.getMessage());
    }

    if (connection != null) {
      context.getLogger().log("Connected Successfully!
");
    }

    ResultSet resultSet = null;
    try {
      //executing query
      Statement stmt = connection.createStatement();
      resultSet = stmt.executeQuery(query);

      ResultSetMetaData metaData = resultSet.getMetaData();
      int numCols = metaData.getColumnCount();

      //printing the results
      while (resultSet.next()) {
        for (int i = 1; i <= numCols; i++) {
          System.out.printf("%-25s", (resultSet.getObject(i) != null) ? resultSet.getObject(i).toString().replaceAll("
", "") : null);
        }
        System.out.print("
");
      }
    } catch (SQLException ex) {
      System.out.println("SQL Exception: " + ex.getMessage());
    } catch (Exception ex) {
      System.out.println("General exception: " + ex.getMessage());
    }
    return "v24 query: " + query + " complete";
  }
}
Step 3: Deploy and run the lambda function
Once you build the function in Intellij, you are ready to deploy the entire Maven project as a single JAR file.
- In IntelliJ, use the mvn install command to build the SNAPSHOT JAR file.
Note: The Maven Shade Plugin generates two JARs in the target folder. Always upload the larger -shaded.jar file to AWS Lambda, as it contains all required dependencies.
- Create a new function in AWS Lambda (or open an existing one).
- Name the function, select an IAM role, and set the timeout value to a high enough value to ensure the function completes (depending on the result size of your query).
- Click "Upload from" -> ".zip file" and select your SNAPSHOT JAR file.

- In the "Runtime settings" section, click "Edit" and set Handler to your "handleRequest" method (e.g. package.class::handleRequest)

- You can now test the function. Set the "Event JSON" field to a table name and click, click "Test"

Free Trial & More Information
Download a free 30-day trial of the CData API Driver for JDBC and start working with your live Outlook data in AWS Lambda. Reach out to our Support Team if you have any questions.