


Using the CData ODBC Driver for RabbitMQ in PyCharm

The CData ODBC Drivers can be used in any environment that supports loading an ODBC Driver. In this tutorial we will explore using the CData ODBC Driver for RabbitMQ from within PyCharm. Included are steps for adding the CData ODBC Driver as a data source, as well as basic PyCharm code to query the data source and display results.
To begin, this tutorial will assume that you have already installed the CData ODBC Driver for RabbitMQ as well as PyCharm.
Add Pyodbc to the Project
Follow the steps below to add the pyodbc module to your project.
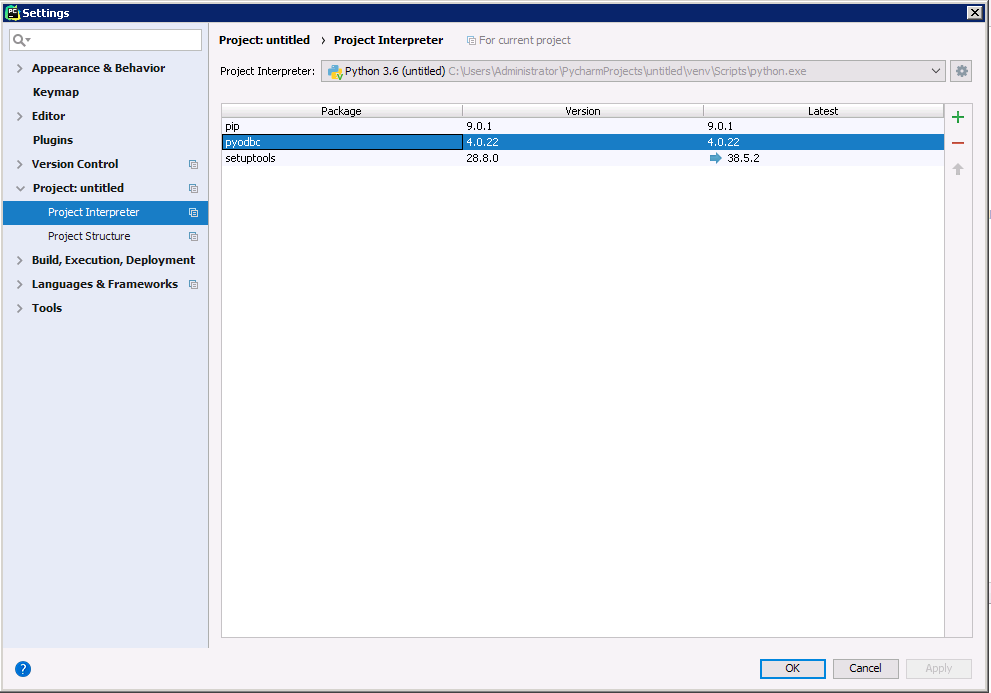
- Click File -> Settings to open the project settings window.
- Click Project Interpreter from the Project: YourProjectName menu.
- To add pyodbc, click the + button and enter pyodbc.
- Click Install Package to install pyodbc.
Connect to RabbitMQ
You can now connect with an ODBC connection string or a DSN. See the Getting Started section in the CData driver documentation for a guide to creating a DSN on your OS.
About RabbitMQ Management HTTP API
RabbitMQ is an open-source message broker that supports multiple messaging protocols. The RabbitMQ Management HTTP API provides HTTP-based access to management and monitoring data for a RabbitMQ server. The API exposes information about virtual hosts, exchanges, queues, bindings, connections, channels, consumers, users, permissions, policies, and cluster-wide statistics.
The Management plugin must be enabled on the RabbitMQ server for the HTTP API to be available. By default, the management interface listens on port 15672.
Using Basic Authentication
RabbitMQ Management HTTP API uses HTTP Basic authentication. You must supply the username and password of a RabbitMQ management user.
To enable access to the management API:
- Ensure the RabbitMQ Management plugin is enabled on your server (rabbitmq-plugins enable rabbitmq_management).
- Use an existing management user or create one with the appropriate management tag (management, policymaker, monitoring, or administrator).
- Note the full base URL of your RabbitMQ Management HTTP API (e.g., http://localhost:15672).
After configuring your RabbitMQ server, set the following connection properties to connect:
- AuthScheme: Set this to Basic.
- URL: Set this to the base URL of your RabbitMQ Management HTTP API (e.g., http://localhost:15672).
- User: Set this to your RabbitMQ management username (e.g., guest).
- Password: Set this to your RabbitMQ management password.
Example connection string:
Profile=C:\profiles\RabbitMQ.apip;AuthScheme=Basic;URL=http://localhost:15672;User=guest;Password=guest;
Available Tables
The RabbitMQ profile provides access to the following tables:
- Overview - Cluster-wide statistics and information about the RabbitMQ node
- Nodes - Information about individual nodes in the RabbitMQ cluster
- NodeMemory - Detailed memory usage breakdown for a specific cluster node
- Connections - List of all open AMQP connections to the broker
- Channels - List of all open AMQP channels across all connections
- Consumers - List of all consumers registered across all queues
- Exchanges - List of exchanges declared across all virtual hosts
- Queues - List of queues declared across all virtual hosts
- Bindings - List of all bindings between exchanges and queues
- VirtualHosts - List of virtual hosts configured on the broker
- VhostPermissions - User permissions within a specific virtual host
- Users - List of all RabbitMQ users
- Permissions - Permission records for all users across all virtual hosts
- TopicPermissions - Topic-level permission records for all users
- Policies - List of policies applied to queues and exchanges in virtual hosts
- OperatorPolicies - List of operator policies applied to queues in virtual hosts
- Parameters - List of component parameters (e.g., federation, shovel) per virtual host
- GlobalParameters - List of global parameters that apply across all virtual hosts
- VhostLimits - Resource limits configured for specific virtual hosts
- UserLimits - Resource limits configured for specific users
- FeatureFlags - List of feature flags and their enabled/disabled state on the node
- DeprecatedFeatures - List of deprecated features and their usage state
- AuthAttempts - Authentication attempt statistics for the node
- ClusterName - The name of the RabbitMQ cluster
- WhoAmI - Information about the currently authenticated management user
- ExchangeBindingsSource - Bindings for which a specific exchange is the source
- ExchangeBindingsDestination - Bindings for which a specific exchange is the destination
- QueueBindings - Bindings for a specific queue within a virtual host
Below is the syntax for a DSN:
[CData API Source]
Driver = CData ODBC Driver for RabbitMQ
Description = My Description
Profile = C:\profiles\\RabbitMQ.apip
AuthScheme = Basic
URL = http://localhost:15672
User = guest
Password = guest
Execute SQL to RabbitMQ
Instantiate a Cursor and use the execute method of the Cursor class to execute any SQL statement.
import pyodbc

cnxn = pyodbc.connect('DRIVER={CData ODBC Driver for API};Profile = C:\profiles\\RabbitMQ.apip;AuthScheme = Basic;URL = http://localhost:15672;User = guest;Password = guest;')
cursor = cnxn.cursor()
cursor.execute("SELECT ,  FROM AuthAttempts WHERE NodeName = 'rabbit@hostname'")
rows = cursor.fetchall()
for row in rows:
  print(row., row.)
After connecting to RabbitMQ in PyCharm using the CData ODBC Driver, you will be able to build Python apps with access to RabbitMQ data as if it were a standard database. If you have any questions, comments, or feedback regarding this tutorial, please contact us at [email protected].