




Access Live Sage X3 Cloud Data in Coginiti Pro

Coginiti Pro is a single tool for all your SQL data and analytics needs, designed specifically for data engineers, analysts, and data scientists. When paired with the CData JDBC Driver for Sage X3 Cloud, Coginiti Pro can access and query live Sage X3 Cloud data. This article describes how to connect to and query Sage X3 Cloud data from Coginiti Pro.
With built-in optimized data processing, the CData JDBC Driver for Sage X3 Cloud offers unmatched performance for interacting with live Sage X3 Cloud data. When you issue complex SQL queries to Sage X3 Cloud, the driver pushes supported SQL operations, like filters and aggregations, directly to Sage X3 Cloud and utilizes the embedded SQL engine to process unsupported operations client-side (often SQL functions and JOIN operations). In addition, its built-in dynamic metadata querying allows you to work with and analyze Sage X3 Cloud data using native data types.
Gather Connection Properties and Build a Connection String
Download the CData JDBC Driver for Sage X3 Cloud installer, unzip the package, and run the JAR file to install the driver. Then gather the required connection properties.
Sage X3 Cloud uses the OAuth 2.0 Client Credentials flow, and an X-API-Key is also required for API access. Set AuthScheme to OAuth and specify the following connection properties:
- URL: The base URL of your Sage X3 Cloud instance.
- OAuthAccessTokenUrl: The OAuth token endpoint (e.g., https://your-auth-domain/oauth/token).
- OAuthClientId: Your OAuth application client ID.
- OAuthClientSecret: Your OAuth application client secret.
- Audience: The API audience value for the token request.
- XAPIKey: The X-API-Key provided by your Sage X3 Cloud administrator.
- Folder: The Sage X3 folder name (e.g., SEED). This folder is used as the default schema.
- Folders (optional): A comma-separated list of Sage X3 folders (e.g., SEED,PERF). Each folder is exposed as a separate schema, so you can query across folders with the Schema.Table syntax.
The driver obtains an access token with the Client Credentials flow and sends it with the X-API-Key on every API request. With InitiateOAuth set to GETANDREFRESH (the default), the driver acquires and refreshes the token automatically.
NOTE: To use the JDBC driver in Coginiti Pro, you may need a license (full or trial) and a Runtime Key (RTK). For more information on obtaining this license (or a trial), contact our sales team.
Built-in Connection String Designer
For assistance constructing the JDBC URL, use the connection string designer built into the Sage X3 Cloud JDBC Driver. Double-click the JAR file or execute the jar file from the command line.
java -jar cdata.jdbc.sagex3cloud.jar

Fill in the connection properties (including the RTK) and copy the connection string to the clipboard.
Create a JDBC Data Source for Sage X3 Cloud Data
- Open Coginiti Pro and in the File menu, select "Edit Drivers."
- In the newly opened wizard, click "Add" and select "Generic."
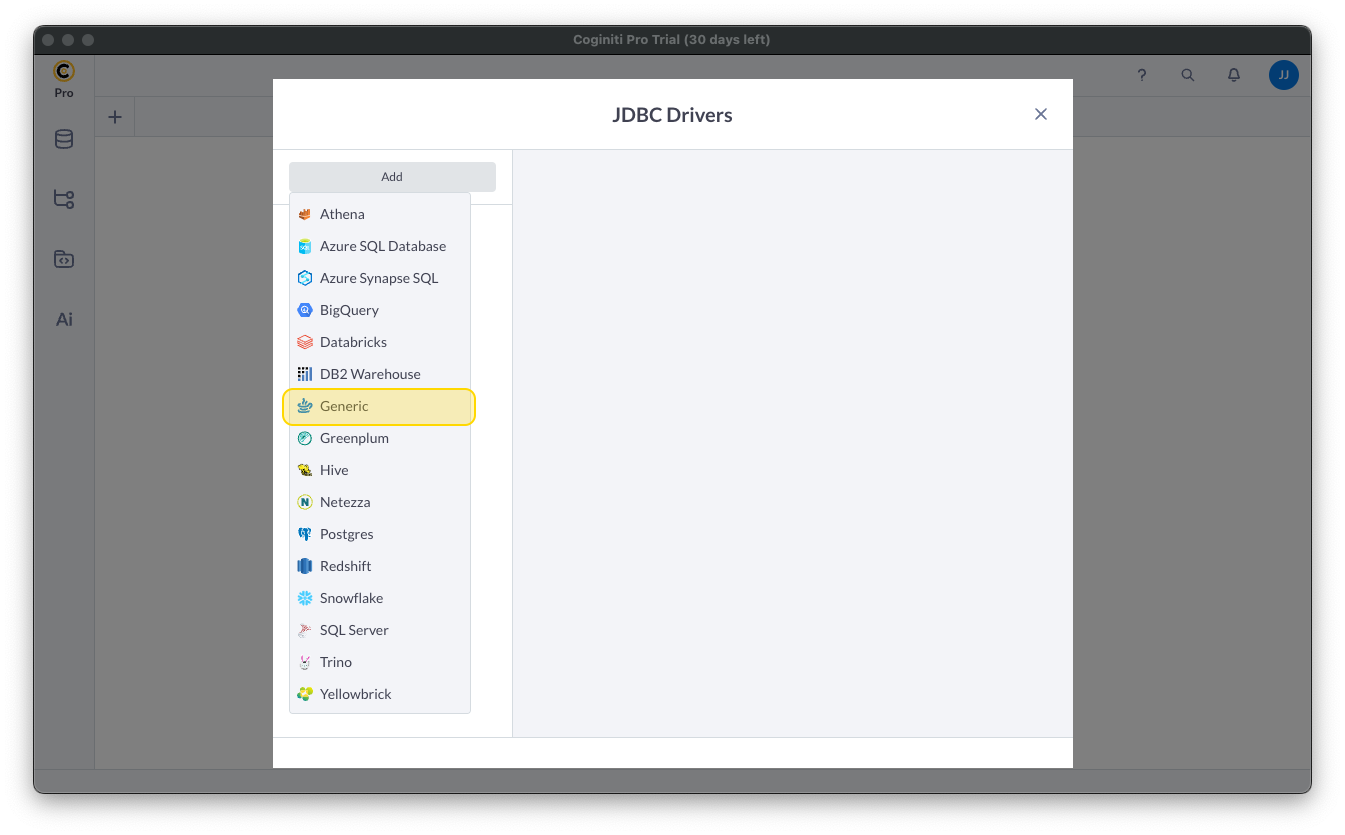
In the "JDBC Drivers" wizard, set the driver properties (below) and click "Create Driver."
- Set JDBC Driver Name to a useful name, like CData JDBC Driver for Sage X3 Cloud.
- Click "Add Files" to add the JAR file from the "lib" folder in the installation directory (e.g. cdata.jdbc.sagex3cloud.jar)
- Select the Class Name: cdata.jdbc.sagex3cloud.SageX3CloudDriver.
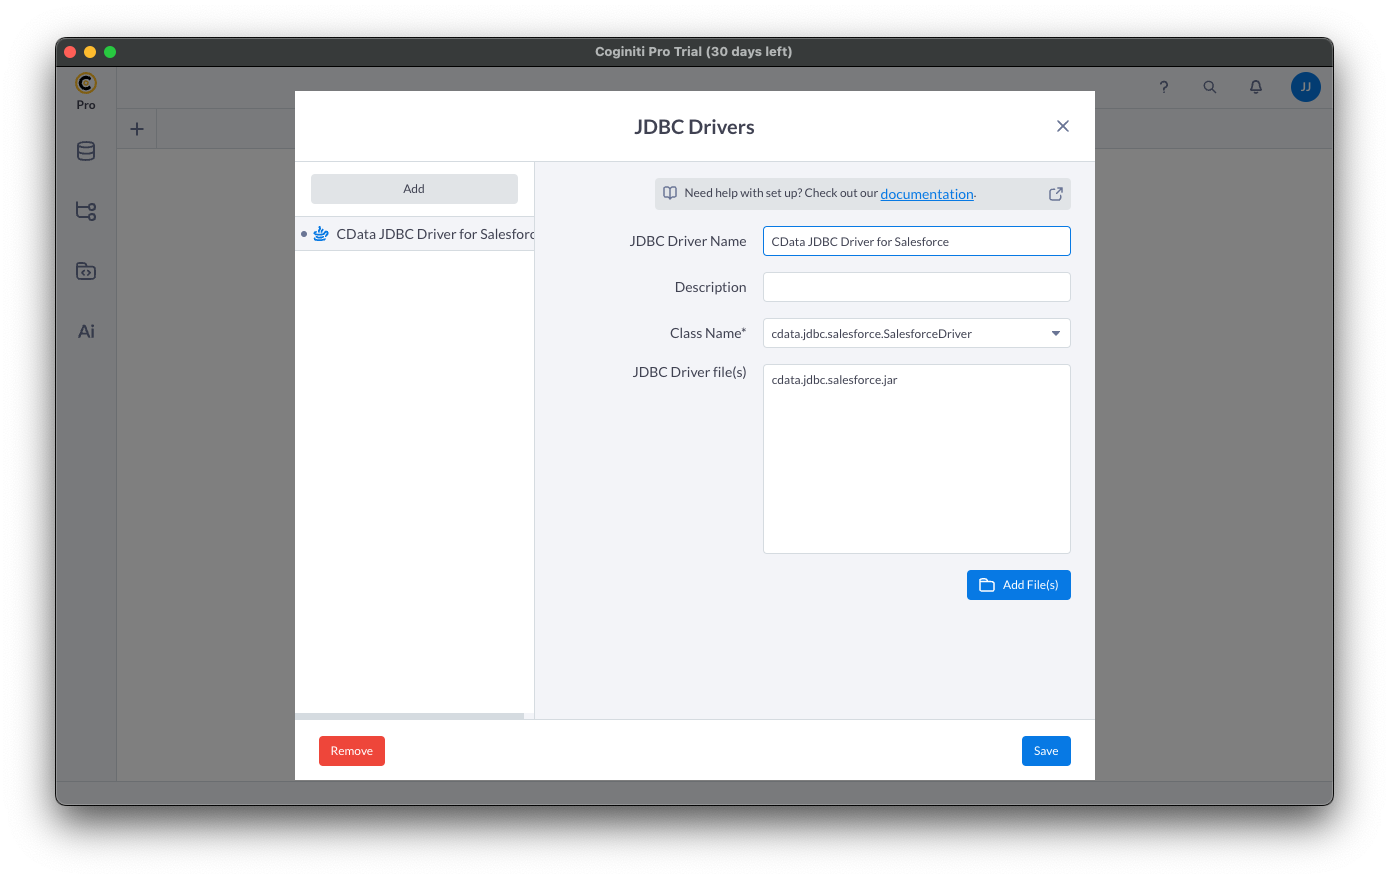
Create a Connection using the CData JDBC Driver for Sage X3 Cloud
- In the File menu, click "Edit Connections."
- In the newly opened wizard, click "Add" and select "Generic."
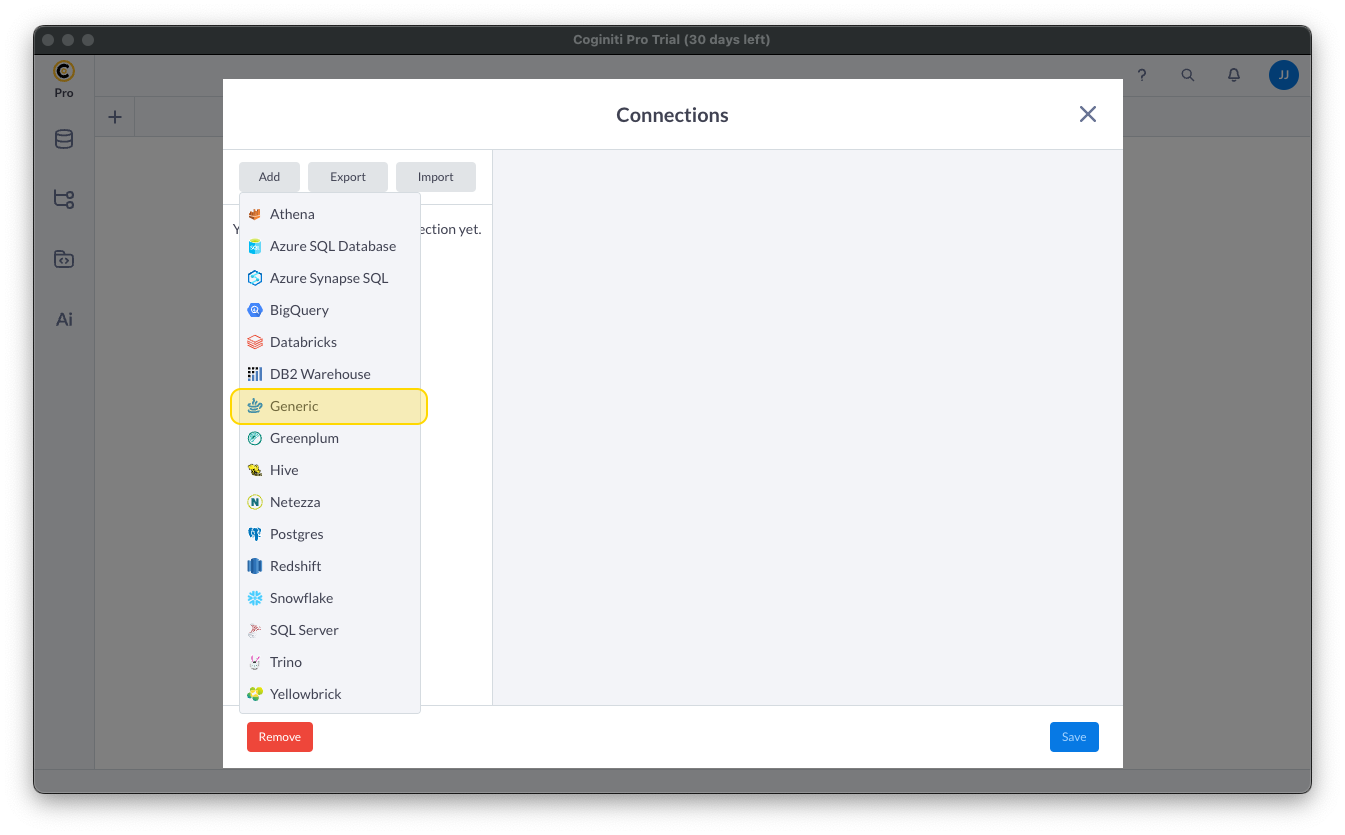
- In the "Connections" wizard, set the connection properties.
- Set Connection name to an identifying name.
- Set Database JDBC driver to the Driver you configured earlier.
- Set JDBC URL to the JDBC URL configured using the built-in connection string designer (e.g. jdbc:sagex3cloud:AuthScheme=OAuth;URL=https://x3server/;OAuthAccessTokenUrl=https://auth-domain/oauth/token;OAuthClientId=your_client_id;OAuthClientSecret=your_client_secret;Audience=https://api-audience;XAPIKey=your_api_key;Folder=SEED;
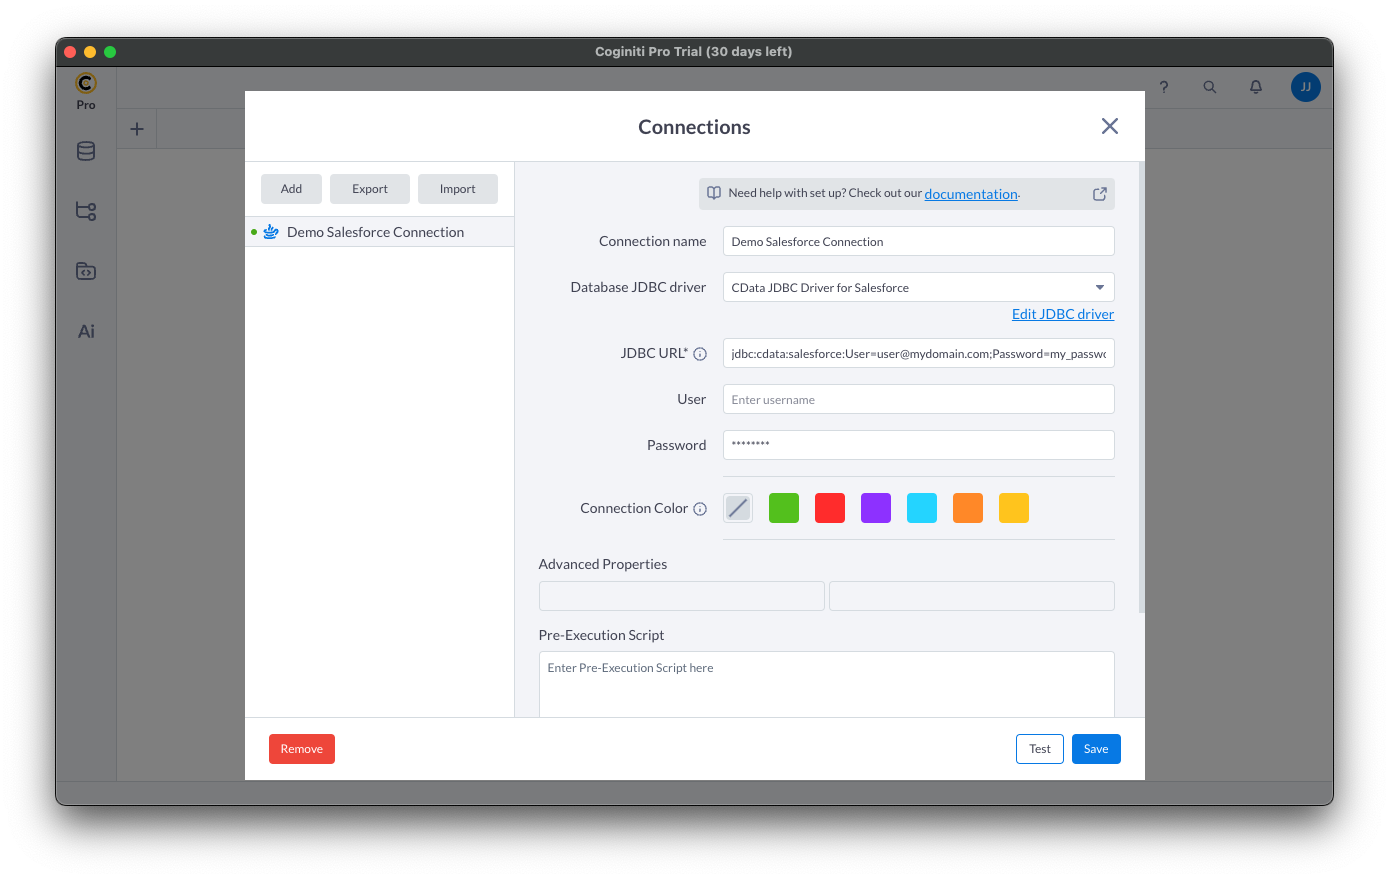
- Click "Test" to ensure the connection is configured properly. Click "Save."
Query Sage X3 Cloud Using SQL
- Open the Connections tab by clicking on database icon: .
- Click the plus sign () to add a new query tab.
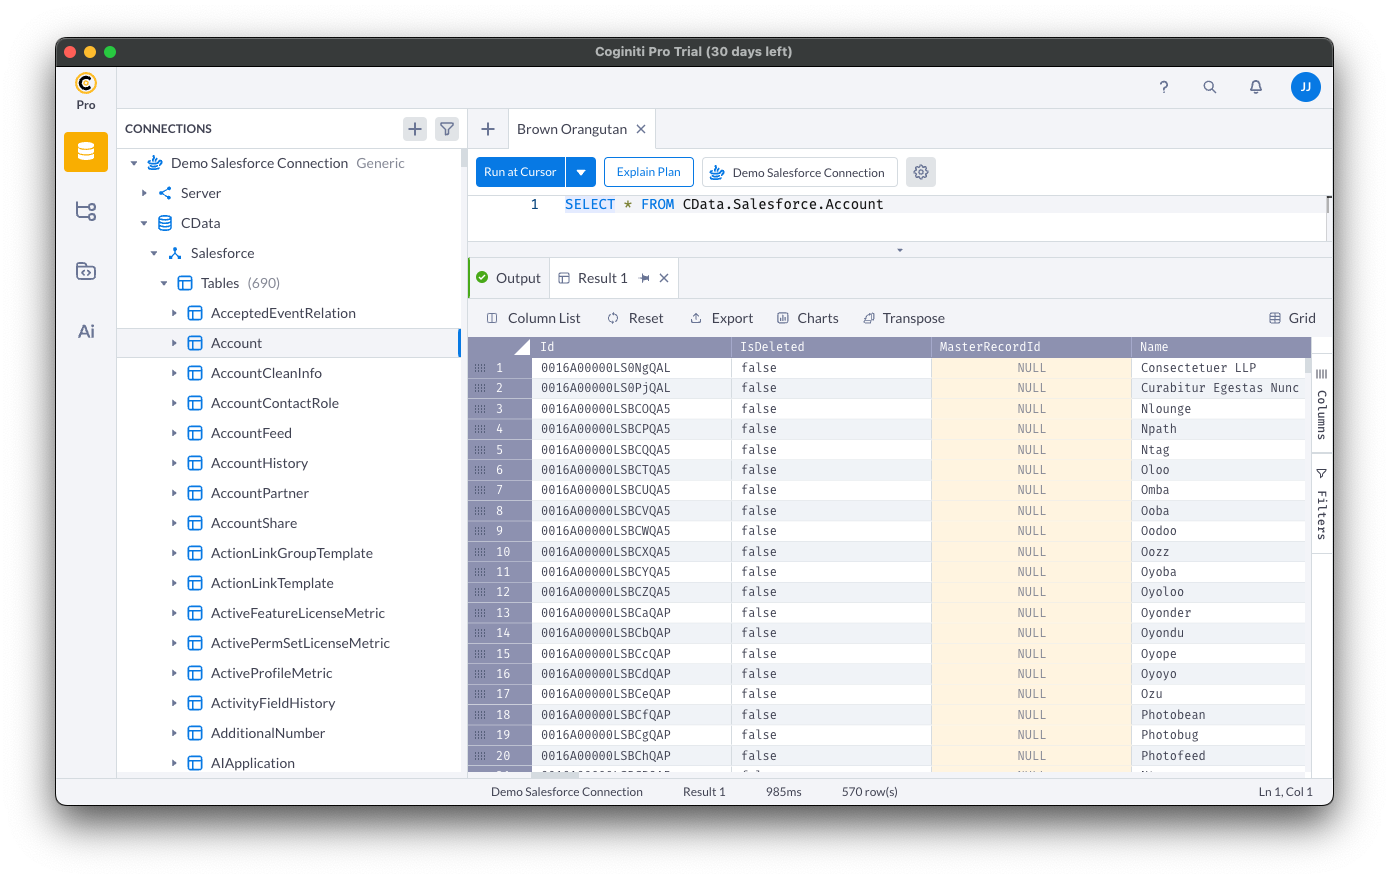
Once the query console is open, write the SQL script you wish to execute and click "Run at Cursor".
NOTE: You can use the explorer on the left to determine table/view names and column names.
Using the explorer
- In the "Select connection" field, select the connection you wish to query.
- Expand your newly created connection, expand the "CData" catalog, and expand the Sage X3 Cloud catalog.
- Expand "Tables" or "Views" to find the entity you wish to query.
- Expand your selected entity to explore the fields (columns).
Free Trial & More Information
Download a free, 30-day trial of the CData JDBC Driver for Sage X3 Cloud and start working with your live Sage X3 Cloud data in Coginiti Pro. Reach out to our Support Team if you have any questions.
Ready to get started?
Download a free trial of the Sage X3 Cloud Driver to get started:
Download NowLearn more:
 Sage X3 Cloud JDBC Driver
Rapidly create and deploy powerful Java applications that integrate with Sage X3 Cloud.