




Query Live Sybase Data in Perplexity Desktop via CData Connect AI

Perplexity is an AI-powered research and answer engine that combines web search, structured data, and connected tools through a unified conversational interface. With Perplexity Desktop for macOS, you can bring external data sources directly into your workflow using MCP, enabling fast, context-aware insights powered by live data.
Integrating Perplexity Desktop with CData Connect AI via its built-in MCP connector allows the AI to query, explore, and reason over live Sybase data without copying data out of its source system. The result is a research experience where you can ask questions about your governed enterprise data directly from Perplexity Desktop.
This article outlines how to configure Sybase connectivity in Connect AI, generate the required access token, register Connect AI's MCP Server in Perplexity Desktop, and then use the chat interface to explore live Sybase data.
Step 1: Configure Sybase connectivity for Perplexity Desktop
Connectivity to Sybase from Perplexity Desktop is made possible through CData Connect AI's Remote MCP Server. To interact with Sybase data from Perplexity Desktop, start by creating and configuring a Sybase connection in CData Connect AI.
- Log into Connect AI, click Sources, and then click Add Connection
- Select Sybase from the Add Connection panel
-
Enter the necessary authentication properties to connect to Sybase.
To connect to Sybase, specify the following connection properties:
- Server: Set this to the name or network address of the Sybase database instance.
- Database: Set this to the name of the Sybase database running on the specified Server.
Optionally, you can also secure your connections with TLS/SSL by setting UseSSL to true.
Sybase supports several methods for authentication including Password and Kerberos.
Connect Using Password Authentication
Set the AuthScheme to Password and set the following connection properties to use Sybase authentication.
- User: Set this to the username of the authenticating Sybase user.
- Password: Set this to the username of the authenticating Sybase user.
Connect using LDAP Authentication
To connect with LDAP authentication, configure Sybase server-side to use the LDAP authentication mechanism.
After configuring Sybase for LDAP, you can connect using the same credentials as Password authentication.
Connect Using Kerberos Authentication
To leverage Kerberos authentication, begin by enabling it setting AuthScheme to Kerberos. See the Using Kerberos section in the Help documentation for more information on using Kerberos authentication.
You can find an example connection string below:
Server=MyServer;Port=MyPort;User=SampleUser;Password=SamplePassword;Database=MyDB;Kerberos=true;KerberosKDC=MyKDC;KerberosRealm=MYREALM.COM;KerberosSPN=server-name
- Click Save & Test
- Navigate to the Permissions tab and update user-based permissions



Add a Personal Access Token
A Personal Access Token (PAT) is used to authenticate the connection to Connect AI from Perplexity Desktop. It is best practice to create a separate PAT for each integration to maintain granular access control.
- Click the gear icon () at the top right of the Connect AI app to open Settings
- On the Settings page, go to the Access Tokens section and click Create PAT
- Give the PAT a descriptive name and click Create
- The personal access token is only visible at creation, so be sure to copy it and store it securely for future use

Create an OAuth App in CData Connect AI
Perplexity Desktop uses OAuth 2.0 to authenticate users against the CData Connect AI MCP Server. This requires creating an OAuth App in your CData Connect AI account.
- Click the Gear icon () in the top-right corner of Connect AI to open Settings
- Navigate to OAuth Apps and click + Create App. The Create OAuth App dialog appears
-
Fill in the following fields:
- Name: Enter a descriptive name (e.g., PerplexityOAuth)
- Authentication Flow: Select User-based (Authorization Code)
- Callback URL: Enter the callback URL provided by Perplexity Desktop when adding the connector
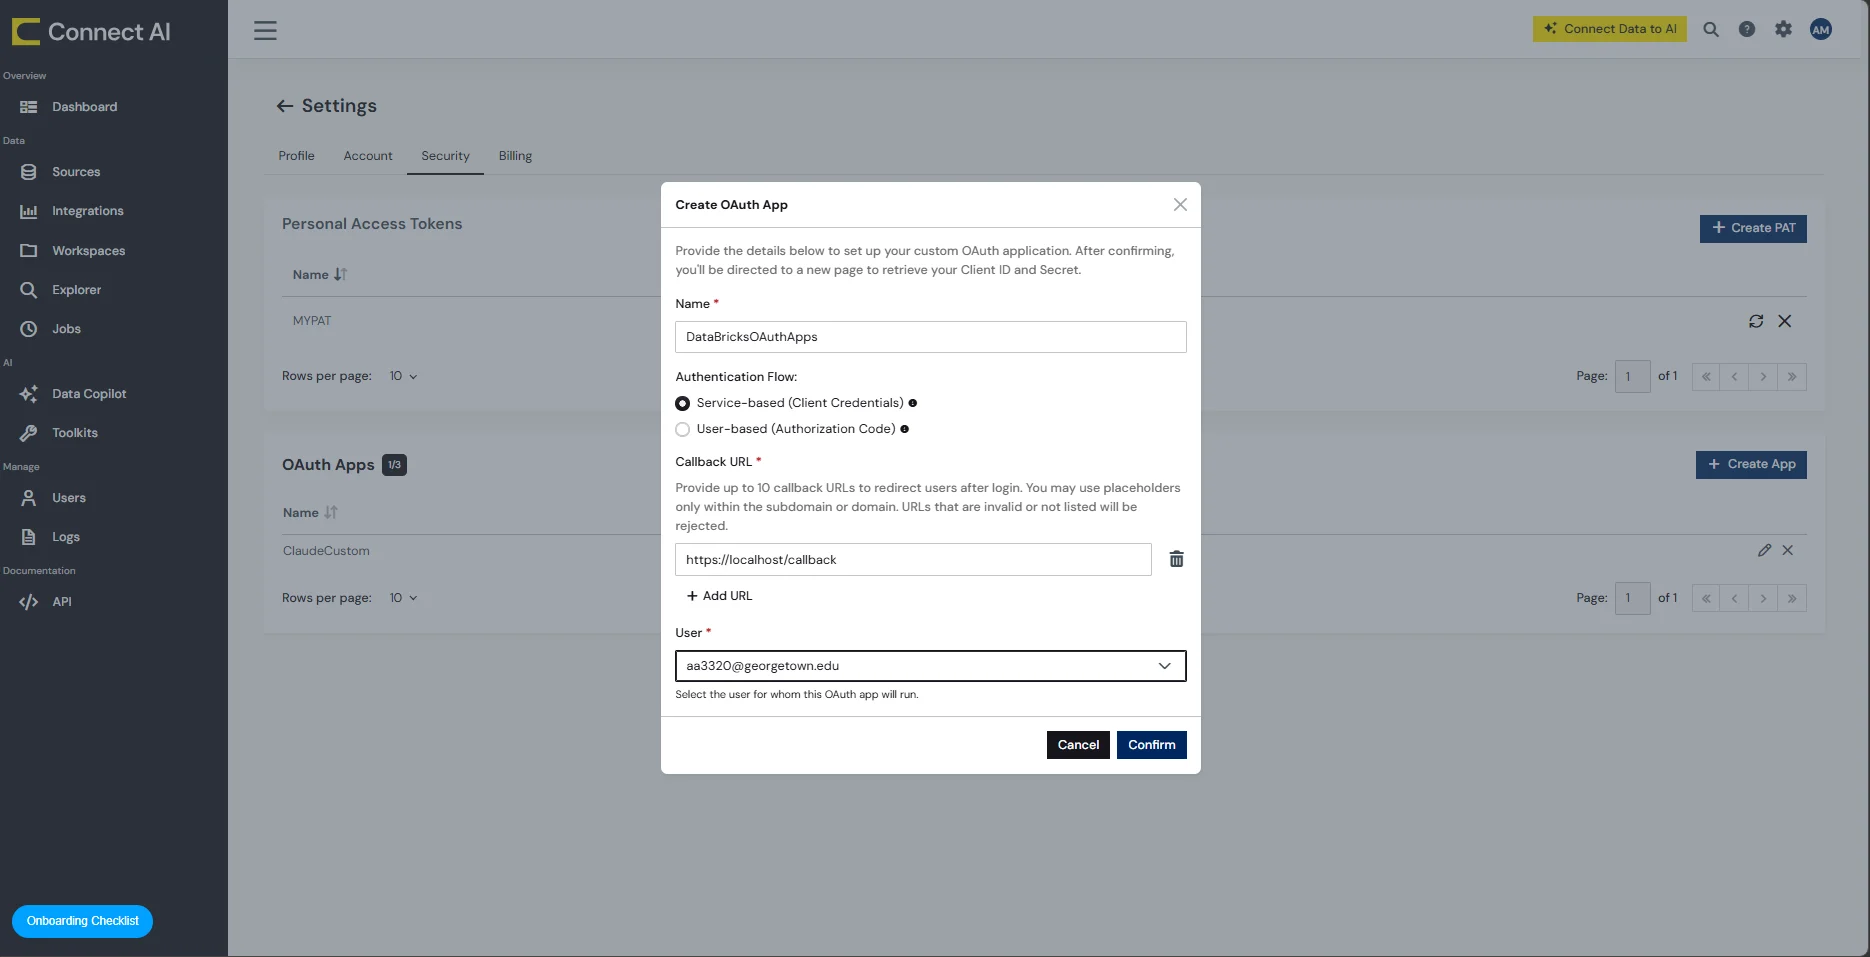
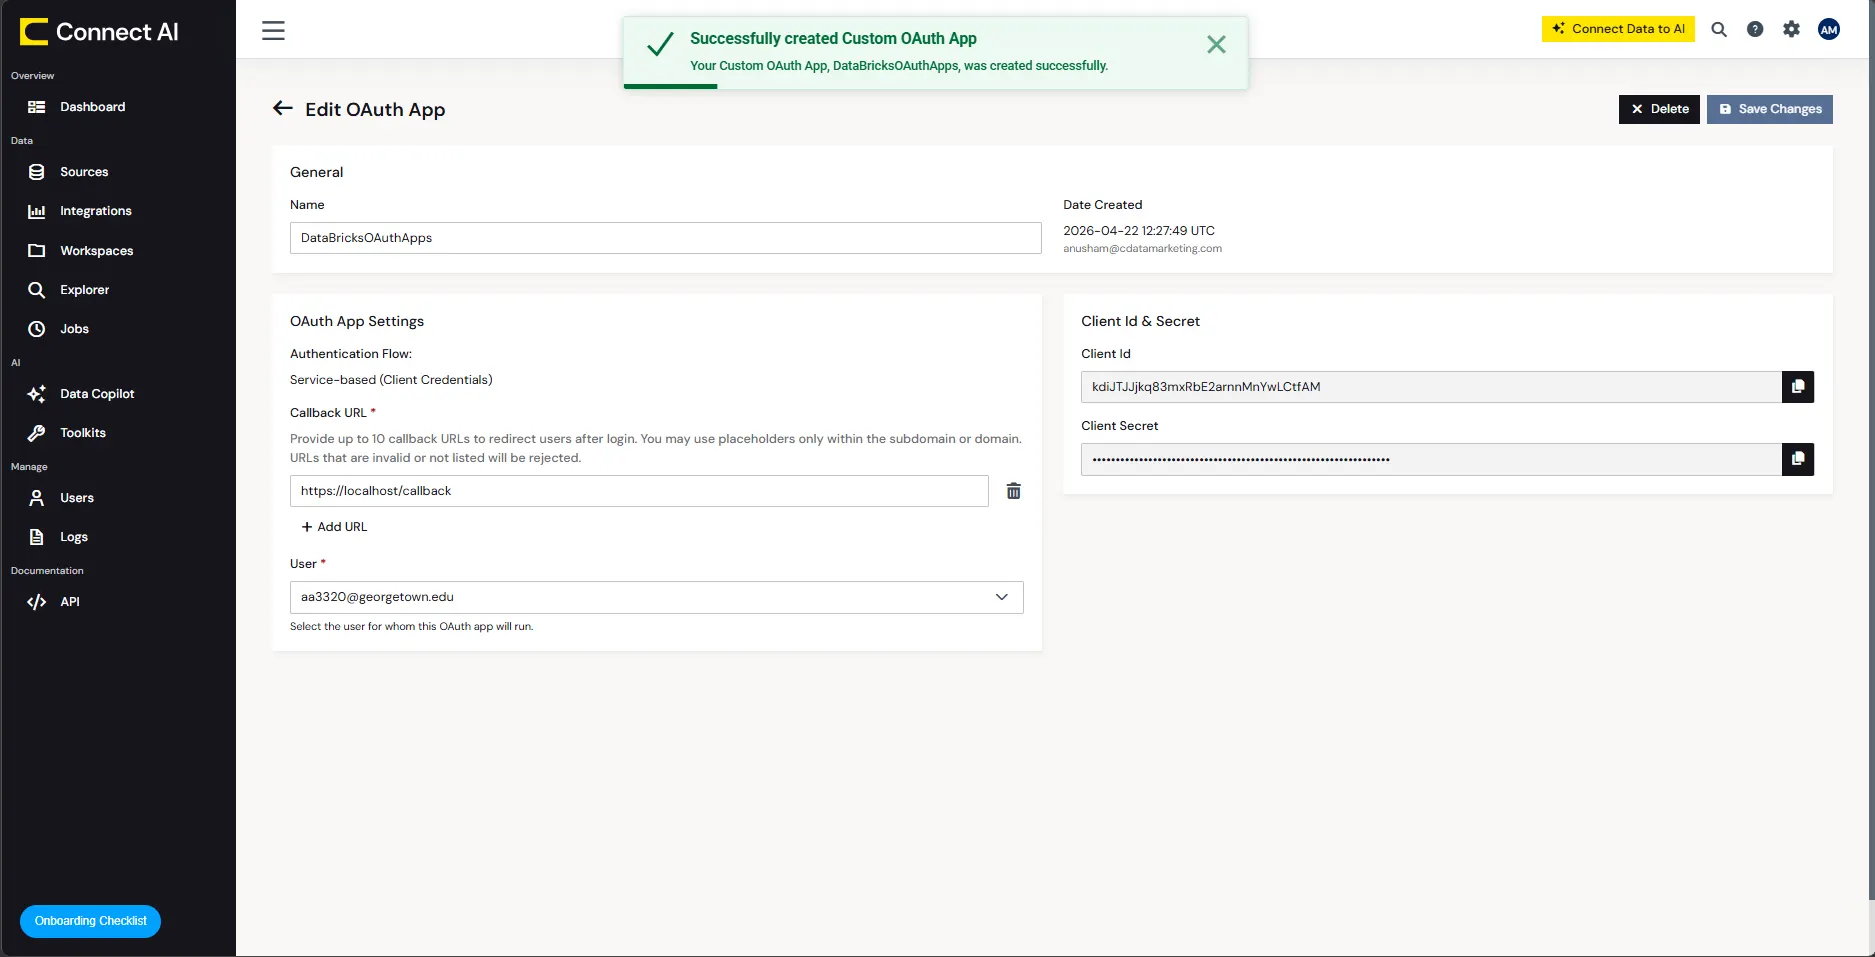
- Click Confirm. CData Connect AI generates a Client ID and Client Secret
- Copy both values and store them securely. You will need them in Step 2
With the Sybase connection configured and an OAuth App created, Perplexity Desktop can now connect to Sybase data through Connect AI.
Step 2: Configure Connect AI in Perplexity Desktop
Next, register the CData Connect AI MCP Server as a custom remote connector in Perplexity Desktop. This feature requires a Perplexity Pro, Max, or Enterprise account and the macOS desktop app. Once configured, Perplexity's AI can call the tools exposed by CData Connect AI to access live Sybase data.
- Download the Perplexity Desktop application for macOS and sign in with your Pro, Max, or Enterprise account
- Click Customize in the left sidebar and open the Connectors tab. Click + Custom connector in the top-right corner to open the Add custom connector dialog
-
Enter a Name for the connector (e.g., CData Connect AI) and, optionally, a Description. In the MCP server URL field, enter the CData Connect AI MCP endpoint: https://mcp.cloud.cdata.com/mcp

-
Expand Advanced and configure the following:
- Authentication: Select OAuth, then enter the Client ID and Client Secret from the OAuth App created in Step 1
- Transport: Select Streamable HTTP
- Network access: Select Public

-
The new connector appears in the Connectors list. Click + on the connector to connect it. When redirected to CData Connect AI, sign in and click Allow to grant Perplexity access

Step 3: Query your live Sybase data from Perplexity Desktop
- Click New Session and make sure the CData Connect AI connector is enabled for the session. The active connector appears above the prompt box
-
Start asking questions about your Sybase data. For example:
"Which data sources do you have access to via Connect AI?"

-
Try additional queries such as:
- "List all the tables available in my Sybase data connection."
- "Show the available schemas in Sybase."
- "Retrieve the top 10 records from the Account table."
- "Summarize the high-priority open opportunities in Sybase."
Perplexity Desktop is now fully integrated with the CData Connect AI MCP Server and can reason over live Sybase data directly from the chat interface.
Get CData Connect AI
To access hundreds of SaaS, Big Data, and NoSQL sources directly from your AI tools, try CData Connect AI today!