




Object-Relational Mapping (ORM) with Talkdesk Data Entities in Java

You can use Hibernate to map object-oriented domain models to a traditional relational database. The tutorial below shows how to use the CData JDBC Driver for Talkdesk to generate an ORM of your Talkdesk repository with Hibernate.
Though Eclipse is the IDE of choice for this article, the CData JDBC Driver for Talkdesk works in any product that supports the Java Runtime Environment. In the Knowledge Base you will find tutorials to connect to Talkdesk data from IntelliJ IDEA and NetBeans.
Install Hibernate
Follow the steps below to install the Hibernate plug-in in Eclipse.
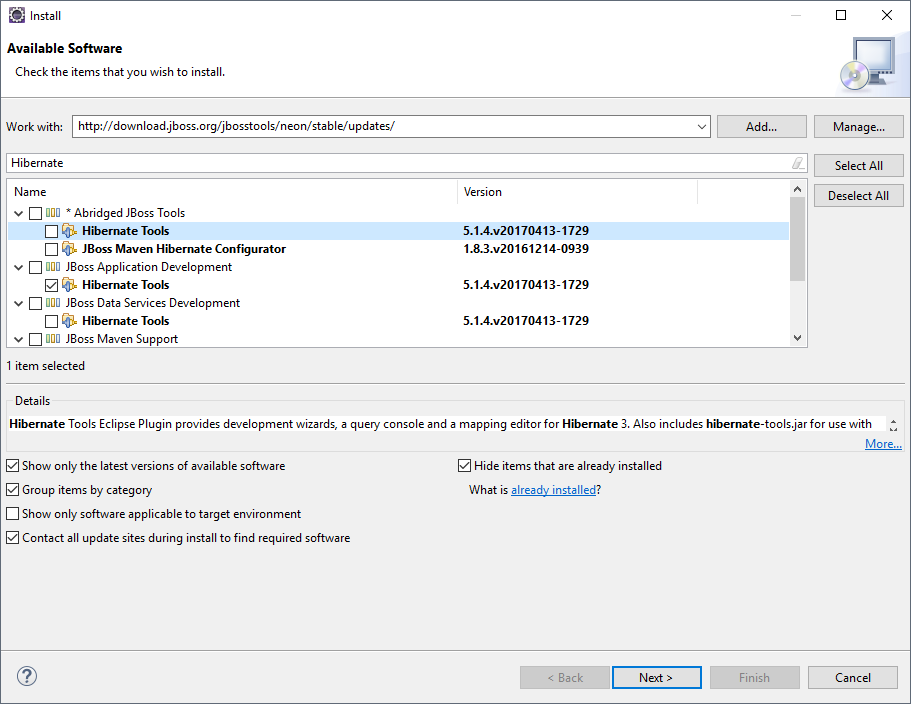
- In Eclipse, navigate to Help -> Install New Software.
- Enter "http://download.jboss.org/jbosstools/neon/stable/updates/" in the Work With box.
- Enter "Hibernate" into the filter box.
- Select Hibernate Tools.
Start A New Project
Follow the steps below to add the driver JARs in a new project.
- Create a new project. Select Java Project as your project type and click Next. Enter a project name and click Finish.
- Right-click the project and click Properties. Click Java Build Path and then open the Libraries tab.
- Click Add External JARs to add the cdata.jdbc.talkdesk.jar library, located in the lib subfolder of the installation directory.
Add a Hibernate Configuration File
Follow the steps below to configure connection properties to Talkdesk data.
- Right-click on the new project and select New -> Hibernate -> Hibernate Configuration File (cfg.xml).
- Select src as the parent folder and click Next.
Input the following values:
- Hibernate version:: 5.2
- Database dialect: Derby
- Driver class: cdata.jdbc.talkdesk.TalkdeskDriver
Connection URL: A JDBC URL, starting with jdbc:talkdesk: and followed by a semicolon-separated list of connection properties.
Talkdesk uses the OAuth 2.0 Client Credentials grant. There is no browser-based authorization step and no callback URL.
Set the following connection properties:
- AccountName: The name of your Talkdesk account.
- Region: The region where your Talkdesk instance is deployed. Supported values are US (default), EU, CA, AU, UK, and FedRamp.
- OAuthClientId: The Client Id assigned when you registered your custom OAuth application.
- OAuthClientSecret: The Client Secret assigned to your custom OAuth application.
Creating a Custom OAuth Application
- Log in to your Talkdesk account and select OAuth Clients from the navigation menu.
- Click Create OAuth Client and give the client a descriptive name.
- Set Grant Type to Client Credentials.
- Click Add scopes and select the scopes for the data you want to access.
- Click Create and copy the Client Id and Client Secret.
When you connect, the driver automatically requests an access token from Talkdesk, caches it, and refreshes it when it expires. Make sure the scopes selected for the application match the views you plan to query, or the token request can fail.
Built-in Connection String Designer
For assistance in constructing the JDBC URL, use the connection string designer built into the Talkdesk JDBC Driver. Either double-click the JAR file or execute the jar file from the command-line.
java -jar cdata.jdbc.talkdesk.jarFill in the connection properties and copy the connection string to the clipboard.
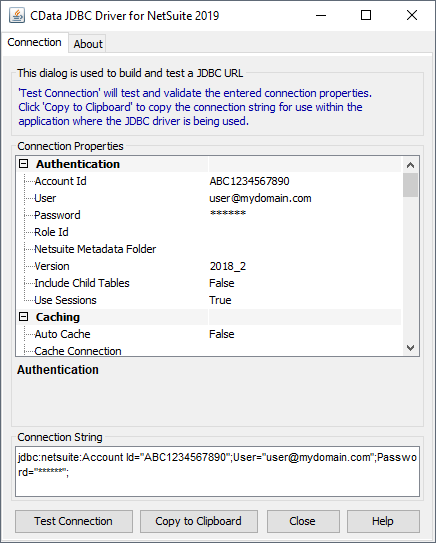
A typical JDBC URL is below:
jdbc:talkdesk:AccountName=myAccount;Region=US;OAuthClientId=myClientId;OAuthClientSecret=myClientSecret;
Connect Hibernate to Talkdesk Data
Follow the steps below to select the configuration you created in the previous step.
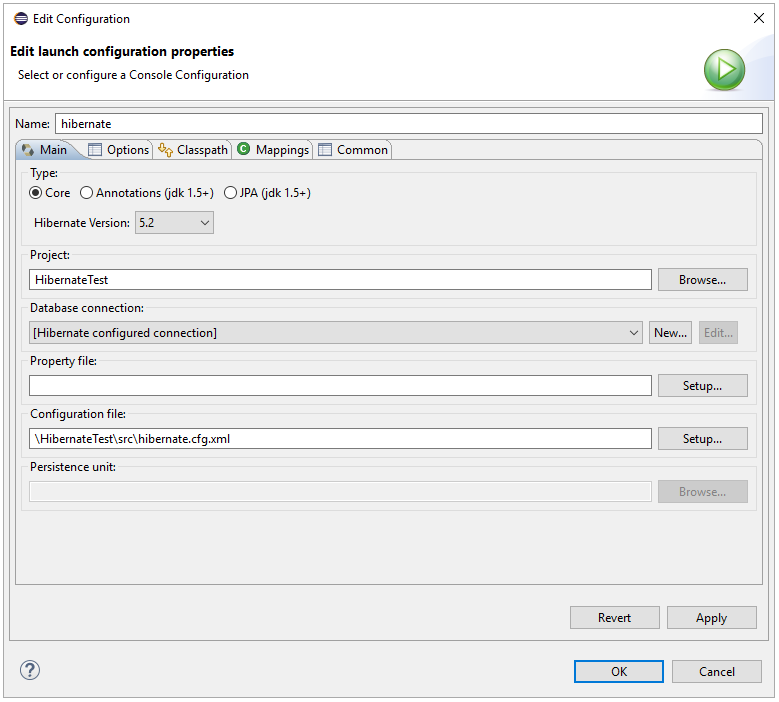
- Switch to the Hibernate Configurations perspective: Window -> Open Perspective -> Hibernate.
- Right-click on the Hibernate Configurations panel and click Add Configuration.
- Set the Hibernate version to 5.2.
- Click the Browse button and select the project.
- For the Configuration file field, click Setup -> Use Existing and select the location of the hibernate.cfg.xml file (inside src folder in this demo).
- In the Classpath tab, if there is nothing under User Entries, click Add External JARS and add the driver jar once more. Click OK once the configuration is done.
- Expand the Database node of the newly created Hibernate configurations file.
Reverse Engineer Talkdesk Data
Follow the steps below to generate the reveng.xml configuration file. You will specify the tables you want to access as objects.
- Switch back to the Package Explorer.
- Right-click your project, select New -> Hibernate -> Hibernate Reverse Engineering File (reveng.xml). Click Next.
- Select src as the parent folder and click Next.
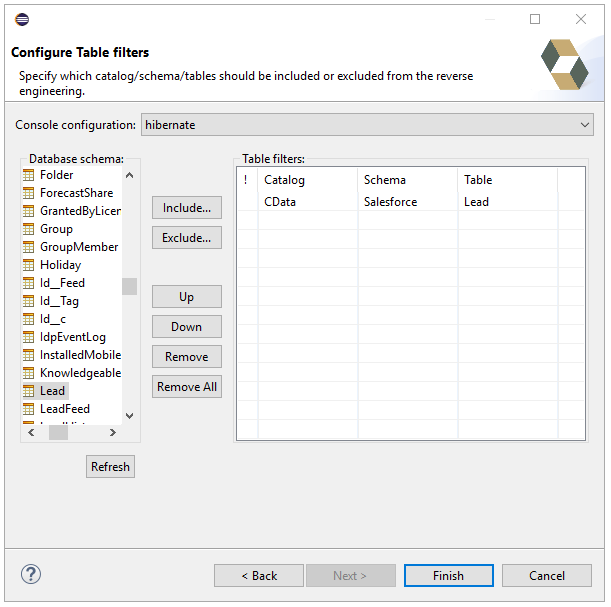
- In the Console configuration drop-down menu, select the Hibernate configuration file you created above and click Refresh.
- Expand the node and choose the tables you want to reverse engineer. Click Finish when you are done.
Configure Hibernate to Run
Follow the steps below to generate plain old Java objects (POJO) for the Talkdesk tables.
- From the menu bar, click Run -> Hibernate Code Generation -> Hibernate Code Generation Configurations.
- In the Console configuration drop-down menu, select the Hibernate configuration file you created in the previous section. Click Browse by Output directory and select src.
- Enable the Reverse Engineer from JDBC Connection checkbox. Click the Setup button, click Use Existing, and select the location of the hibernate.reveng.xml file (inside src folder in this demo).
- In the Exporters tab, check Domain code (.java) and Hibernate XML Mappings (hbm.xml).
- Click Run.
One or more POJOs are created based on the reverse-engineering setting in the previous step.
Insert Mapping Tags
For each mapping you have generated, you will need to create a mapping tag in hibernate.cfg.xml to point Hibernate to your mapping resource. Open hibernate.cfg.xml and insert the mapping tags as so:
      cdata.talkdesk.TalkdeskDriver


      jdbc:talkdesk:AccountName=myAccount;Region=US;OAuthClientId=myClientId;OAuthClientSecret=myClientSecret;


      org.hibernate.dialect.SQLServerDialect
Execute SQL
Using the entity you created from the last step, you can now search Talkdesk data:
import java.util.*;
import org.hibernate.Session;
import org.hibernate.cfg.Configuration;
import org.hibernate.query.Query;

public class App {
  public static void main(final String[] args) {
    Session session =  new
    Configuration().configure().buildSessionFactory().openSession();
    String SELECT = "FROM Users U WHERE Active = :Active";
    Query q = session.createQuery(SELECT, Users.class);
    q.setParameter("Active","true");
    List<Users> resultList = (List<Users>) q.list();

    for(Users s: resultList){
      System.out.println(s.getId());
      System.out.println(s.getName());
    }
  }
}
Ready to get started?
Download a free trial of the Talkdesk Driver to get started:
Download NowLearn more:
 Talkdesk JDBC Driver
Rapidly create and deploy powerful Java applications that integrate with Talkdesk data including Accounts, Attributes, BillingAccounts, Callbacks, Campaigns, Cases, Contacts, GuardianUsers, Invoices, Products, Subscriptions, Teams, Users, Wallets, and more!