Connect to UKG Pro WFM Data in CloverDX (formerly CloverETL)

The CData JDBC Driver for UKG Pro WFM enables you to use the data transformation components in CloverDX (formerly CloverETL) to work with UKG Pro WFM as sources. In this article, you will use the JDBC Driver for UKG Pro WFM to set up a simple transfer into a flat file. The CData JDBC Driver for UKG Pro WFM enables you to use the data transformation components in CloverDX (formerly CloverETL) to work with UKG Pro WFM as sources. In this article, you will use the JDBC Driver for UKG Pro WFM to set up a simple transfer into a flat file.
Connect to UKG Pro WFM as a JDBC Data Source
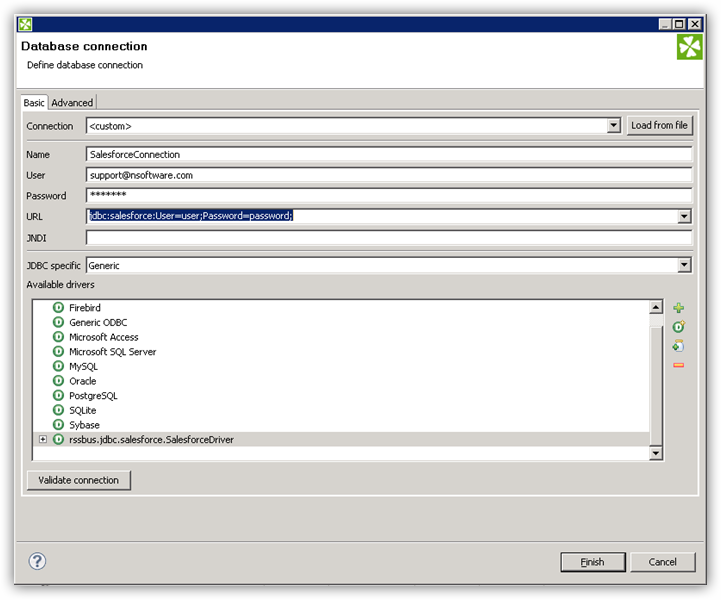
- Create the connection to UKG Pro WFM data. In a new CloverDX graph, right-click the Connections node in the Outline pane and click Connections -> Create Connection. The Database Connection wizard is displayed.
- Click the plus icon to load a driver from a JAR. Browse to the lib subfolder of the installation directory and select the cdata.jdbc.api.jar file.
- Enter the JDBC URL.
Start by setting the Profile connection property to the location of the UKGProWFM Profile on disk (e.g. C:\profiles\UKGProWFM.apip). Next, set the ProfileSettings connection property to the connection string for UKGProWFM (see below).
UKGProWFM API Profile Settings
UKG Pro Workforce Management uses OAuth 2.0 with the Resource Owner Password Credentials grant (grant_type=password) to authorize access to the API. Unlike most OAuth-based profiles, this does not use a browser redirect/authorization-code step: the driver exchanges your UKG Pro WFM username, password, client ID, and client secret directly for an access token.
Set the following connection properties to authenticate:
- AuthScheme: Set this to OAuthPassword.
- Host: Set this to the hostname of your UKG Pro Workforce Management datacenter/tenant (for example, yourcompany.mykronos.com). Do not include the protocol (https://) or a trailing slash.
- OAuthClientId: Set this to the client ID issued for your UKG Pro Workforce Management OAuth application.
- OAuthClientSecret: Set this to the client secret issued for your UKG Pro Workforce Management OAuth application.
- User: Set this to your UKG Pro Workforce Management username.
- Password: Set this to your UKG Pro Workforce Management password.
Access tokens are obtained from https://{Host}/api/authentication/access_token. Refresh tokens issued by UKG Pro Workforce Management expire after 7 days; if a refresh attempt fails because the refresh token itself has expired, the driver must re-authenticate with your User/Password credentials to obtain a new access token.
Built-in Connection String Designer
For assistance in constructing the JDBC URL, use the connection string designer built into the UKG Pro WFM JDBC Driver. Either double-click the JAR file or execute the jar file from the command-line.
java -jar cdata.jdbc.api.jarFill in the connection properties and copy the connection string to the clipboard.

A typical JDBC URL is below:
jdbc:api:Profile=C:\profiles\UKGProWFM.apip;AuthScheme=OAuthPassword;ProfileSettings='Host=yourcompany.mykronos.com;User=your_username;Password=your_password;';OAuthClientId=your_client_id;OAuthClientSecret=your_client_secret;
Query UKG Pro WFM Data with the DBInputTable Component
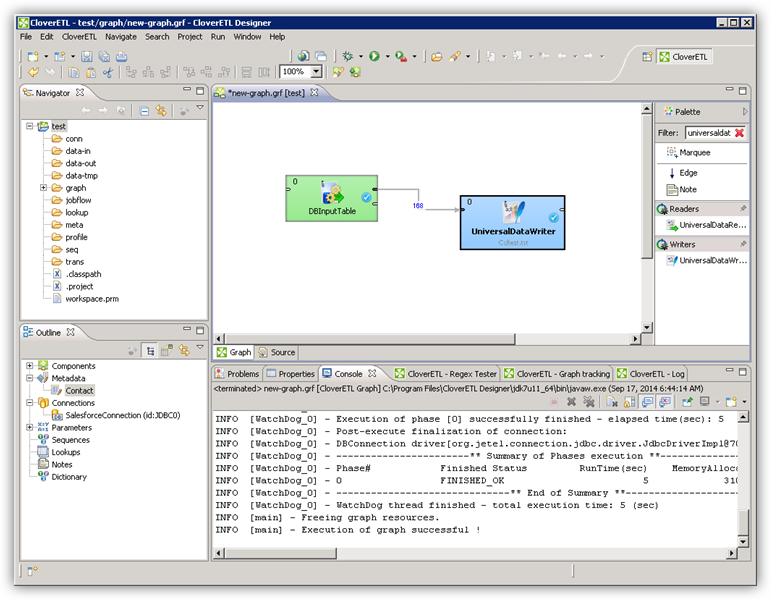
- Drag a DBInputTable from the Readers selection of the Palette onto the job flow and double-click it to open the configuration editor.
- In the DB connection property, select the UKG Pro WFM JDBC data source from the drop-down menu.
- Enter the SQL query. For example:
SELECT PersonNumber, UserName FROM Employees WHERE PersonId = '12345'
Write the Output of the Query to a UniversalDataWriter
- Drag a UniversalDataWriter from the Writers selection onto the jobflow.
- Double-click the UniversalDataWriter to open the configuration editor and add a file URL.
- Right-click the DBInputTable and then click Extract Metadata.
- Connect the output port of the DBInputTable to the UniversalDataWriter.
- In the resulting Select Metadata menu for the UniversalDataWriter, choose the Employees table. (You can also open this menu by right-clicking the input port for the UniversalDataWriter.)
- Click Run to write to the file.