Create an SAP BusinessObjects Universe on the CData JDBC Driver for UKG Pro WFM

This article shows how to use the CData JDBC Driver for UKG Pro WFM to connect to UKG Pro WFM from SAP BusinessObjects Business Intelligence applications. You will use the Information Design Tool to analyze UKG Pro WFM data and create a universe on the CData JDBC Driver for UKG Pro WFM. You will then connect to the universe from Web Intelligence.
Create the JDBC Connection to UKG Pro WFM
Follow the steps below to create a connection to the UKG Pro WFM JDBC data source in the Information Design Tool.
- Copy the CData JAR and .lic file into the following subfolder in the installation directory for BusinessObjects: dataAccess\connectionServer\jdbc\drivers\jdbc. The CData JAR is located in the lib subfolder of the installation directory.
- Right-click your project and click New -> New Relational Connection.
- In the wizard that results, click Generic -> Generic JDBC datasource -> JDBC Drivers.
- On the next page of the wizard enter the connection details.
On the next page, set the Authentication Mode option to "Use specified username and password". Enter the username, password, and JDBC URL. The JDBC URL begins with jdbc:api: and is followed by a semicolon-separated list of connection properties.
Start by setting the Profile connection property to the location of the UKGProWFM Profile on disk (e.g. C:\profiles\UKGProWFM.apip). Next, set the ProfileSettings connection property to the connection string for UKGProWFM (see below).
UKGProWFM API Profile Settings
UKG Pro Workforce Management uses OAuth 2.0 with the Resource Owner Password Credentials grant (grant_type=password) to authorize access to the API. Unlike most OAuth-based profiles, this does not use a browser redirect/authorization-code step: the driver exchanges your UKG Pro WFM username, password, client ID, and client secret directly for an access token.
Set the following connection properties to authenticate:
- AuthScheme: Set this to OAuthPassword.
- Host: Set this to the hostname of your UKG Pro Workforce Management datacenter/tenant (for example, yourcompany.mykronos.com). Do not include the protocol (https://) or a trailing slash.
- OAuthClientId: Set this to the client ID issued for your UKG Pro Workforce Management OAuth application.
- OAuthClientSecret: Set this to the client secret issued for your UKG Pro Workforce Management OAuth application.
- User: Set this to your UKG Pro Workforce Management username.
- Password: Set this to your UKG Pro Workforce Management password.
Access tokens are obtained from https://{Host}/api/authentication/access_token. Refresh tokens issued by UKG Pro Workforce Management expire after 7 days; if a refresh attempt fails because the refresh token itself has expired, the driver must re-authenticate with your User/Password credentials to obtain a new access token.
Built-in Connection String Designer
For assistance in constructing the JDBC URL, use the connection string designer built into the UKG Pro WFM JDBC Driver. Either double-click the JAR file or execute the jar file from the command-line.
java -jar cdata.jdbc.api.jarFill in the connection properties and copy the connection string to the clipboard.

When you configure the JDBC URL, you may also want to set the Max Rows connection property. This will limit the number of rows returned, which is especially helpful for improving performance when designing reports and visualizations.
A typical JDBC URL is below:
jdbc:api:Profile=C:\profiles\UKGProWFM.apip;AuthScheme=OAuthPassword;ProfileSettings='Host=yourcompany.mykronos.com;User=your_username;Password=your_password;';OAuthClientId=your_client_id;OAuthClientSecret=your_client_secret;- Enter the driver class: cdata.jdbc.api.APIDriver
- Finish the wizard with the default values for connection pooling and custom parameters.
Analyze UKG Pro WFM Data in the Information Design Tool
You can use the JDBC connection to analyze UKG Pro WFM data in the Information Design Tool.
- In the Local Projects view, double-click the connection (the .cnx file) to open the UKG Pro WFM data source.
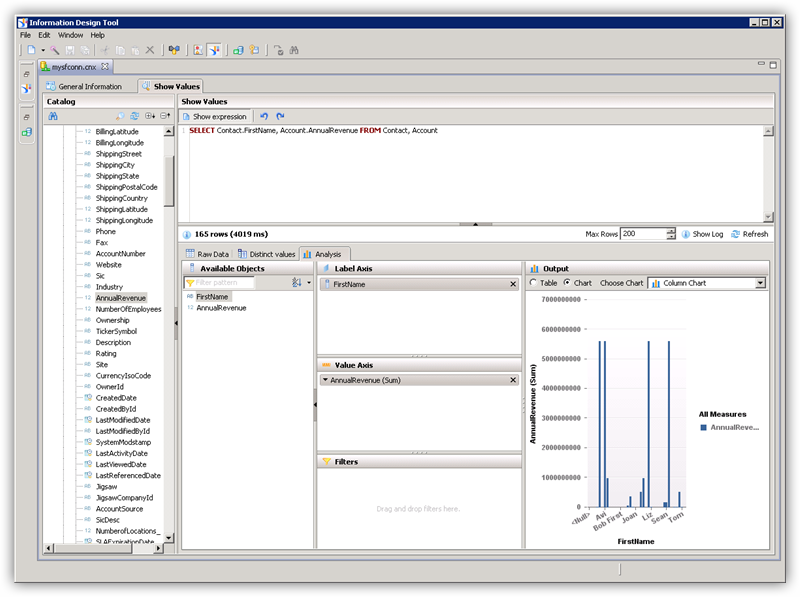
- On the Show Values tab, you can load table data and enter SQL queries. To view table data, expand the node for the table, right-click the table, and click Show Values. Values will be displayed in the Raw Data tab.
- On the Analysis tab, you can then analyze data by dragging and dropping columns onto the axes of a chart.
Publish the Local Connection
To publish the universe to the CMS, you additionally need to publish the connection.
- In the Local Projects view, right-click the connection and click Publish Connection to a Repository.
- Enter the host and port of the repository and connection credentials.
- Select the folder where the connection will be published.
- In the success dialog that results, click Yes to create a connection shortcut.
Create a Universe on the JDBC Driver for UKG Pro WFM
You can follow the steps below to create a universe on the JDBC driver. The universe in this example will be published to a repository, so it uses the published connection created in the previous step.
- In the Information Design Tool, click File->New Universe.
- Select your project.
- Select the option to create the universe on a relational data source.
- Select the shortcut to the published connection.
- Enter a name for the Data Foundation.
- Import tables and columns that you want to access as objects.
- Enter a name for the Business Layer.
Publish the Universe
You can follow the steps below to publish the universe to the CMS.
- In the Local Projects view, right-click the business layer and click Publish -> To a Repository.
- In the Publish Universe dialog, enter any integrity checks before importing.
- Select or create a folder on the repository where the universe will be published.
Query UKG Pro WFM Data in Web Intelligence
You can use the published universe to connect to UKG Pro WFM in Web Intelligence.
- Copy the cdata.jdbc.api.lic file to the following subfolder in the BusinessObjects installation directory: \dataAccess\connectionServer\jdbc\drivers\jdbc. The license file is located in the lib subfolder of the installation directory.
- Open Web Intelligence from the BusinessObjects launchpad and create a new document.
- Select the Universe option for the data source.
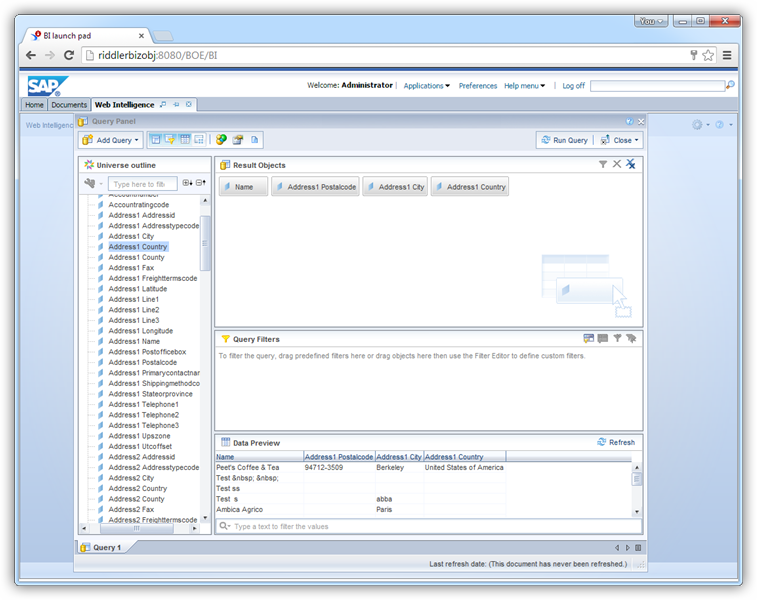
- Select the UKG Pro WFM universe. This opens a Query Panel. Drag objects to the Result Objects pane to use them in the query.