




How to create an RPA flow for ApprovalMax Data in UiPath Studio

UiPath is a Robotic Process Automation (RPA) platform with rich features and an easy-to-use UI that enables non-developers to create process automation. By using UiPath Studio, you can build an RPA program just like drawing a diagram. With the CData API Driver for ODBC, users can embed ApprovalMax data in the workflow.
This article explains how to use the ApprovalMax ODBC Driver in UiPath Studio to create an RPA program that accesses ApprovalMax data.
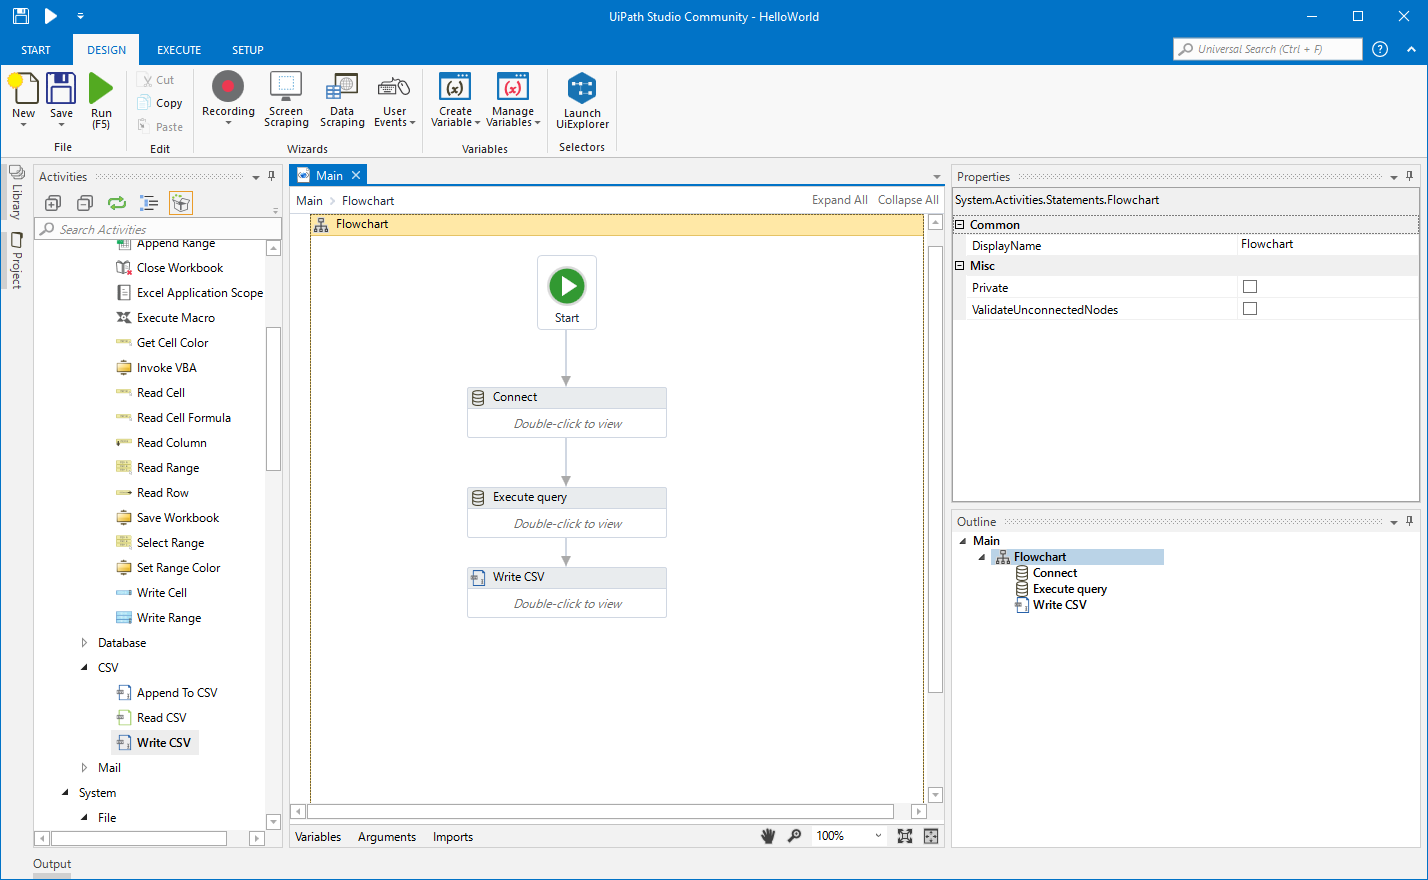
Configure the Connection to ApprovalMax
If you have not already, first specify connection properties in an ODBC DSN (data source name). This is the last step of the driver installation. You can use the Microsoft ODBC Data Source Administrator to create and configure ODBC DSNs.
Start by setting the Profile connection property to the location of the ApprovalMax Profile on disk (e.g. C:\profiles\ApprovalMax.apip). Next, set the ProfileSettings connection property to the connection string for ApprovalMax (see below).
ApprovalMax API Profile Settings
To authenticate to ApprovalMax and connect to your own data or to allow other users to connect to their data, the ApprovalMax Public API requires the OAuth 2.0 authorization code flow.
First, you will need to register an OAuth application with ApprovalMax. Sign in to the ApprovalMax Developer Portal (https://developer.approvalmax.com/applications) and create a new application. Your OAuth application will be assigned a Client ID and a Client Secret, and you must register at least one Redirect URI (Callback URL).
A Premium ApprovalMax subscription (or active trial) is required to use the Public API.
After setting the following connection properties, you are ready to connect:
- AuthScheme: Set this to OAuth.
- InitiateOAuth: Set this to GETANDREFRESH. You can use InitiateOAuth to manage the process to obtain the OAuthAccessToken.
- OAuthClientId: Set this to the Client ID that is shown in your application settings on the ApprovalMax Developer Portal.
- OAuthClientSecret: Set this to the Client Secret that is shown in your application settings on the ApprovalMax Developer Portal.
- CallbackURL: Set this to the Redirect URI that is registered in your application settings.
- Scope: (Optional) Override the default OAuth scopes. The default value openid offline_access https://www.approvalmax.com/scopes/public_api/read grants read-only access to all tables in this profile and enables refresh tokens. Use the principle of least privilege when narrowing this scope.
The OAuth Authorization URL is https://identity.approvalmax.com/connect/authorize and the Token URL is https://identity.approvalmax.com/connect/token. Both authorization_code and refresh_token grant types are supported.
Connect UiPath Studio to ApprovalMax Data
Now you are ready to use ApprovalMax data ODBC DSN in UiPath Studio with the following steps.
- From the Start page, click Blank to create a New Project.
- Click Manage Packages then search for and install UiPath.Database.Activities.
- Navigate to the Activities and drop a Flowchart (Workflow -> Flowchart -> Flowchart) onto the process.
- Drop a database Connect activity (App Integration -> Datbase -> Connect) after the Start activity.
- Double-click the Connect activity and configure the Connection.

- Click the Connection Wizard
- Select "Microsoft ODBC Data Source"
- In Connection Properties, select your DSN (CData API Source) and click OK
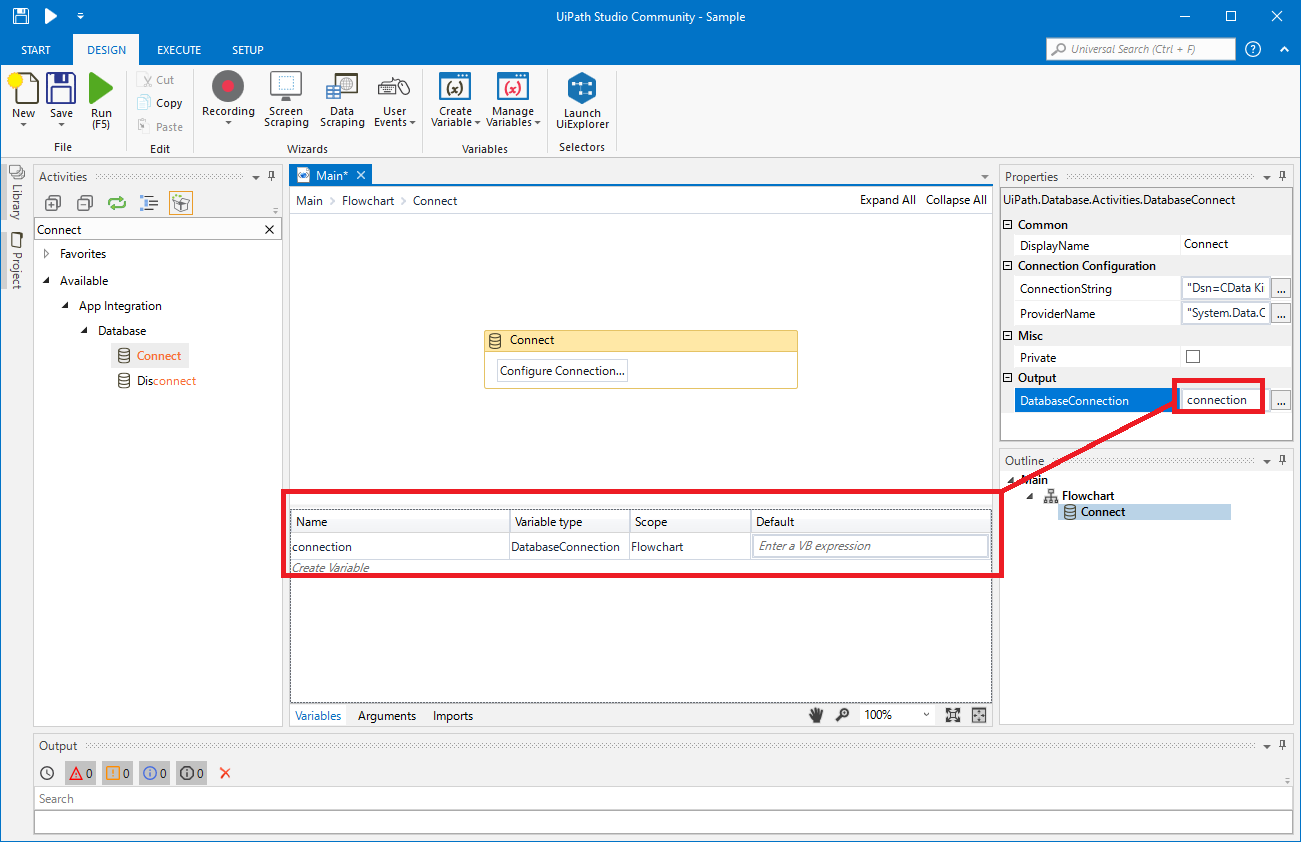
- To store Connection info, create a variable and bind to Output in the Properties section. Choose DatabaseConnection in Output.
Create an Execute Query Activity
With the connection configured, we are ready to query ApprovalMax data in our RPA.
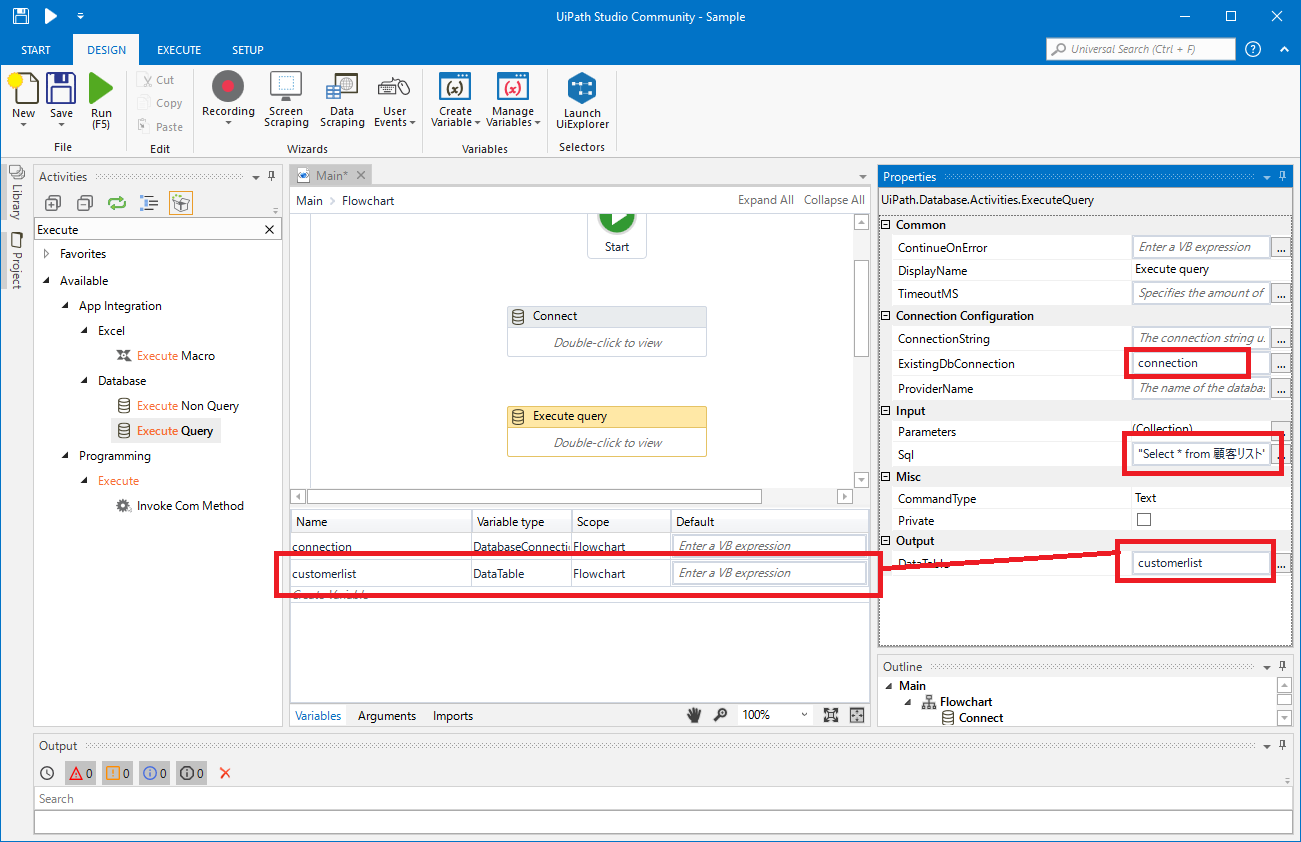
- From the Activities navigation, select Execute Query and drop it on the Flowchart.
- Double-click the Execute Query activity and set the properties as follows:
- ExistingDbConnection: Your Connection variable
- Sql: SELECT statement like SELECT UserId, Email FROM UserProfiles WHERE CompanyId = '00000000-0000-0000-0000-000000000000'
- DataTable: Create and use a variable with the Type System.Data.DataTable
Create Write CSV Activity
With the Connection and Execute Query activities configured, we are ready to add a Write CSV activity to the Flowchart to replicate the ApprovalMax data.
- From the Activities navigation, select Write CSV and drop it after the Execute Query activity.
- Double-click the Write CSV activity and set the properties as follows:
- FilePath: Set to a file (new or existing) on disk (i.e.: C:\UiPath[id]-data.csv
- DataTable: Set to the DataTable variable you created earlier
Connect the Activities and Run the Flowchart
If they are not already connected, connect each Activity that you created to complete the RPA project for extracting ApprovalMax data and exporting it to CSV.
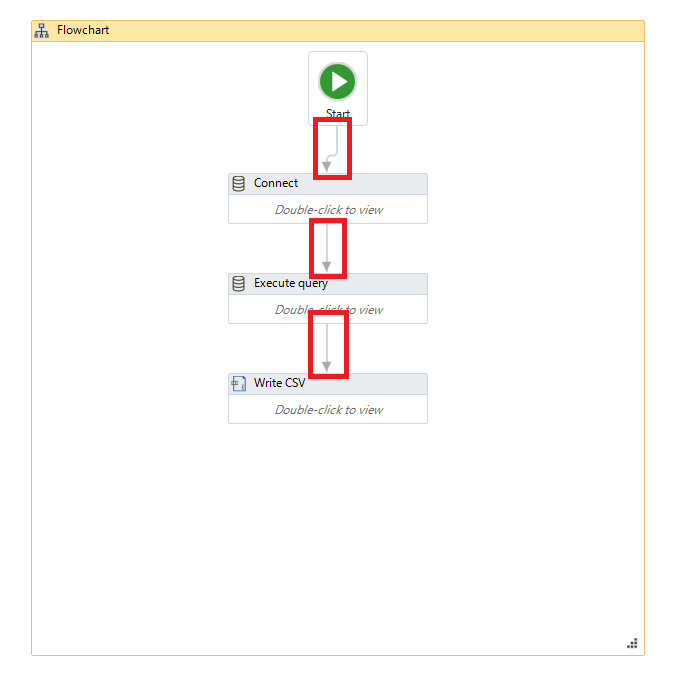
Click Run to extract ApprovalMax data and create a CSV file.
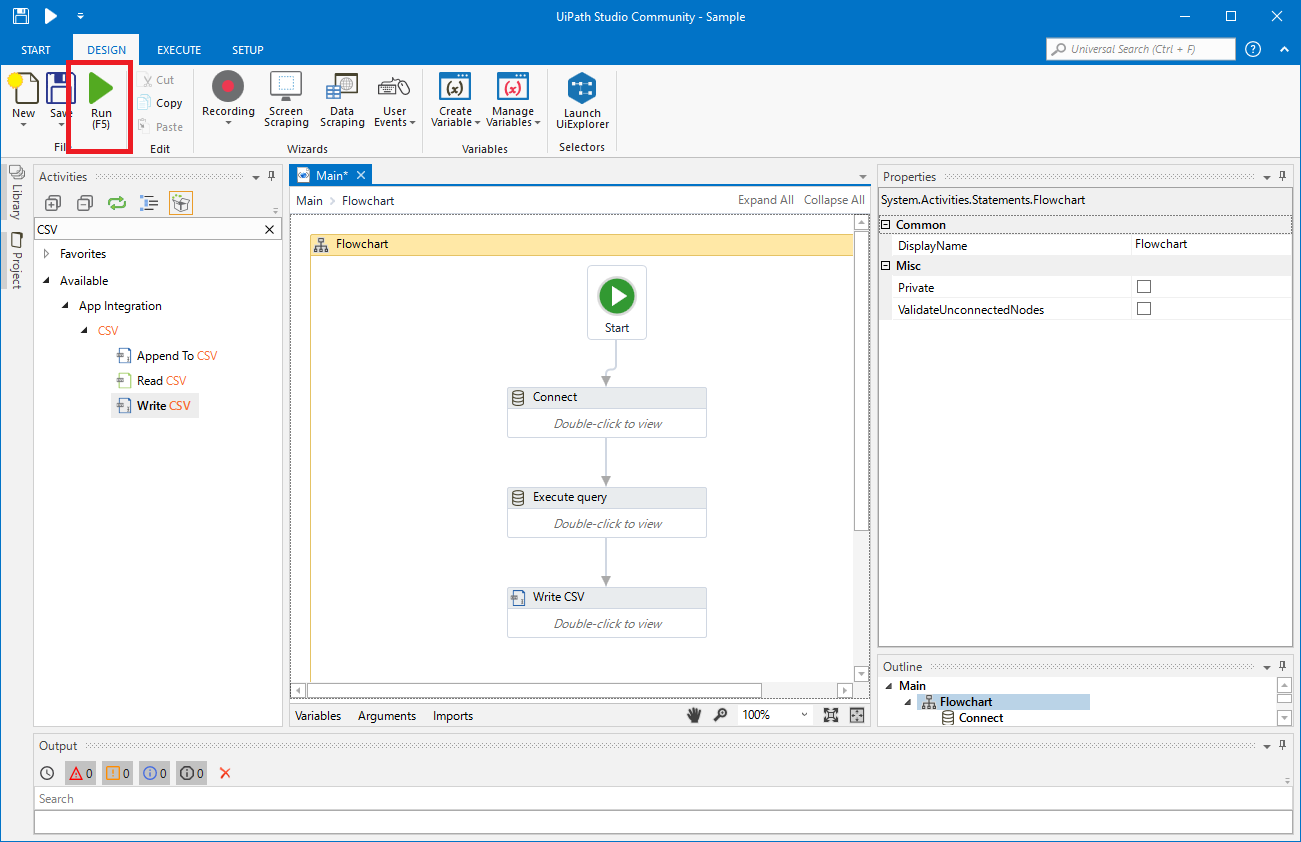
In this article, we used the CData API Driver for ODBC to create an automation flow that accesses ApprovalMax data in UiPath Studio. Download a free, 30-day trial of the ODBC Driver and start working with live ApprovalMax data in UiPath Studio today!