




How to create Clarifai federated tables in MySQL

You can use the SQL Gateway to configure a MySQL remoting service and set up federated tables for Clarifai data. The service is a daemon process that provides a MySQL interface to the CData ODBC Driver for Clarifai: After you have started the service, you can create a server and tables using the FEDERATED Storage Engine in MySQL. You can then work with Clarifai data just as you would local MySQL tables.
Connect to Clarifai Data
If you have not already done so, provide values for the required connection properties in the data source name (DSN). You can use the built-in Microsoft ODBC Data Source Administrator to configure the DSN. This is also the last step of the driver installation. See the "Getting Started" chapter in the help documentation for a guide to using the Microsoft ODBC Data Source Administrator to create and configure a DSN.
Start by setting the Profile connection property to the location of the Clarifai Profile on disk (e.g. C:\profiles\Clarifai.apip). Next, set the ProfileSettings connection property to the connection string for Clarifai (see below).
Clarifai API Profile Settings
Clarifai uses Personal Access Tokens (PATs) for authentication. To obtain a PAT:
- Log in to your Clarifai account at https://clarifai.com.
- Navigate to your profile settings and select Security.
- Click Create Personal Access Token.
- Select the required scopes and click Create Token.
- Copy the generated token (it will only be shown once).
After obtaining your Personal Access Token, set the following connection properties:
- AuthScheme: Set this to APIKey.
Set the following in the ProfileSettings connection property:
- APIKey: Set this to your Clarifai Personal Access Token (PAT).
Configure the SQL Gateway
See the SQL Gateway Overview to set up connectivity to Clarifai data as a virtual MySQL database. You will configure a MySQL remoting service that listens for MySQL requests from clients. The service can be configured in the SQL Gateway UI.
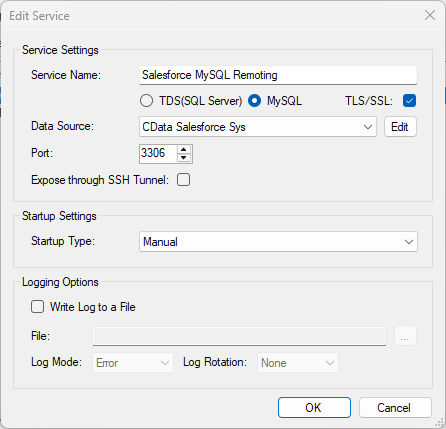
Create a FEDERATED Server and Tables for Clarifai Data
After you have configured and started the service, create a FEDERATED server to simplify the process of creating FEDERATED tables:
Create a FEDERATED Server
The following statement will create a FEDERATED server based on the ODBC Driver for Clarifai. Note that the username and password of the FEDERATED server must match a user account you defined on the Users tab of the SQL Gateway.
CREATE SERVER fedAPI
FOREIGN DATA WRAPPER mysql
OPTIONS (USER 'sql_gateway_user', PASSWORD 'sql_gateway_passwd', HOST 'sql_gateway_host', PORT ####, DATABASE 'CData API Sys');
Create a FEDERATED Table
To create a FEDERATED table using our newly created server, use the CONNECTION keyword and pass the name of the FEDERATED server and the remote table (Apps). Refer to the following template for the statement to create a FEDERATED table:
CREATE TABLE fed_apps (
  ...,
  id  TYPE(LEN),
  name  TYPE(LEN),
  ...,
)
ENGINE=FEDERATED
DEFAULT CHARSET=latin1
CONNECTION='fedAPI/apps';
NOTE: The table schema for the FEDERATED table must match the remote table schema exactly. You can always connect directly to the MySQL remoting service using any MySQL client and run a SHOW CREATE TABLE query to get the table schema.
Execute Queries
You can now execute queries to the Clarifai FEDERATED tables from any tool that can connect to MySQL, which is particularly useful if you need to JOIN data from a local table with data from Clarifai. Refer to the following example:
SELECT
  fed_apps.id,
  local_table.custom_field
FROM
  local_table
JOIN
  fed_apps
ON
  local_table.foreign_id = fed_apps.id;