




Integrate Sage X3 Cloud Data in the Pentaho Report Designer

The CData JDBC driver for Sage X3 Cloud data enables access to live data from dashboards and reports. This article shows how to connect to Sage X3 Cloud data as a JDBC data source and publish reports based on Sage X3 Cloud data in Pentaho.
Connect and Create a Report
- Copy the JAR file of the driver, located in the lib subfolder of the installation directory, to the \Report-Designer\lib\jdbc\ folder in the Pentaho directory.
- Run the report-designer.bat file in the \Report-Designer\ folder to open the Report-Designer UI.
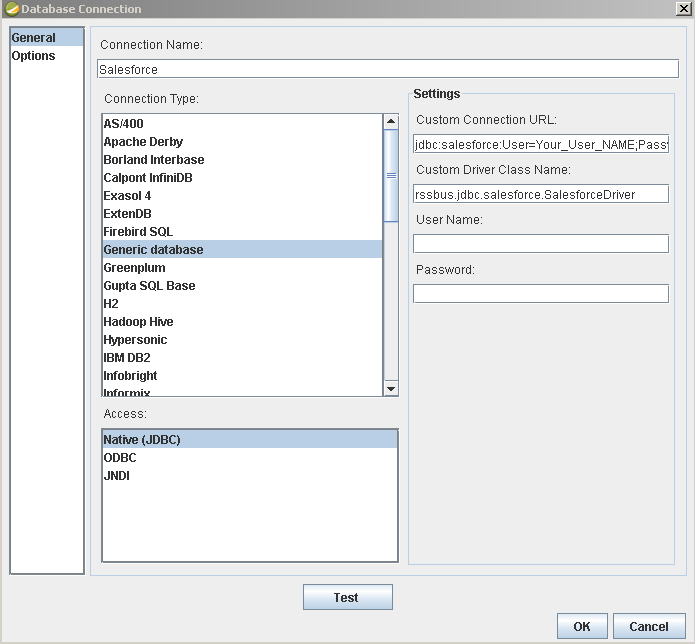
Create a new data source with the driver by clicking Data -> Add Data Source -> Advanced -> JDBC (Custom) and then creating a new Sage X3 Cloud connection. In the resulting dialog, configure the connection properties as shown below.
Custom Connection URL property: Enter the JDBC URL. This starts with jdbc:sagex3cloud: and is followed by a semicolon-separated list of connection properties.
Sage X3 Cloud uses the OAuth 2.0 Client Credentials flow, and an X-API-Key is also required for API access. Set AuthScheme to OAuth and specify the following connection properties:
- URL: The base URL of your Sage X3 Cloud instance.
- OAuthAccessTokenUrl: The OAuth token endpoint (e.g., https://your-auth-domain/oauth/token).
- OAuthClientId: Your OAuth application client ID.
- OAuthClientSecret: Your OAuth application client secret.
- Audience: The API audience value for the token request.
- XAPIKey: The X-API-Key provided by your Sage X3 Cloud administrator.
- Folder: The Sage X3 folder name (e.g., SEED). This folder is used as the default schema.
- Folders (optional): A comma-separated list of Sage X3 folders (e.g., SEED,PERF). Each folder is exposed as a separate schema, so you can query across folders with the Schema.Table syntax.
The driver obtains an access token with the Client Credentials flow and sends it with the X-API-Key on every API request. With InitiateOAuth set to GETANDREFRESH (the default), the driver acquires and refreshes the token automatically.
Built-in Connection String Designer
For assistance in constructing the JDBC URL, use the connection string designer built into the Sage X3 Cloud JDBC Driver. Either double-click the JAR file or execute the jar file from the command-line.
java -jar cdata.jdbc.sagex3cloud.jarFill in the connection properties and copy the connection string to the clipboard.

When you configure the JDBC URL, you may also want to set the Max Rows connection property. This will limit the number of rows returned, which is especially helpful for improving performance when designing reports and visualizations.
Below is a typical JDBC URL:
jdbc:sagex3cloud:AuthScheme=OAuth;URL=https://x3server/;OAuthAccessTokenUrl=https://auth-domain/oauth/token;OAuthClientId=your_client_id;OAuthClientSecret=your_client_secret;Audience=https://api-audience;XAPIKey=your_api_key;Folder=SEED;- Custom Driver Class Name: Enter cdata.jdbc.sagex3cloud.SageX3CloudDriver.
- User Name: The username to authenticate with.
- Password: The password to authenticate with.
Add Sage X3 Cloud Data to a Report
You are now ready to create a report with Sage X3 Cloud data.
-
Add the Sage X3 Cloud source to your report: Click Data -> Add Data Source -> JDBC and select the data source.
Configure the query. This article uses the one below:
SELECT BPCNUM, BPCNAM FROM BPCUSTOMER WHERE BPCNUM = 'MARTIN'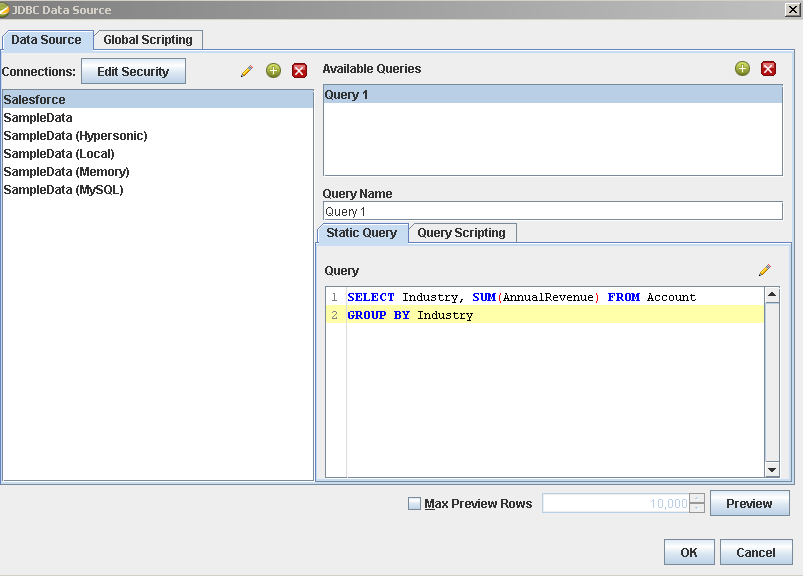
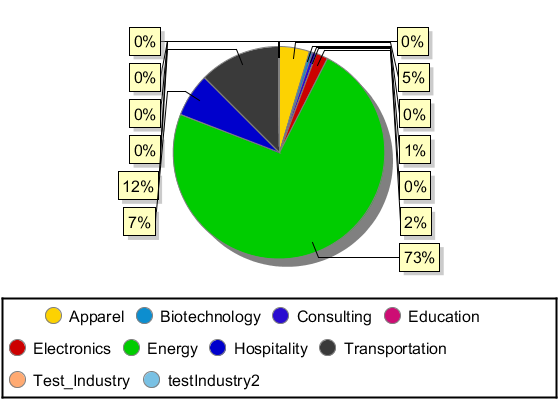
- Drag a chart onto your report and double-click it to edit the chart. Run the report to display the chart. You can use the results of this query to create a simple chart for the BPCUSTOMER table.
- Finally, run the report to see the chart.
Ready to get started?
Download a free trial of the Sage X3 Cloud Driver to get started:
Download NowLearn more:
 Sage X3 Cloud JDBC Driver
Rapidly create and deploy powerful Java applications that integrate with Sage X3 Cloud.