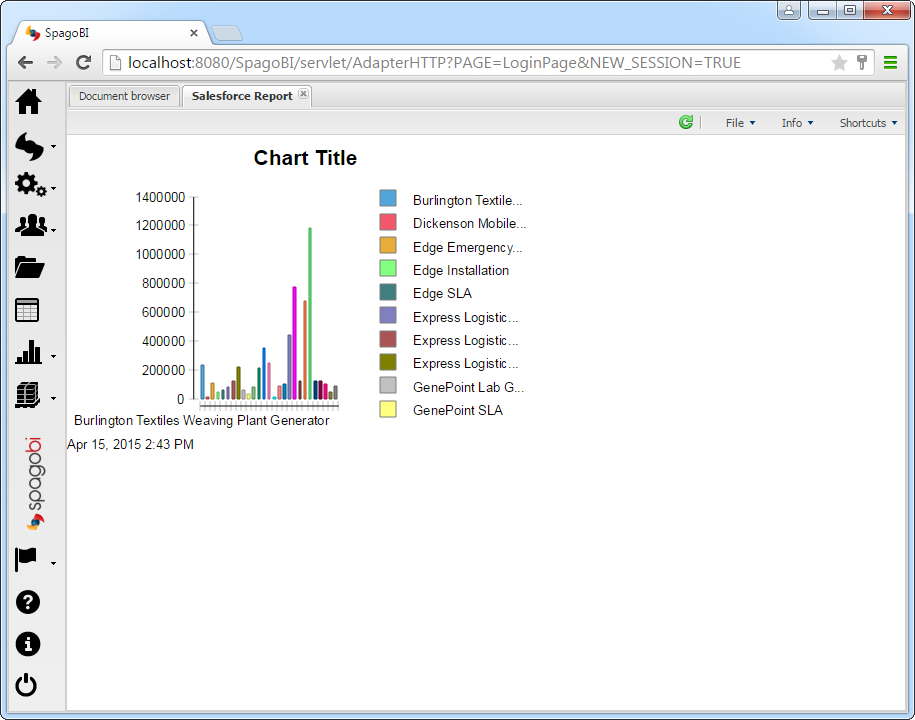
Connect to UKG Pro WFM in SpagoBI

The CData JDBC Driver for UKG Pro WFM enables you to connect to live UKG Pro WFM data from business intelligence and data mining tools that support the JDBC standard. This article shows how to integrate UKG Pro WFM data into a report in SpagoBI Studio and host it on SpagoBI Server.
- Deploy the Driver in SpagoBI Server
- Create a Report in SpagoBI Studio
- Host UKG Pro WFM Reports on SpagoBI Server
Deploy the JDBC Driver in SpagoBI Server
Follow the steps to create a JDBC data source for UKG Pro WFM in SpagoBI Server.
- Copy the driver JAR into %CATALINA_BASE%/lib. These files are located in the lib subfolder of the installation directory.
Add a UKG Pro WFM driver resource to the context. The following resource definition can be added to the GlobalNamingResources element in server.xml:
<Resource name="jdbc/api" auth="Container" type="javax.sql.DataSource" driverclassname="cdata.jdbc.api.APIDriver" factory="org.apache.tomcat.jdbc.pool.DataSourceFactory" maxactive="20" maxidle="10" maxwait="-1"/>- Add the following resource link to give access to Web applications. For this article, add the following line to META-INF\context.xml for SpagoBI.
<ResourceLink global="jdbc/api" name="jdbc/api" type="javax.sql.DataSource"/> - Restart the server.
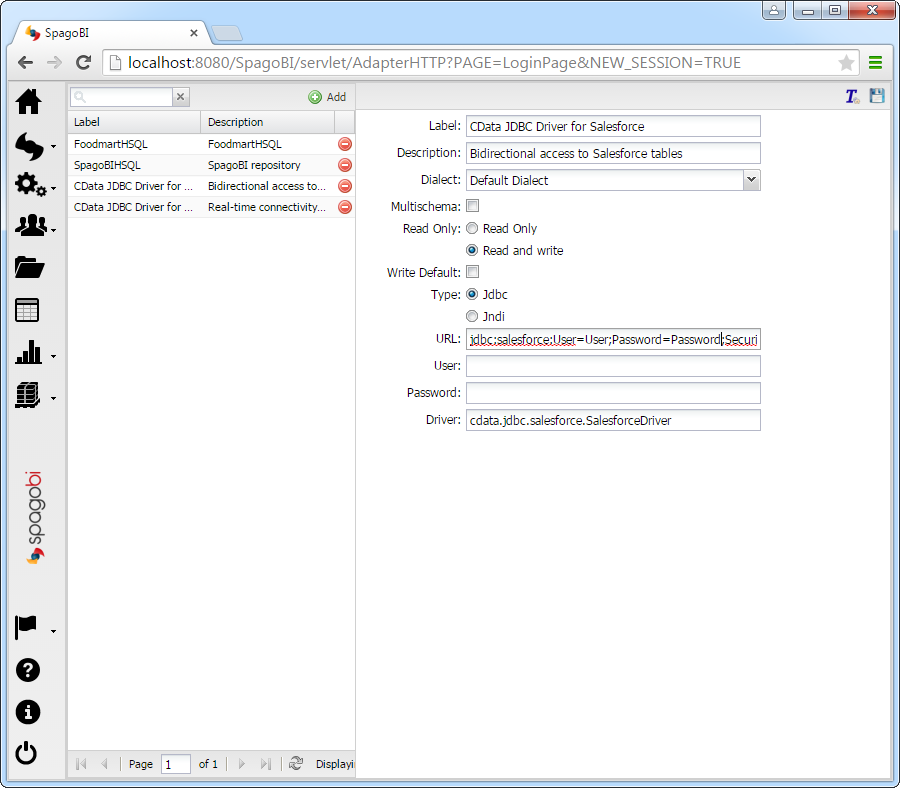
After adding the driver to the resources for the SpagoBI server, add the data source: In SpagoBI, click Resources -> Data Source -> Add and enter the following information:
- Label: Enter a unique identifier for the driver.
- Description: Enter a description for the driver.
- Dialect: Select Default Dialect.
- Read Only: Select the read-only option. This option determines whether the data source is the default database to save datasets created by the end user.
- Type: Select JDBC.
- URL: Enter the JDBC URL using the required connection string properties:
Start by setting the Profile connection property to the location of the UKGProWFM Profile on disk (e.g. C:\profiles\UKGProWFM.apip). Next, set the ProfileSettings connection property to the connection string for UKGProWFM (see below).
UKGProWFM API Profile Settings
UKG Pro Workforce Management uses OAuth 2.0 with the Resource Owner Password Credentials grant (grant_type=password) to authorize access to the API. Unlike most OAuth-based profiles, this does not use a browser redirect/authorization-code step: the driver exchanges your UKG Pro WFM username, password, client ID, and client secret directly for an access token.
Set the following connection properties to authenticate:
- AuthScheme: Set this to OAuthPassword.
- Host: Set this to the hostname of your UKG Pro Workforce Management datacenter/tenant (for example, yourcompany.mykronos.com). Do not include the protocol (https://) or a trailing slash.
- OAuthClientId: Set this to the client ID issued for your UKG Pro Workforce Management OAuth application.
- OAuthClientSecret: Set this to the client secret issued for your UKG Pro Workforce Management OAuth application.
- User: Set this to your UKG Pro Workforce Management username.
- Password: Set this to your UKG Pro Workforce Management password.
Access tokens are obtained from https://{Host}/api/authentication/access_token. Refresh tokens issued by UKG Pro Workforce Management expire after 7 days; if a refresh attempt fails because the refresh token itself has expired, the driver must re-authenticate with your User/Password credentials to obtain a new access token.
Built-in Connection String Designer
For assistance in constructing the JDBC URL, use the connection string designer built into the UKG Pro WFM JDBC Driver. Either double-click the JAR file or execute the jar file from the command-line.
java -jar cdata.jdbc.api.jarFill in the connection properties and copy the connection string to the clipboard.

A typical JDBC URL is below:
jdbc:api:Profile=C:\profiles\UKGProWFM.apip;AuthScheme=OAuthPassword;ProfileSettings='Host=yourcompany.mykronos.com;User=your_username;Password=your_password;';OAuthClientId=your_client_id;OAuthClientSecret=your_client_secret; - Driver: Enter the class name for the driver: cdata.jdbc.api.APIDriver
Create Reports in SpagoBI Studio
Follow the steps below to populate reports based on UKG Pro WFM data in SpagoBI Studio. You will create a dataset that populates a chart with the results of an SQL query. In the next section, you will host this report on SpagoBI Server.
First, you will need to connect to UKG Pro WFM data from a report in SpagoBI Studio:
- In SpagoBI Studio, click File -> New -> Project and select Report Project in the Business Intelligence and Reporting Tools folder.
- Click File -> New -> Report and select Blank Report.
- In the Data Explorer view, right-click Data Sources and click New Data Source.
- Select JDBC Data Source and enter a name for the data source.
- Click Manage Drivers and click Add to add the driver JAR, cdata.jdbc.api.jar. The driver JAR is located in the lib subfolder of the installation directory.
- In the Driver Class menu, select the driver class, cdata.jdbc.api.APIDriver.
- In the Database URL box, enter the JDBC URL. A typical JDBC URL is below:
See the "Getting Started" chapter of the driver help for a guide to obtaining the required connection properties.jdbc:api:Profile=C:\profiles\UKGProWFM.apip;AuthScheme=OAuthPassword;ProfileSettings='Host=yourcompany.mykronos.com;User=your_username;Password=your_password;';OAuthClientId=your_client_id;OAuthClientSecret=your_client_secret;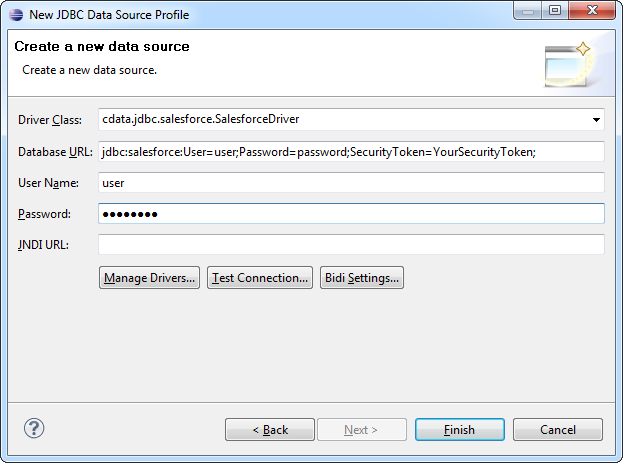
After you have connected to UKG Pro WFM data, create a dataset that contains the results of an SQL query:
- Right-click the DataSet folder and click New Data Set. Select the JDBC data source for UKG Pro WFM and enter a name for the dataset.
- Build the SQL query. In this example, this query will be used to add a chart to the dashboard. For example:
SELECT PersonNumber, UserName FROM Employees WHERE PersonId = '12345'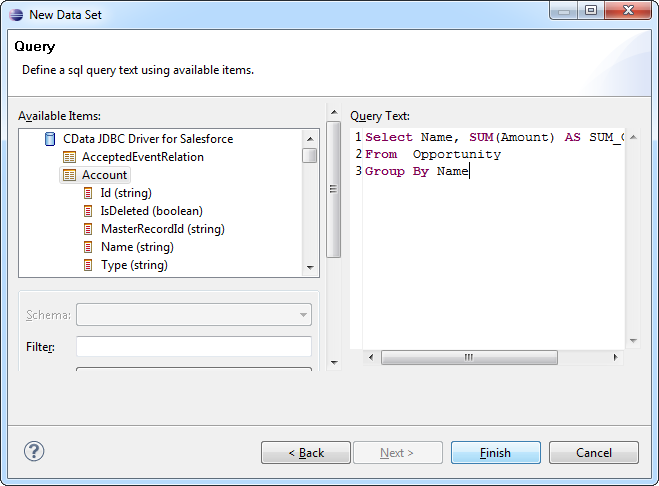
You can use the dataset to populate report objects. Follow the steps below to create a chart.
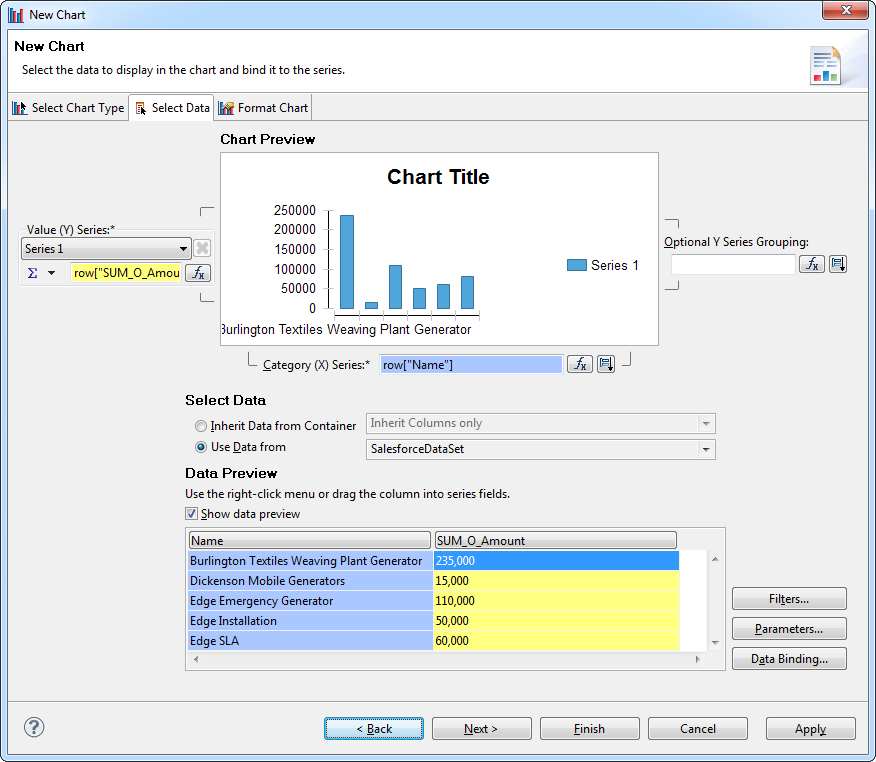
- In the Palette view, drag a chart onto the canvas.
- In the Select Chart Type tab, select a bar chart.
- In the Select Data tab, click the Use Data From option and select the UKG Pro WFM data set from the menu.
- Drag PersonNumber from the table to the series for the x-axis.
- Drag UserName from the table to the series for the y-axis.
Host UKG Pro WFM Reports on SpagoBI Server
Follow the steps below to host documents based on live UKG Pro WFM data on SpagoBI Server. You will use the report you created in the previous section as a template. To enable report users to access the live data, create placeholder parameters to be replaced by the UKG Pro WFM JDBC data source on the server:
- If you have not already done so, open the Report Design perspective in SpagoBI Studio.
- In the Data Explorer view, right-click the Report Parameters folder and click New Parameter. Add the url parameter and assign an empty value to it. This parameter is a placeholder for the JDBC data source on the SpagoBI Server.
- Right-click the UKG Pro WFM data source and click Edit.
-
In the Property Binding node, set the JDBC Driver URL binding property to the url parameter: Click the box for the property. In the Category section, select Report Parameters. Select All in the Subcategory section and double-click the parameter.
You can also enter the following in the JavaScript syntax:
params["url"].value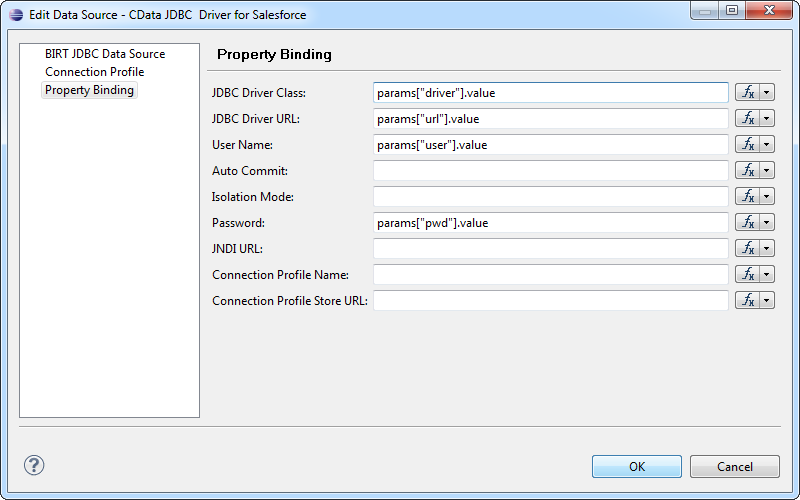
Next, create a new document for the report on SpagoBI Server.
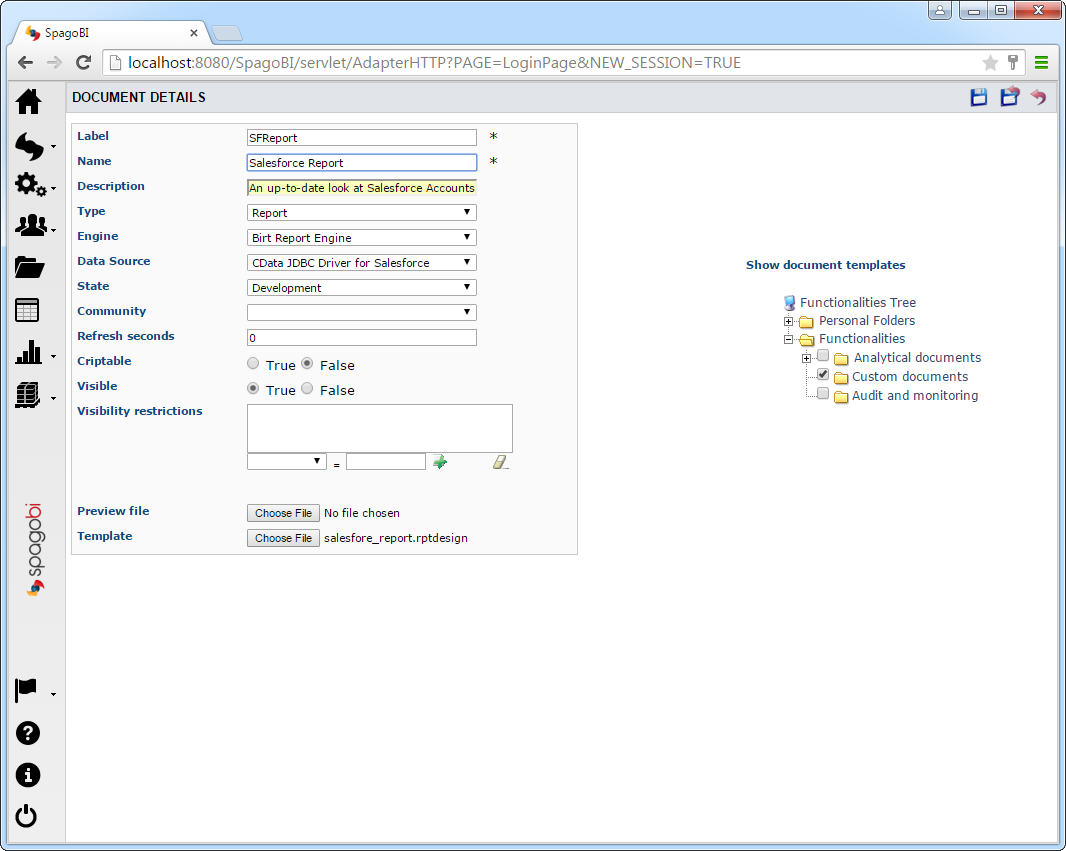
- In SpagoBI Server, click Documents Development -> Create Document -> Generic Document. The Document Details page is displayed.
- To create the document, enter the following:
- Label: Enter a unique identifier for the document.
- Name: Enter a user-friendly name for the document.
- Type: Select Report from the menu.
- Engine: Select BIRT Report Engine.
- Data Source: Select the UKG Pro WFM Data Source you created in Create a JDBC Data Source for UKG Pro WFM in SpagoBI Server.
- In the Show Document Templates section, select the folder where you want the document to be stored.
In the Template section, click Choose File. Navigate to the folder containing your report project. Select the .rptdesign file.
Note: You can find the path to the project in the project properties.
- Click the Save button.
When you run the report on the server, the placeholder url parameter is replaced with the JDBC URL defined on the server.