








Connect to Anaplan Data from Filemaker Pro (Mac)

FileMaker Pro is a cross-platform relational database application that allows users to visually modify a database. When paired with CData Connect AI, FileMaker Pro gets access to live Anaplan data. This article demonstrates how to connect to Anaplan using Connect AI and query Anaplan data in FileMaker Pro.
CData Connect AI provides a pure SQL Server interface for Anaplan, allowing you to query data from Anaplan without replicating the data to a natively supported database. Using optimized data processing out of the box, CData Connect AI pushes all supported SQL operations (filters, JOINs, etc.) directly to Anaplan, leveraging server-side processing to return the requested Anaplan data quickly.
Configure Anaplan Connectivity for FileMaker Pro
Connectivity to Anaplan from FileMaker Pro is made possible through CData Connect AI. To work with Anaplan data from FileMaker Pro, we start by creating and configuring a Anaplan connection.
- Log into Connect AI, click Sources, and then click Add Connection
- Select "Anaplan" from the Add Connection panel
-
Enter the necessary authentication properties to connect to Anaplan.
Authenticating to Anaplan
The driver supports authenticating with Basic, Certificate, or OAuth. In every case, set Region to the region where your Anaplan account data is hosted (e.g., US1, which is the default).
Using Basic Authentication
Set AuthScheme to Basic, then supply your Anaplan User and Password. If your workspace uses single sign-on (SSO), you must be assigned as an Exception User to use Basic authentication.
Using Certificate Authentication
Set AuthScheme to Certificate, then supply the Certificate, CertificateType, and PrivateKey properties (and the matching CertificatePassword / PrivateKeyPassword if either is encrypted). The certificate must be a CA-issued X.509 certificate registered with your Anaplan tenant administrator.
Using OAuth Authentication
Register a custom OAuth application in Anaplan, then set the following properties:
- OAuthClientId: The client Id assigned when you registered your custom OAuth application.
- OAuthClientSecret: The client secret assigned when you registered your custom OAuth application.
- CallbackURL: The redirect URI defined when you registered your application.
- InitiateOAuth: Set to GETANDREFRESH to have the driver manage the OAuth token exchange and refresh automatically.
See the Getting Started chapter of the help documentation for a guide to creating a custom OAuth app and using OAuth.

- Click Save & Test
-
Navigate to the Permissions tab in the Add Anaplan Connection page and update the User-based permissions.



Add a Personal Access Token
When connecting to Connect AI through the REST API, the OData API, or the Virtual SQL Server, a Personal Access Token (PAT) is used to authenticate the connection to Connect AI. It is best practice to create a separate PAT for each service to maintain granularity of access.
- Click on the Gear icon () at the top right of the Connect AI app to open the settings page.
- On the Settings page, go to the Access Tokens section and click Create PAT.
-
Give the PAT a name and click Create.

- The personal access token is only visible at creation, so be sure to copy it and store it securely for future use.
With the connection configured and a PAT generated, you are ready to connect to Anaplan data from Filemaker Pro.
Connect to Anaplan from FileMaker Pro using Connect AI
To establish a connection from FileMaker Pro to the CData Connect AI Virtual SQL Server API, follow these steps.
Configure the ODBC Connection to CData Connect AI
- Download and install the Actual ODBC Driver for SQL Server (actualtech.com)
- Configure a DSN for the Actual ODBC driver by setting the following properties:
- URL: tds.cdata.com
- Port: Change the port from 1433 to 14333
- Username: Your Connect AI email address
- Password: the PAT you created earlier
Query Anaplan from FileMaker Pro
- In the SQL Query Builder "SELECT" tab, select the columns to include as part of the query.
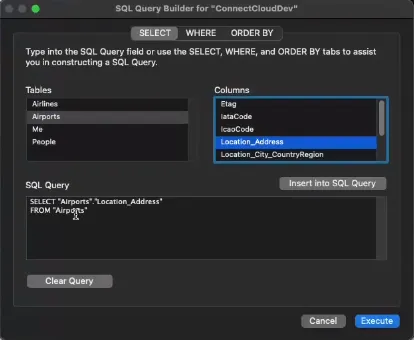
- Open the "WHERE" tab of the SQL Query Builder and select "Show only selected columns."
- In "Table.Column,"" select a table and a column name.
- Set the "Operator" to =.
- Select "Column," and then select the same table and column name as "Table.Column."
- Click "Insert into SQL Query."
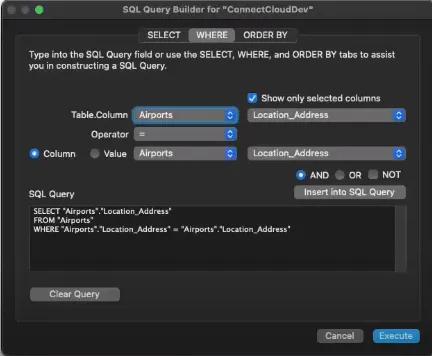
- If no other modifications to the SQL query are required, click "Execute."
Get CData Connect AI
To get live data access to hundreds of SaaS, Big Data, and NoSQL sources directly from your SQL Server database, try CData Connect AI today!