








Connecting Agentforce with Bitbucket Data via CData Connect AI MCP Server

Agentforce is built for enterprise teams. Its declarative tooling and API-first architecture make it straightforward to compose assistants and automate CRM-centric workflows. But when agents need to work with data beyond Bitbucket data, many implementations fall back on periodic syncs or bespoke middleware to replicate external systems into local stores. That adds complexity, creates governance and maintenance overhead, introduces sync delays, and limits the real-time potential of your agents.
CData Connect AI fills this gap with direct, live connectivity to hundreds of enterprise apps, databases, ERPs, and finance platforms. Using CData's remote Model Context Protocol (MCP) Server, Agentforce agents can securely read, write, and act on fresh, contextual data at runtime; no replication required. The result is grounded responses, real-time decisions, and cross-system automations with fewer moving parts and stronger control.
This article outlines the steps required to configure Bitbucket connectivity in Connect AI, register the MCP server in Agentforce, and build a workflow that queries Bitbucket data data.
Prerequisites:
- CData Connect AI account
- Install Python 3.9+
- Bitbucket data org with Agentforce enabled and permission to create/manage Connected Apps
Credentials Checklist:
Before you begin, you'll need a few credentials mentioned below:
CData Connect AI MCP:
- USERNAME: Your CData email login
- PAT: Connect AI, go to Settings and click on Access Tokens (copy once)
- MCP_BASE_URL: https://mcp.cloud.cdata.com/mcp
- MCP_AUTH: Base64 encoded (EMAIL:PAT), where EMAIL is your Connect AI email address and PAT is your Connect AI personal access token (see below).
Note: You can create the base64 encoded version of MCP_AUTH using any Base64 encoding tool.
Agentforce:
- SFDC_DOMAIN: My Domain URL (https://your_domain.my.salesforce.com)
- SFDC_CLIENT_ID & SFDC_CLIENT_SECRET: from your Connected App
- AGENT_ID: open your agent in Agentforce Agents and copy the 18-char ID at the end of the URL
Step 1: Configure Bitbucket Connectivity for Agentforce
Connectivity to Bitbucket from Agentforce is made possible through CData Connect AI Remote MCP. To interact with Bitbucket data from Agentforce, we start by creating and configuring a Bitbucket connection in CData Connect AI.
- Log into Connect AI, click Sources, and then click Add Connection
- Select "Bitbucket" from the Add Connection panel
-
Enter the necessary authentication properties to connect to Bitbucket.
For most queries, you must set the Workspace. The only exception to this is the Workspaces table, which does not require this property to be set, as querying it provides a list of workspace slugs that can be used to set Workspace. To query this table, you must set Schema to 'Information' and execute the query SELECT * FROM Workspaces>.
Setting Schema to 'Information' displays general information. To connect to Bitbucket, set these parameters:
- Schema: To show general information about a workspace, such as its users, repositories, and projects, set this to Information. Otherwise, set this to the schema of the repository or project you are querying. To get a full set of available schemas, query the sys_schemas table.
- Workspace: Required if you are not querying the Workspaces table. This property is not required for querying the Workspaces table, as that query only returns a list of workspace slugs that can be used to set Workspace.
Authenticating to Bitbucket
Bitbucket supports OAuth authentication only. To enable this authentication from all OAuth flows, you must create a custom OAuth application, and set AuthScheme to OAuth.
Be sure to review the Help documentation for the required connection properties for you specific authentication needs (desktop applications, web applications, and headless machines).
Creating a custom OAuth application
From your Bitbucket account:
- Go to Settings (the gear icon) and select Workspace Settings.
- In the Apps and Features section, select OAuth Consumers.
- Click Add Consumer.
- Enter a name and description for your custom application.
- Set the callback URL:
- For desktop applications and headless machines, use http://localhost:33333 or another port number of your choice. The URI you set here becomes the CallbackURL property.
- For web applications, set the callback URL to a trusted redirect URL. This URL is the web location the user returns to with the token that verifies that your application has been granted access.
- If you plan to use client credentials to authenticate, you must select This is a private consumer. In the driver, you must set AuthScheme to client.
- Select which permissions to give your OAuth application. These determine what data you can read and write with it.
- To save the new custom application, click Save.
- After the application has been saved, you can select it to view its settings. The application's Key and Secret are displayed. Record these for future use. You will use the Key to set the OAuthClientId and the Secret to set the OAuthClientSecret.

- Click Save & Test
-
Navigate to the Permissions tab in the Add Bitbucket Connection page and update the User-based permissions.



Add a Personal Access Token
A Personal Access Token (PAT) is used to authenticate the connection to Connect AI from Agentforce. It is best practice to create a separate PAT for each service to maintain granularity of access.
- Click on the Gear icon () at the top right of the Connect AI app to open the settings page.
- On the Settings page, go to the Access Tokens section and click Create PAT.
-
Give the PAT a name and click Create.

- The personal access token is only visible at creation, so be sure to copy it and store it securely for future use.
With the connection configured and a PAT generated, we are ready to connect to Bitbucket data from Agentforce.
Step 2: Enable Agentforce and publish the Experience Cloud site
- In Salesforce Setup, go to Einstein Setup, toggle Turn on Einstein
- Go to Agentforce Agents, toggle Agentforce on
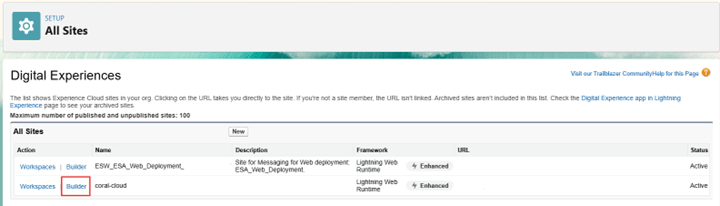
- Publish the Experience Cloud Site that hosts Coral Cloud: Setup, search for All Sites then select Builder (for coral-cloud) click Publish and Confirm
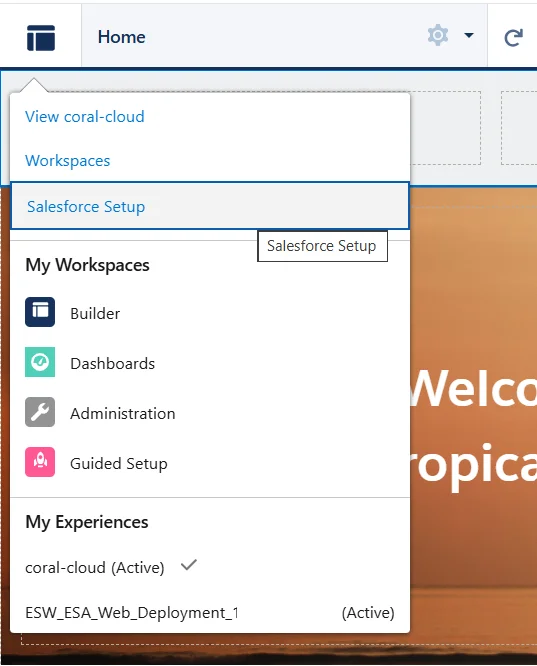
- Click the Experience Builder menu
- Click Salesforce Setup
- Refresh your browser to reload Setup. Feel free to close the Experience Site browser tab.


Step 3: Set up the EinsteinServiceAgent user and profile
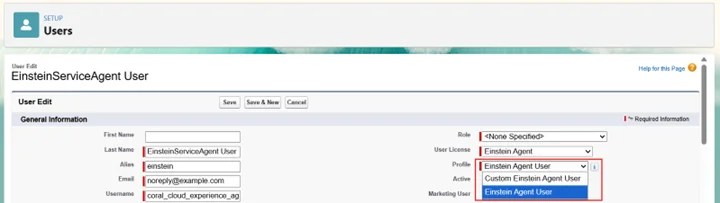
- In the Setup Quick Find, search for and select Users
- Click Edit next to the EinsteinServiceAgent User
- Update the Profile to Einstein Agent User
- Keep everything else as-is
- Click Save
Step 4: Create the Agent and attach an external connection
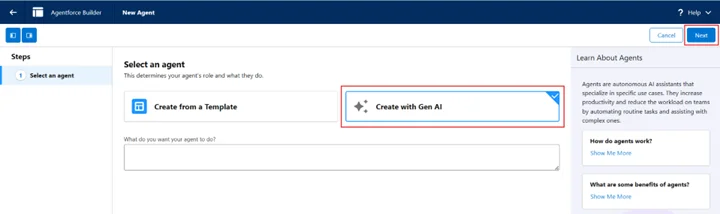
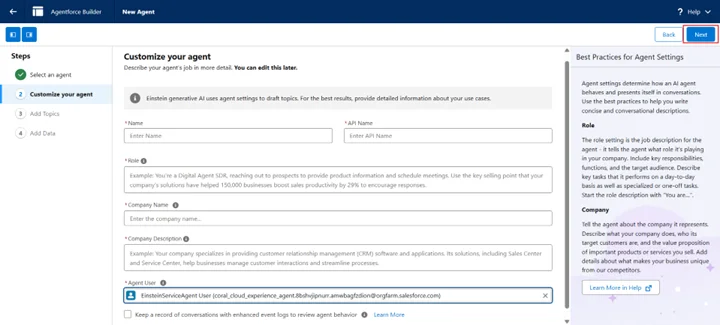
- Setup search for Agentforce Agents click New Agent
- Click Create with Gen AI
- Provide a summary, name, role, company info; set Agent User = EinsteinServiceAgent User
- Check Keep a record of conversations with enhanced event logs, and click Save
- Click Create
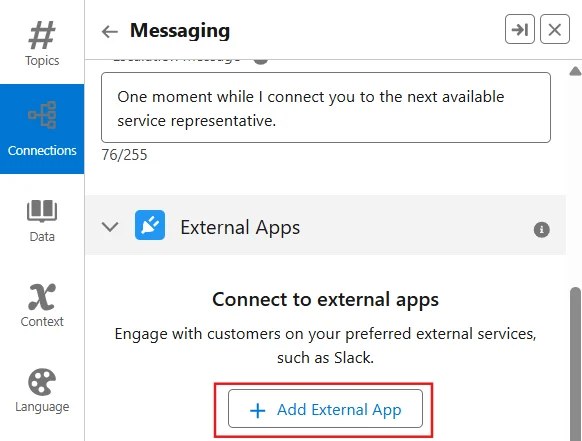
- Add Connections select Needs Setup click on Add External App
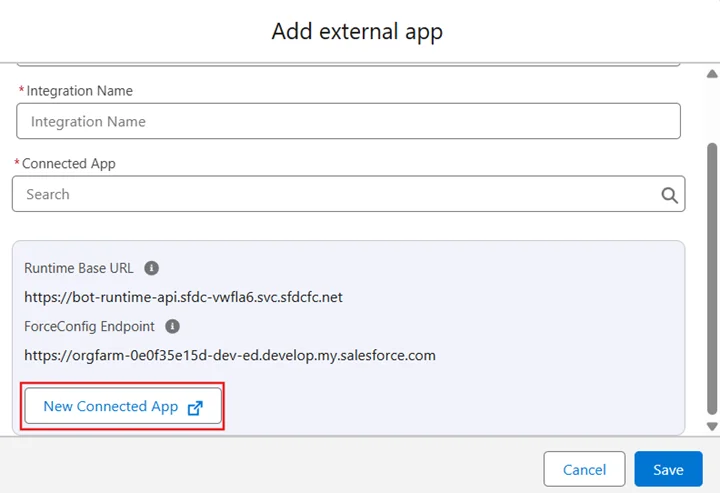
- Set Connection Type = API, and provide an Integration Name
- Click New Connected App (you'll configure it in the next step)
Step 5: Create and configure the Salesforce Connected App (Client Credentials)
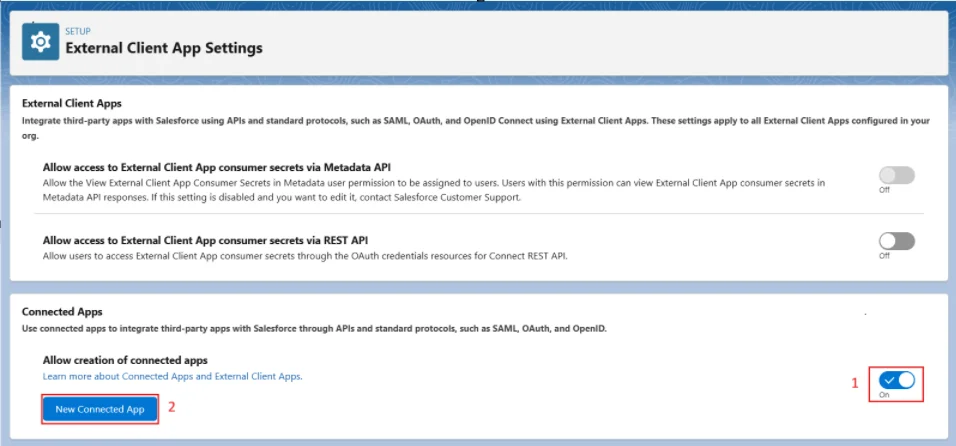
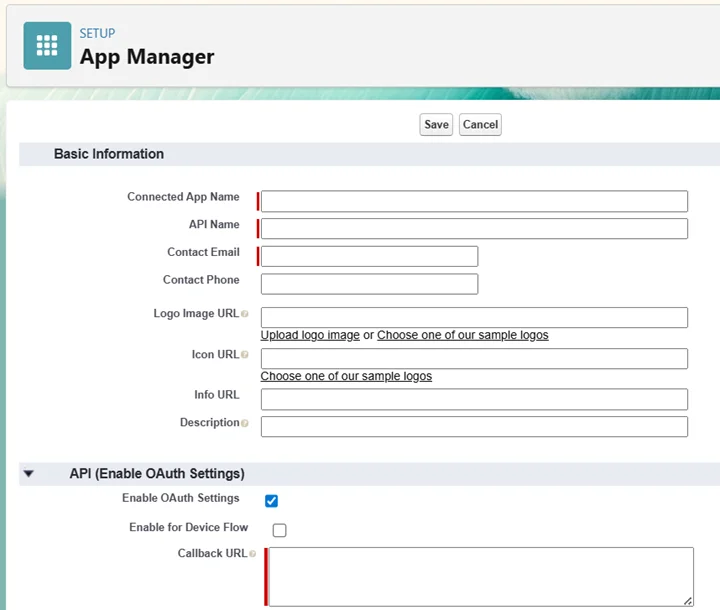
- Allow creation of Connected Apps
- Click on New Connected App and provide Name and Admin Email
- Enable OAuth Settings with Callback URL: https://login.salesforce.com
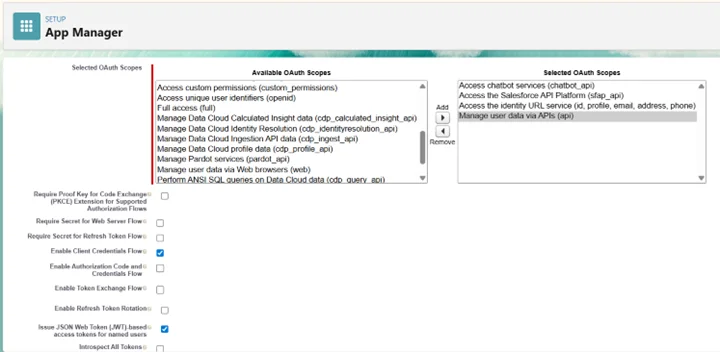
- OAuth Scopes (add all):
- Access chatbot services (chatbot_api)
- Access the Salesforce API Platform (sfap_api)
- Manage user data via APIs (api)
- Perform requests at any time (refresh_token, offline_access)
- Deselect:
- PKCE
- Require Secret for Web Server Flow
- Require Secret for Refresh Token Flow
- Select:
- Enable Client Credentials Flow
- Issue JWT-based access tokens for named users.
- Enable the Save option
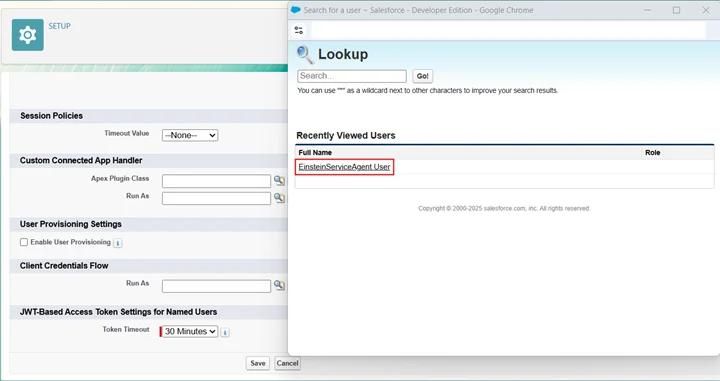
- On the app's Manage page click on Edit Policies
- Permitted Users: Select the appropriate option for your org
- In Client Credentials Flow set Run As: choose a user with at least API Only access.
- Enable JWT-based Access Tokens; Token Timeout: 30 minutes, and click Save
- Finally, return to your Agent Connection and select this Connected App, and click Save
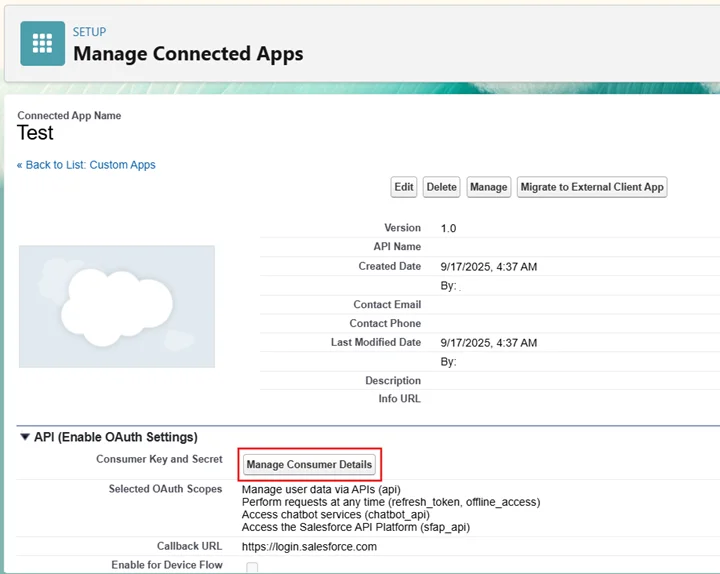
- Retrieve Consumer Key and Consumer Secret from App Manager
- Find your Connected App and View the Manage Consumer Details
- Copy Consumer Key and Consumer Secret

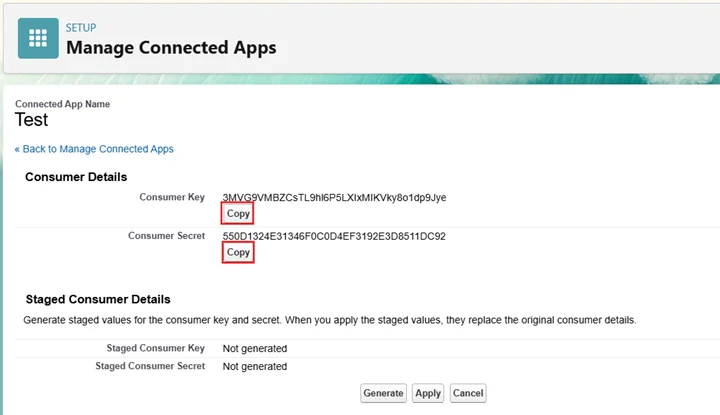
Step 6: Collect remaining IDs
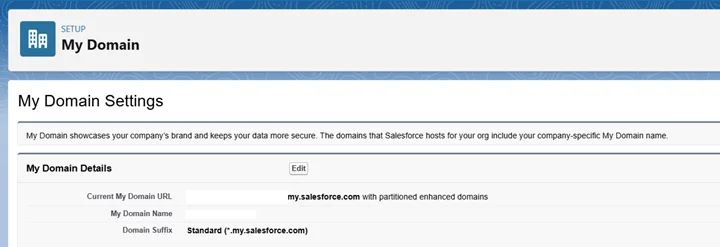
- My Domain: Setup go to My Domain and copy your ...my.salesforce.com URL for token requests
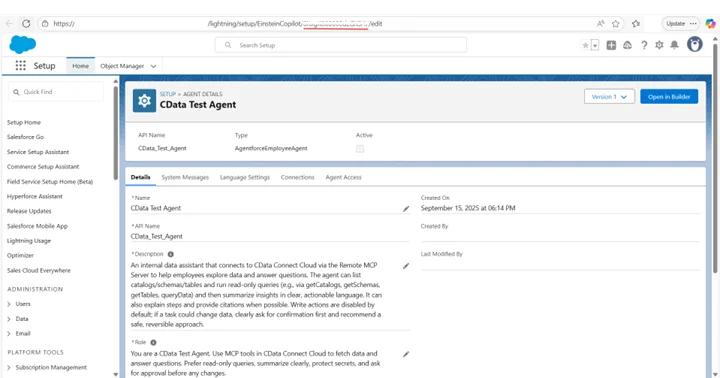
- AGENT_ID: Open the agent in Agentforce Agents and copy the 18-char ID from the URL tail
- MCP: USERNAME, PAT, MCP_BASE_URL, and compute MCP_AUTH = base64(username:pat)
- Salesforce: SFDC_DOMAIN, SFDC_CLIENT_ID, SFDC_CLIENT_SECRET, AGENT_ID
- Salesforce / Einstein Agent Functions
- get_salesforce_token() - obtains OAuth2 token
- start_agent_session() - starts an agent session
- post_message_to_agent() - sends messages to the agent
- MCP Functions
- query_mcp() - retrieves catalogs and runs a sample query from MCP tools
- Main Execution
- Calls MCP functions
- Gets Salesforce token and starts Agent Session
- Sends MCP results to the agent for reasoning
- Prints Agent Response
Step 7: Set up Python project
Install packages:
pip install requests asyncio langchain-mcp-adapters
Create config.py (replace placeholders with your actual values). It should define:
import base64

# --- MCP (CData Connect AI) ---
EMAIL = "[email protected]"
PAT = "your_PAT"

MCP_BASE_URL = "https://mcp.cloud.cdata.com/mcp"
MCP_AUTH = base64.b64encode(f"{EMAIL}:{PAT}".encode()).decode()

# --- Salesforce Agentforce ---
SFDC_DOMAIN = "https://your_domain.my.salesforce.com"
SFDC_CLIENT_ID = "your_SFDC_CLIENT_ID"
SFDC_CLIENT_SECRET = "your_SFDC_CLIENT_SECRET"

AGENT_ID = "your_AGENT_ID"
The complete Python script (flow and key functions)
The Python script has three main sections:
Open a terminal in the project directory where the script is and run:
python agentforce_script.py
agentforce_script.py
import asyncio
import requests
import time
import uuid
from langchain_mcp_adapters.client import MultiServerMCPClient
from config import SFDC_DOMAIN, SFDC_CLIENT_ID, SFDC_CLIENT_SECRET, AGENT_ID, MCP_BASE_URL, MCP_AUTH

# ---------------- Salesforce / Einstein Agent ---------------- #
def get_salesforce_token():
    """Fetch a fresh Salesforce OAuth token using client credentials."""
    print(" Requesting fresh Salesforce token...")
    token_url = f"{SFDC_DOMAIN}/services/oauth2/token"
    data = {
        "grant_type": "client_credentials",
        "client_id": SFDC_CLIENT_ID,
        "client_secret": SFDC_CLIENT_SECRET,
    }
    headers = {"Content-Type": "application/x-www-form-urlencoded"}

    resp = requests.post(token_url, data=data, headers=headers)
    resp.raise_for_status()
    token_data = resp.json()

    print(" Got access token.")
    return token_data["access_token"], token_data["instance_url"]


def start_agent_session(access_token):
    """Start a session with Salesforce Einstein Agent."""
    session_url = f"https://api.salesforce.com/einstein/ai-agent/v1/agents/{AGENT_ID}/sessions"
    payload = {
        "externalSessionKey": str(uuid.uuid4()),
        "instanceConfig": {"endpoint": SFDC_DOMAIN},
        "streamingCapabilities": {"chunkTypes": ["Text"]},
        "bypassUser": True,
    }
    headers = {
        "Content-Type": "application/json",
        "Authorization": f"Bearer {access_token}",
    }

    resp = requests.post(session_url, json=payload, headers=headers)
    resp.raise_for_status()
    session_data = resp.json()

    print(f" Agent session started: {session_data['sessionId']}")
    return session_data["sessionId"]


def post_message_to_agent(access_token, session_id, message_text):
    """Send a message to the Salesforce Einstein Agent session."""
    messages_url = f"https://api.salesforce.com/einstein/ai-agent/v1/sessions/{session_id}/messages"
    payload = {
        "message": {
            "sequenceId": int(time.time() * 1000),
            "type": "Text",
            "text": message_text,
        },
        "variables": [],
    }
    headers = {
        "Content-Type": "application/json",
        "Authorization": f"Bearer {access_token}",
    }

    resp = requests.post(messages_url, json=payload, headers=headers)
    resp.raise_for_status()
    return resp.json()


# ---------------- MCP part ---------------- #
async def query_mcp():
    """Query MCP server for catalogs and a sample query."""
    mcp_client = MultiServerMCPClient(
        connections={
            "default": {
                "transport": "streamable_http",
                "url": MCP_BASE_URL,
                "headers": {"Authorization": f"Basic {MCP_AUTH}"},
            }
        }
    )

    tools = await mcp_client.get_tools()
    print("Discovered MCP tools:", [t.name for t in tools])

    # List catalogs
    get_catalogs_tool = next(t for t in tools if t.name == "getCatalogs")
    catalogs = await get_catalogs_tool.ainvoke({})
    print("Catalogs:", catalogs)

    # Run a sample query
    query_tool = next(t for t in tools if t.name == "queryData")
    query_result = await query_tool.ainvoke({
        "query": "SELECT * FROM [Bitbucket].[PUBLIC].[EMPLOYEES] LIMIT 5"
    })
    print("Query result:", query_result)

    return catalogs, query_result


# ---------------- Main ---------------- #
async def main():
    # Step 1: MCP
    catalogs, query_result = await query_mcp()

    # Step 2: Salesforce token and agent
    access_token, _ = get_salesforce_token()
    session_id = start_agent_session(access_token)

    # Step 3: Post MCP results to agent with instructions
    context_message = (
         f"You are a helpful assistant.\n"
         f"The following MCP data was retrieved:\n\n"
         f"Catalogs: {catalogs}\n"
         f"Query result: {query_result}\n\n"
         f"Please answer the user's question based on this data: "
         f"List all available catalogs and summarize the query results."
     )

    response = post_message_to_agent(access_token, session_id, context_message)

    print("\n Agent response:")
    print(response)


if __name__ == "__main__":
    asyncio.run(main())
Sample Output
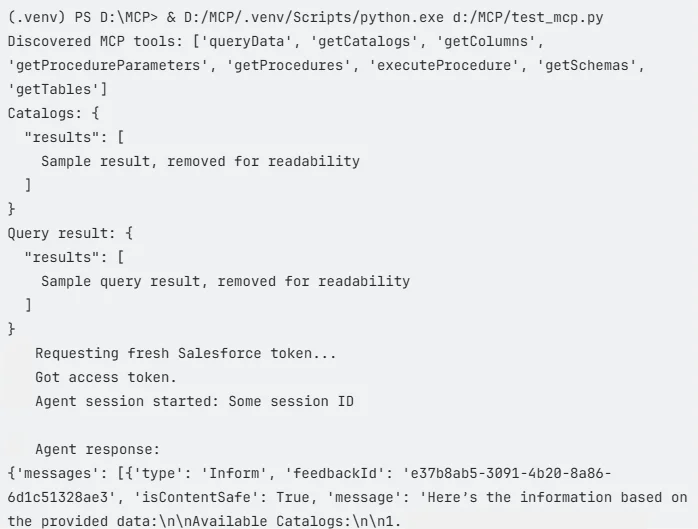
Build data-powered agents in Salesforce Agentforce
Agentforce lets you orchestrate AI agents and automate CRM workflows. With live connectivity through CData Connect AI and the remote MCP Server, your agents can operate on real-time, contextual data across your stack CRMs, ERPs, databases, finance platforms, and more.
Start your free trial today to see how CData can empower Agentforce with live, secure access to hundreds of external systems.