








Query, Visualize, and Share live Bitbucket Data in Redash

Redash is a collaboration tool that lets you query, visualize, and share your data. When paired with CData Connect AI, Redash gets access to live Bitbucket data. This article demonstrates how to connect to Bitbucket using Connect AI and work with live Bitbucket data in Redash.
CData Connect AI provides a pure SQL Server interface for Bitbucket, allowing you to query data from Bitbucket without replicating the data to a natively supported database. Using optimized data processing out of the box, CData Connect AI pushes all supported SQL operations (filters, JOINs, etc.) directly to Bitbucket, leveraging server-side processing to return the requested Bitbucket data quickly.
Configure Bitbucket Connectivity for Redash
Connectivity to Bitbucket from Redash is made possible through CData Connect AI. To work with Bitbucket data in Redash, we start by creating and configuring a Bitbucket connection.
- Log into Connect AI, click Sources, and then click Add Connection
- Select "Bitbucket" from the Add Connection panel
-
Enter the necessary authentication properties to connect to Bitbucket.
For most queries, you must set the Workspace. The only exception to this is the Workspaces table, which does not require this property to be set, as querying it provides a list of workspace slugs that can be used to set Workspace. To query this table, you must set Schema to 'Information' and execute the query SELECT * FROM Workspaces>.
Setting Schema to 'Information' displays general information. To connect to Bitbucket, set these parameters:
- Schema: To show general information about a workspace, such as its users, repositories, and projects, set this to Information. Otherwise, set this to the schema of the repository or project you are querying. To get a full set of available schemas, query the sys_schemas table.
- Workspace: Required if you are not querying the Workspaces table. This property is not required for querying the Workspaces table, as that query only returns a list of workspace slugs that can be used to set Workspace.
Authenticating to Bitbucket
Bitbucket supports OAuth authentication only. To enable this authentication from all OAuth flows, you must create a custom OAuth application, and set AuthScheme to OAuth.
Be sure to review the Help documentation for the required connection properties for you specific authentication needs (desktop applications, web applications, and headless machines).
Creating a custom OAuth application
From your Bitbucket account:
- Go to Settings (the gear icon) and select Workspace Settings.
- In the Apps and Features section, select OAuth Consumers.
- Click Add Consumer.
- Enter a name and description for your custom application.
- Set the callback URL:
- For desktop applications and headless machines, use http://localhost:33333 or another port number of your choice. The URI you set here becomes the CallbackURL property.
- For web applications, set the callback URL to a trusted redirect URL. This URL is the web location the user returns to with the token that verifies that your application has been granted access.
- If you plan to use client credentials to authenticate, you must select This is a private consumer. In the driver, you must set AuthScheme to client.
- Select which permissions to give your OAuth application. These determine what data you can read and write with it.
- To save the new custom application, click Save.
- After the application has been saved, you can select it to view its settings. The application's Key and Secret are displayed. Record these for future use. You will use the Key to set the OAuthClientId and the Secret to set the OAuthClientSecret.

- Click Save & Test
-
Navigate to the Permissions tab in the Add Bitbucket Connection page and update the User-based permissions.



Add a Personal Access Token
When connecting to Connect AI through the REST API, the OData API, or the Virtual SQL Server, a Personal Access Token (PAT) is used to authenticate the connection to Connect AI. It is best practice to create a separate PAT for each service to maintain granularity of access.
- Click on the Gear icon () at the top right of the Connect AI app to open the settings page.
- On the Settings page, go to the Access Tokens section and click Create PAT.
-
Give the PAT a name and click Create.

- The personal access token is only visible at creation, so be sure to copy it and store it securely for future use.
With the connection configured and a PAT generated, you are ready to connect to Bitbucket data from Redash.
Connect to Bitbucket from Redash using Connect AI
To establish a connection from Redash to CData Connect AI using the Virtual SQL Server, follow these steps:
- Log into Redash.
- Click the settings widget on the top right.
- Click New Data Source.
- Select Microsoft SQL Server as the Data Source Type.
-
On the configuration tab, set the following properties:
- Database Name: enter the Connection Name of the CData Connect AI data source you want to connect to (for example, Salesforce1).
- Server: enter the virtual SQL Server host name (tds.cdata.com)
- User: enter your CData Connect AI username. This is displayed in the top-right corner of the CData Connect AI interface. For example, [email protected].
- Password: enter the PAT you generated on the Settings page.
- Port: enter 14333
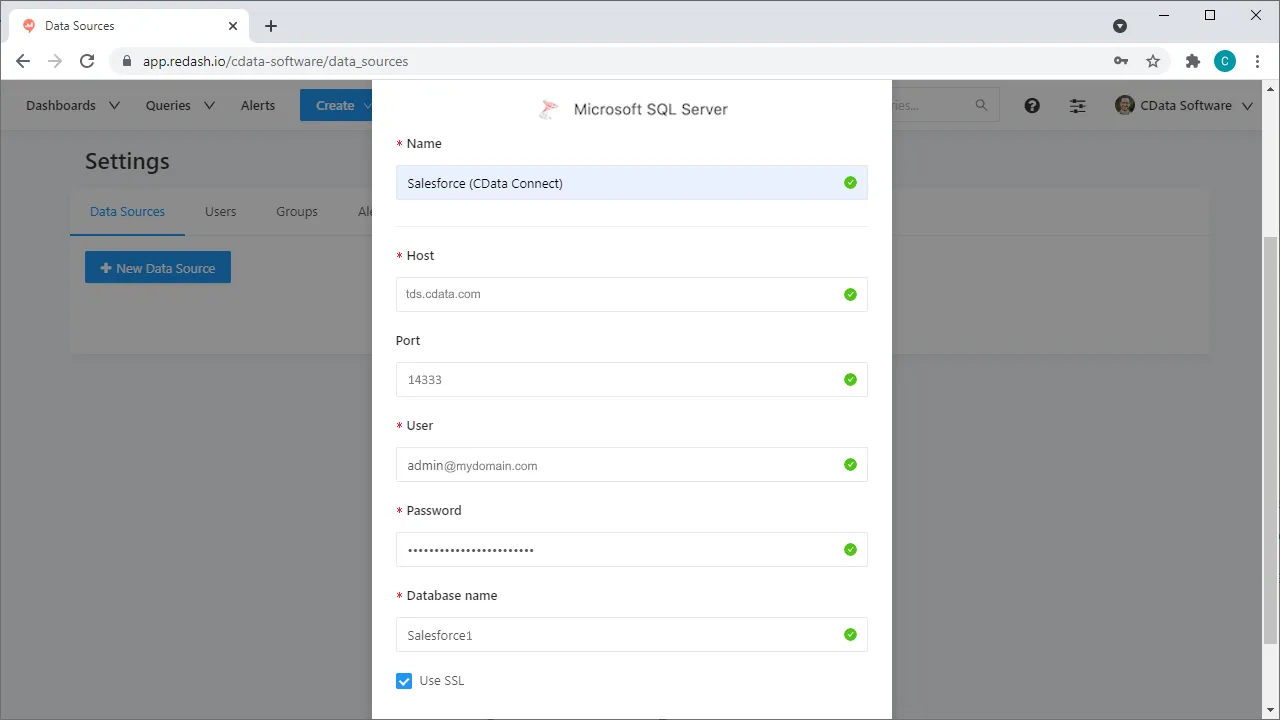
- Click Create.
- Click Test Connection to ensure that the connection is configured properly.
You can now work with live Bitbucket data in Redash.
Get CData Connect AI
To get live data access to hundreds of SaaS, Big Data, and NoSQL sources directly from Redash, try CData Connect AI today!