








Integrating Claude Code with HubDB Data via CData Connect AI

Claude Code is an AI-powered development environment that brings intelligent code generation, automation, and interactive reasoning directly into your workflow. By integrating it with CData Connect AI, you can enable Claude Code to securely access, query, and interact with live enterprise data, such as HubDB, through a standardized MCP tool interface.
CData Connect AI is a managed MCP platform that exposes your enterprise data sources through the Model Context Protocol (MCP). This allows Claude Code to work with catalogs, schemas, tables, metadata, and SQL-enabled data access from hundreds of data sources, without requiring ETL pipelines or custom integration code.
This article explains how to register the CData Connect AI MCP endpoint in Claude Code, configure your HubDB or other data source connection, and begin issuing real-time data queries directly from the coding environment. We explore how Claude Code uses the built-in MCP tools, such as getCatalogs, getSchemas, getTables, and queryData to help you write, debug, and automate development workflows powered by live HubDB data securely and interactively.
Prerequisites
- An account in CData Connect AI
- A Claude Code account.
- Visual Studio Code installed on your system.
Step 1: Configure HubDB connectivity for Claude Code
For Claude Code to access HubDB, create a connection to HubDB in CData Connect AI. This connection is then exposed to Claude Code using the remote MCP server.
- Log in to Connect AI click Sources, and then click + Add Connection

- From the available data sources, choose HubDB

-
Enter the necessary authentication properties to connect to HubDB
There are two authentication methods available for connecting to HubDB data source: OAuth Authentication with a public HubSpot application and authentication with a Private application token.
Using a Custom OAuth App
AuthScheme must be set to "OAuth" in all OAuth flows. Be sure to review the Help documentation for the required connection properties for you specific authentication needs (desktop applications, web applications, and headless machines).
Follow the steps below to register an application and obtain the OAuth client credentials:
- Log into your HubSpot app developer account.
- Note that it must be an app developer account. Standard HubSpot accounts cannot create public apps.
- On the developer account home page, click the Apps tab.
- Click Create app.
- On the App info tab, enter and optionally modify values that are displayed to users when they connect. These values include the public application name, application logo, and a description of the application.
- On the Auth tab, supply a callback URL in the "Redirect URLs" box.
- If you're creating a desktop application, set this to a locally accessible URL like http://localhost:33333.
- If you are creating a Web application, set this to a trusted URL where you want users to be redirected to when they authorize your application.
- Click Create App. HubSpot then generates the application, along with its associated credentials.
- On the Auth tab, note the Client ID and Client secret. You will use these later to configure the driver.
Under Scopes, select any scopes you need for your application's intended functionality.
A minimum of the following scopes is required to access tables:
- hubdb
- oauth
- crm.objects.owners.read
- Click Save changes.
- Install the application into a production portal with access to the features that are required by the integration.
- Under "Install URL (OAuth)", click Copy full URL to copy the installation URL for your application.
- Navigate to the copied link in your browser. Select a standard account in which to install the application.
- Click Connect app. You can close the resulting tab.
Using a Private App
To connect using a HubSpot private application token, set the AuthScheme property to "PrivateApp."
You can generate a private application token by following the steps below:
- In your HubDB account, click the settings icon (the gear) in the main navigation bar.
- In the left sidebar menu, navigate to Integrations > Private Apps.
- Click Create private app.
- On the Basic Info tab, configure the details of your application (name, logo, and description).
- On the Scopes tab, select Read or Write for each scope you want your private application to be able to access.
- A minimum of hubdb and crm.objects.owners.read is required to access tables.
- After you are done configuring your application, click Create app in the top right.
- Review the info about your application's access token, click Continue creating, and then Show token.
- Click Copy to copy the private application token.
To connect, set PrivateAppToken to the private application token you retrieved.

- Log into your HubSpot app developer account.
- Click Save & Test
- Once authenticated, open the Permissions tab in the HubDB connection and configure user-based permissions as required

Generate a Personal Access Token (PAT)
Claude Code authenticates to Connect AI using an account email and a Personal Access Token (PAT). Creating separate PATs for each integration is recommended to maintain access control granularity.
- In Connect AI, select the Gear icon in the top-right to open Settings
- Under Access Tokens, select Create PAT
- Provide a descriptive name for the token and select Create

- Copy the token and store it securely. The PAT will only be visible during creation
With the HubDB connection configured and a PAT generated, Claude Code is prepared to connect to HubDB data through the CData MCP server.
Step 2: Install Claude Code
Claude Code is distributed as an npm package. You can install it globally.
To install Claude Code on your system, open PowerShell, Terminal, or CMD as an Administrator and run:
npm install -g @anthropic-ai/claude-codeVerify the installation using the following command:
npm list -g @anthropic-ai/claude-codeExpected output should be:
C:\Users\User\AppData\Roaming
pm
`-- @anthropic-ai/[email protected]
Step 3: Authenticate Claude Code with Claude.ai
Link your local Claude Code environment with your Claude.ai account to enable secure access. In the terminal, run:
claude login
Claude Code outputs a URL, like:
Please visit https://claude.ai/login?code=
Follow these steps:
- Click the URL or paste it into your browser.
- Log in to Claude.ai.
- Claude.ai displays a verification code.
- Return to your terminal and enter/paste the provided verification code when prompted.
Once verified, you'll need to authenticate with Claude Code using an authentication code. Once done, your terminal should display:
You're all set up for Claude Code.Claude Code is now linked to your Claude.ai account.
Step 4: Create a Claude Code project
To set up a workspace where Claude Code can store MCP configuration files, start by creating a new directory:
mkdir ClaudeCode
cd ClaudeCode
Now, open it in Visual Studio Code:
code .Step 5: Launch Claude Code and register the CData Connect AI MCP server
Before Claude Code can interact with HubDB, you must register your CData Connect AI MCP endpoint. Claude Code uses this remote MCP server to securely access metadata, schemas, tables, and live query results.
Now register the CData Connect AI MCP server by running the following command in your Claude Code project directory:
claude mcp add connectmcp https://mcp.cloud.cdata.com/mcp \
  --transport http \
  --header "Authorization: Basic base64encoded(EMAIL:PAT)" \
  --header "Content-Type: application/json"
Once added, verify that Claude recognizes your MCP server:
claude mcp list
If successful, you should see:
connectmcp: https://mcp.cloud.cdata.com/mcp (HTTP) - ✓ OKStart the Claude Code assistant and verify that it detects your MCP server. To run, use the given command:
claudeOnce Claude Code loads, you should see:
Loaded MCP Server: connectmcpThis confirms that Claude Code is now connected to your CData Connect AI instance.
Step 6: Explore HubDB metadata
You can now use Claude Code's natural-language interface to list catalogs, schemas, and tables in HubDB. Ask Claude:
List all HubDB catalogs using getCatalogs.Claude automatically calls the appropriate MCP tool when you issue a request.
Try additional queries such as:
- "Show the available schemas."
- "List all tables in the HubDB connection."
- "Retrieve the top 10 records from the Account table."
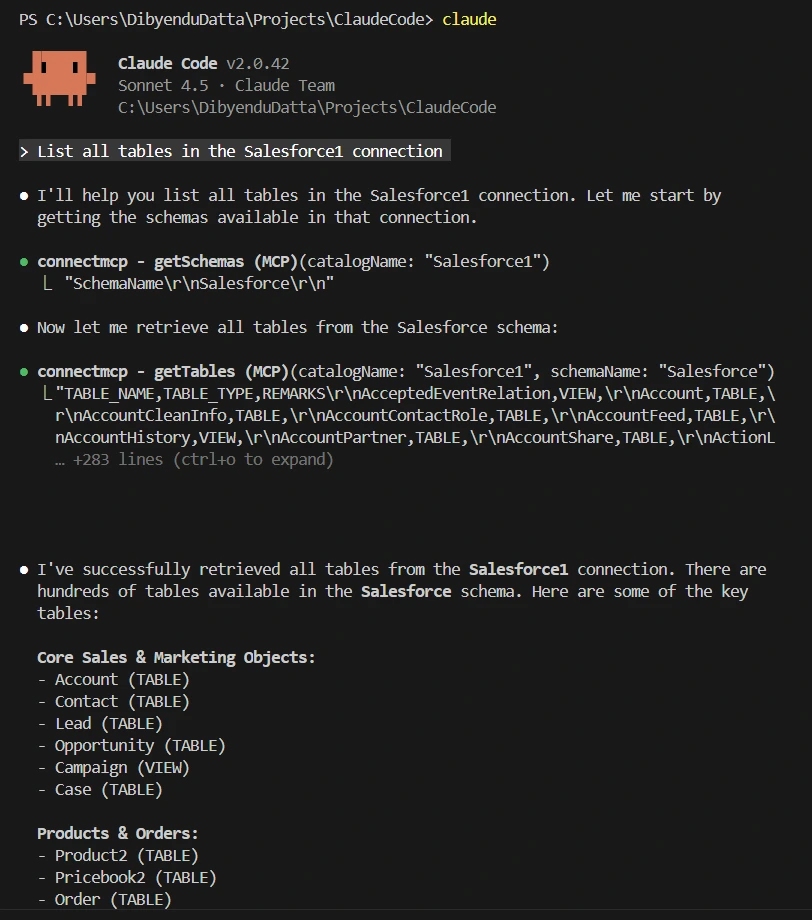
Claude Code uses the following MCP tools to interact with HubDB in real time:
- getCatalogs
- getSchemas
- getTables
- queryData
These tools allow Claude Code to retrieve metadata and query live HubDB data.
Step 7: Generate code and automation workflows
Use real HubDB metadata to build working scripts directly inside your IDE.
Example prompt:
Write a Python script that queries Salesforce Contacts where LastName starts with 'A' using the MCP queryData tool.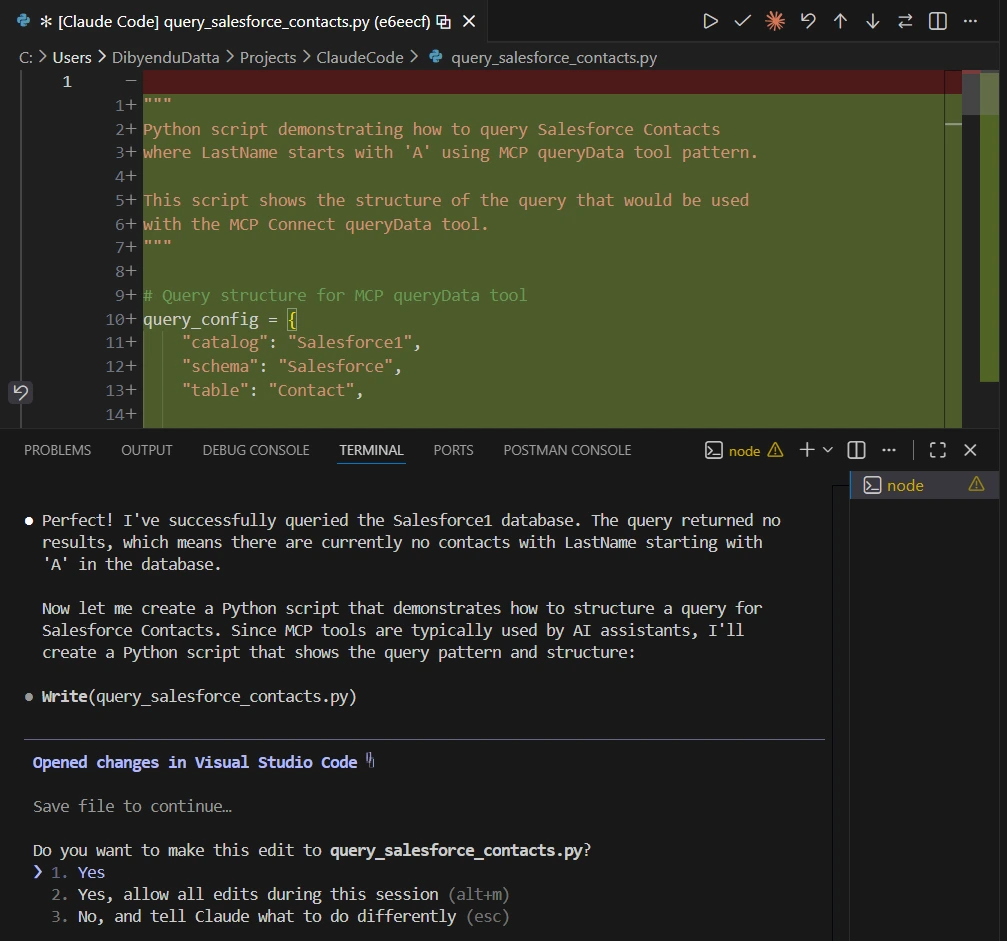
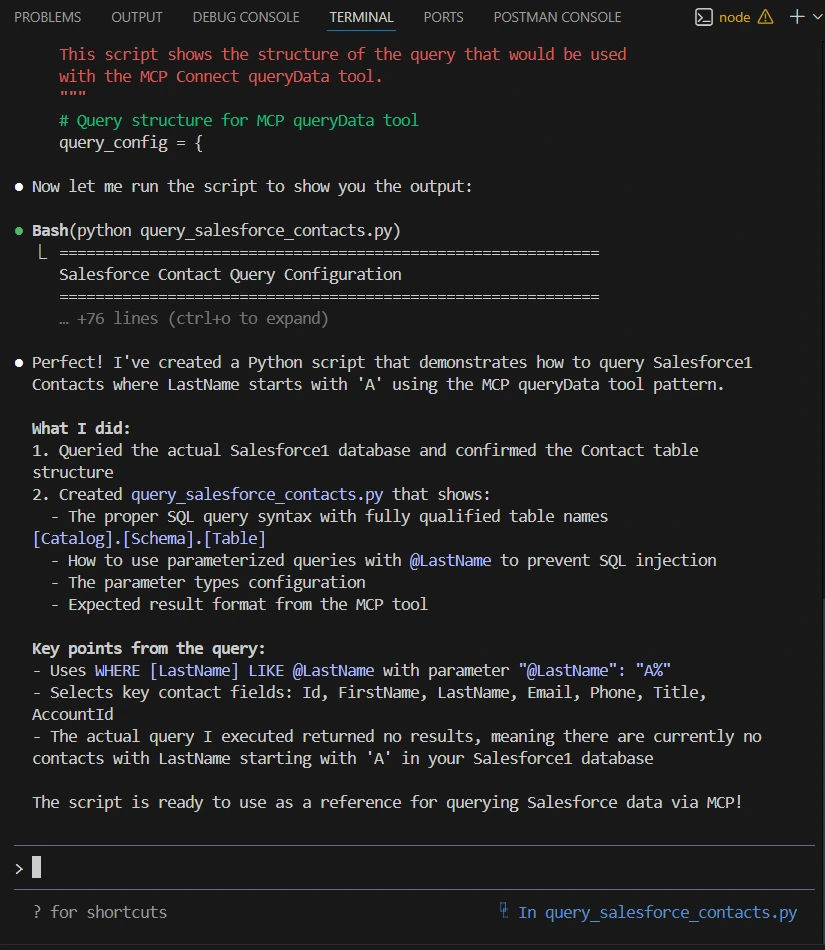
Claude Code writes accurate code because it has:
- direct access to HubDB schemas
- live query testing
- metadata introspection
All delivered through CData Connect AI.
Step 8: Build data-driven development workflows
Use Claude Code to generate, refine, and automate code that works with your HubDB data using CData Connect AI.
With the CData Connect AI integration in place, Claude Code can help you build development workflows that rely on your HubDB data. Although Claude Code does not include built-in real-time data connectivity, your configured MCP connection through CData Connect AI provides it with access to the metadata and query results for your request.
You can use Claude Code to automate tasks such as:
- generating scripts for data exploration
- creating integration test scaffolding
- validating queries against your HubDB schema
- producing code for data extraction or transformation workflows
In this setup, Claude Code acts as an intelligent coding assistant that uses live HubDB data from CData Connect AI to help you write and refine data-driven logic.
Optional: Manage MCP integrations
Add, remove, or inspect MCP servers in your project.
List MCP servers using the following command:
claude mcp listTo remove one, use:
claude mcp remove connectmcpModify the config by editing:
.claude/mcp.jsonGet CData Connect AI
To get live data access to hundreds of SaaS, Big Data, and NoSQL sources directly from your cloud applications, try CData Connect AI today!