








Connect and Visualize Live HubDB Data in Databricks Lakehouse Federation with CData Connect AI

Databricks Lakehouse Federation enables organizations to query and integrate data from multiple sources without requiring data movement. It allows federated queries across databases, data warehouses, and lakehouses, providing a unified interface for data analysis and management within Databricks. When combined with CData Connect AI, it enables seamless access to HubDB data for data virtualization, while also supporting data lineage and fine-grained access control.
This article explains how to use CData Connect AI to establish a live connection to HubDB and how to access live HubDB data from the Databricks platform.
CData Connect AI offers a seamless SQL Server, cloud-to-cloud interface for HubDB, enabling you to effortlessly create dashboards and visualizations using live HubDB data in Databricks. While building visualizations, Databricks requires SQL queries to retrieve the necessary data. With built-in optimized data processing, CData Connect AI pushes all supported SQL operations (such as filters and JOINs) directly to HubDB, utilizing server-side processing for fast and efficient data retrieval of HubDB data.
Configure HubDB connectivity for Databricks in CData Connect AI
To work with HubDB data in Databricks - Lakehouse Federation, you need to connect to HubDB from Connect AI and provide user access to the connection.
- Log into Connect AI, click Sources, and then click Add Connection
- Select "HubDB" from the Add Connection panel
-
Enter the necessary authentication properties to connect to HubDB.
There are two authentication methods available for connecting to HubDB data source: OAuth Authentication with a public HubSpot application and authentication with a Private application token.
Using a Custom OAuth App
AuthScheme must be set to "OAuth" in all OAuth flows. Be sure to review the Help documentation for the required connection properties for you specific authentication needs (desktop applications, web applications, and headless machines).
Follow the steps below to register an application and obtain the OAuth client credentials:
- Log into your HubSpot app developer account.
- Note that it must be an app developer account. Standard HubSpot accounts cannot create public apps.
- On the developer account home page, click the Apps tab.
- Click Create app.
- On the App info tab, enter and optionally modify values that are displayed to users when they connect. These values include the public application name, application logo, and a description of the application.
- On the Auth tab, supply a callback URL in the "Redirect URLs" box.
- If you're creating a desktop application, set this to a locally accessible URL like http://localhost:33333.
- If you are creating a Web application, set this to a trusted URL where you want users to be redirected to when they authorize your application.
- Click Create App. HubSpot then generates the application, along with its associated credentials.
- On the Auth tab, note the Client ID and Client secret. You will use these later to configure the driver.
Under Scopes, select any scopes you need for your application's intended functionality.
A minimum of the following scopes is required to access tables:
- hubdb
- oauth
- crm.objects.owners.read
- Click Save changes.
- Install the application into a production portal with access to the features that are required by the integration.
- Under "Install URL (OAuth)", click Copy full URL to copy the installation URL for your application.
- Navigate to the copied link in your browser. Select a standard account in which to install the application.
- Click Connect app. You can close the resulting tab.
Using a Private App
To connect using a HubSpot private application token, set the AuthScheme property to "PrivateApp."
You can generate a private application token by following the steps below:
- In your HubDB account, click the settings icon (the gear) in the main navigation bar.
- In the left sidebar menu, navigate to Integrations > Private Apps.
- Click Create private app.
- On the Basic Info tab, configure the details of your application (name, logo, and description).
- On the Scopes tab, select Read or Write for each scope you want your private application to be able to access.
- A minimum of hubdb and crm.objects.owners.read is required to access tables.
- After you are done configuring your application, click Create app in the top right.
- Review the info about your application's access token, click Continue creating, and then Show token.
- Click Copy to copy the private application token.
To connect, set PrivateAppToken to the private application token you retrieved.

- Log into your HubSpot app developer account.
- Click Save & Test
-
Navigate to the Permissions tab in the Add HubDB Connection page and update the User-based permissions.



Add a Personal Access Token
When connecting to Connect AI through the REST API, the OData API, or the Virtual SQL Server, a Personal Access Token (PAT) is used to authenticate the connection to Connect AI. It is best practice to create a separate PAT for each service to maintain granularity of access.
- Click on the Gear icon () at the top right of the Connect AI app to open the settings page.
- On the Settings page, go to the Access Tokens section and click Create PAT.
-
Give the PAT a name and click Create.

- The personal access token is only visible at creation, so be sure to copy it and store it securely for future use.
With the connection configured and a PAT generated, you are ready to connect to HubDB data from Databricks.
Connecting live HubDB data in Databricks
Follow these steps to establish a connection from Databricks to the CData Connect AI Virtual SQL Server API.
- Log into Databricks.
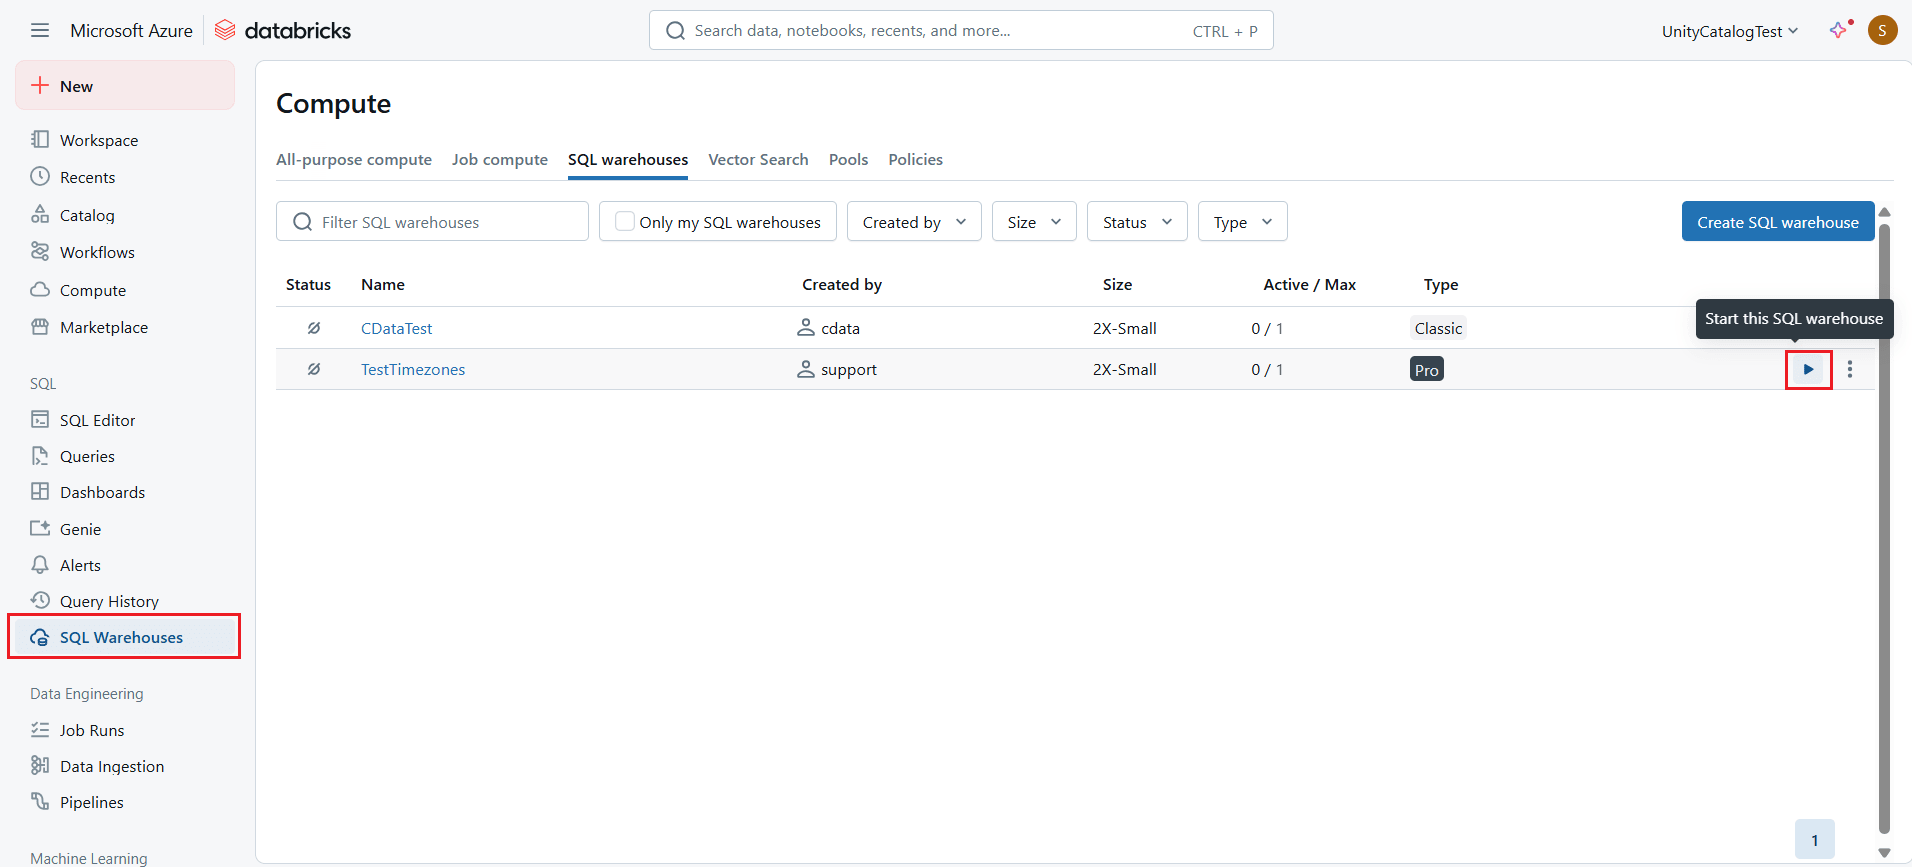
- Navigate to SQL Warehouses and start any warehouse of your choice.
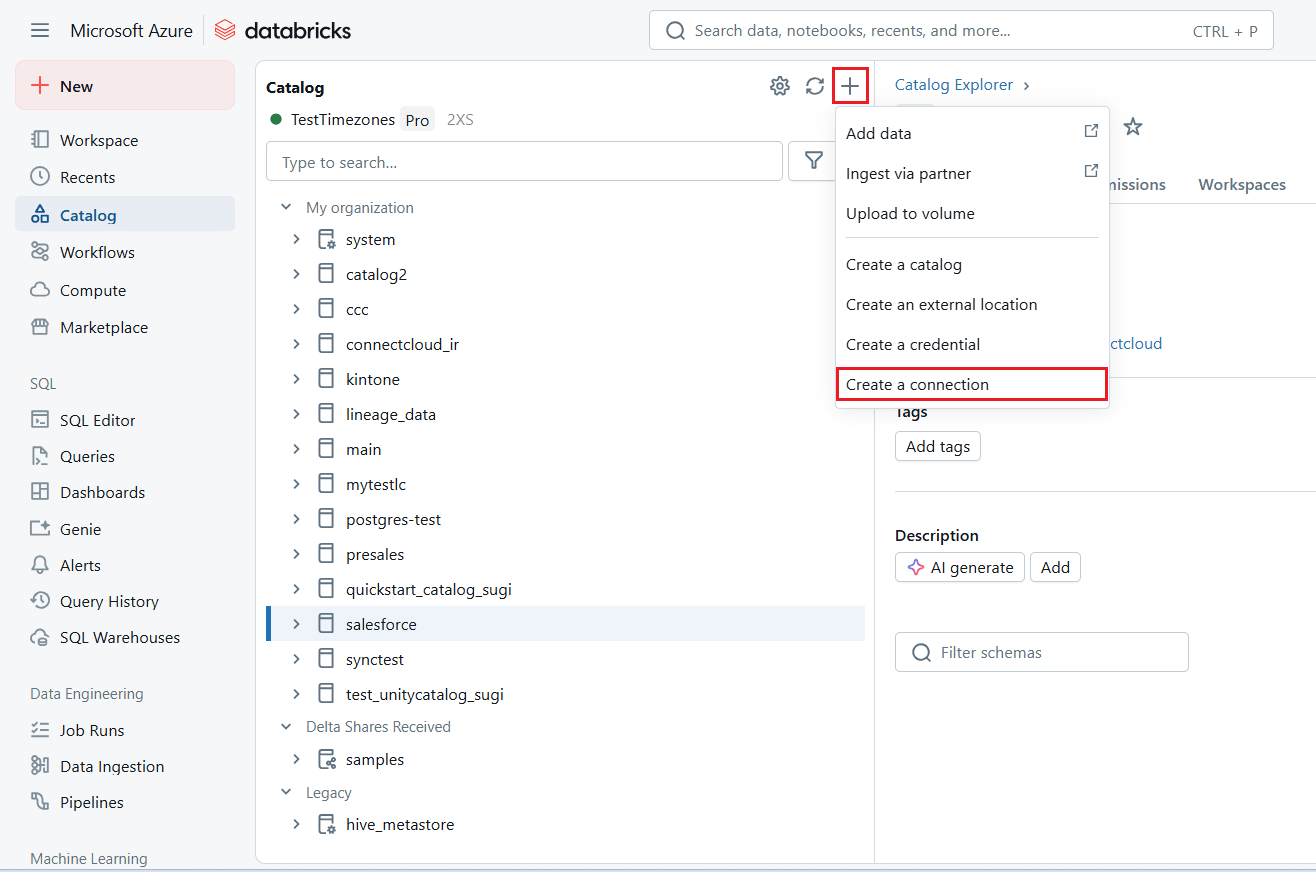
- In the navigation pane, select Catalog. Click and select Create a connection.
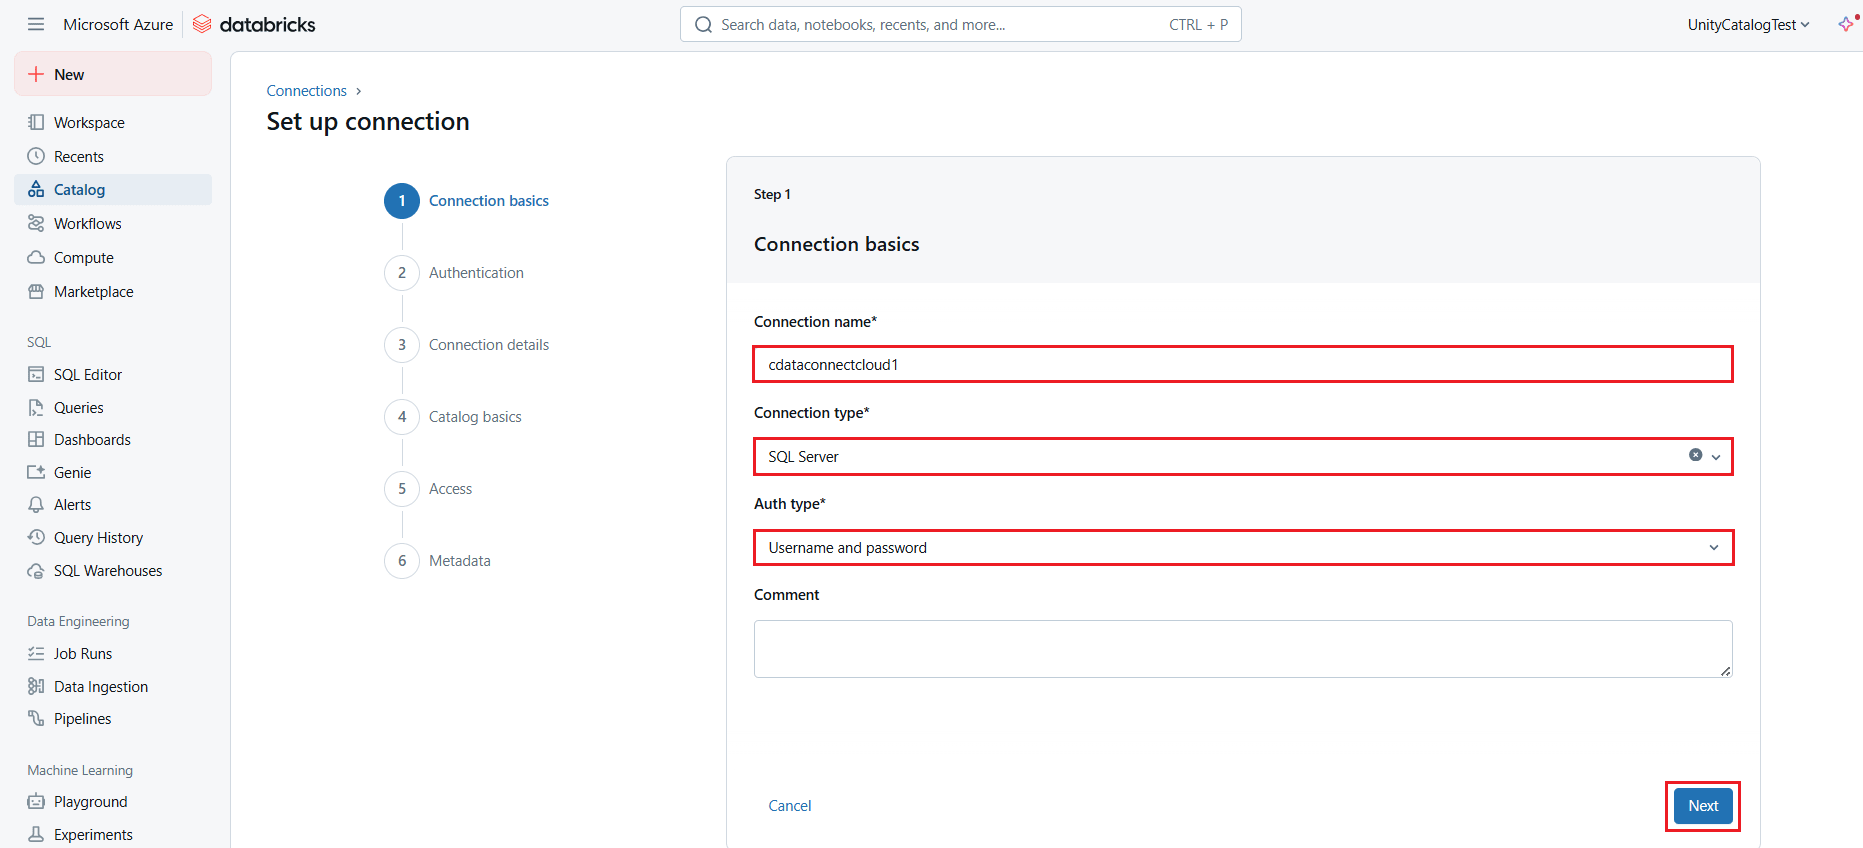
- In the Connection basics section (or Step 1 of Set up connection page), enter the following connection details and click Next:
- Connection name: a user-defined connection name.
- Connection type: select SQL Server from the drop-down list.
- Auth type: select Username and password.
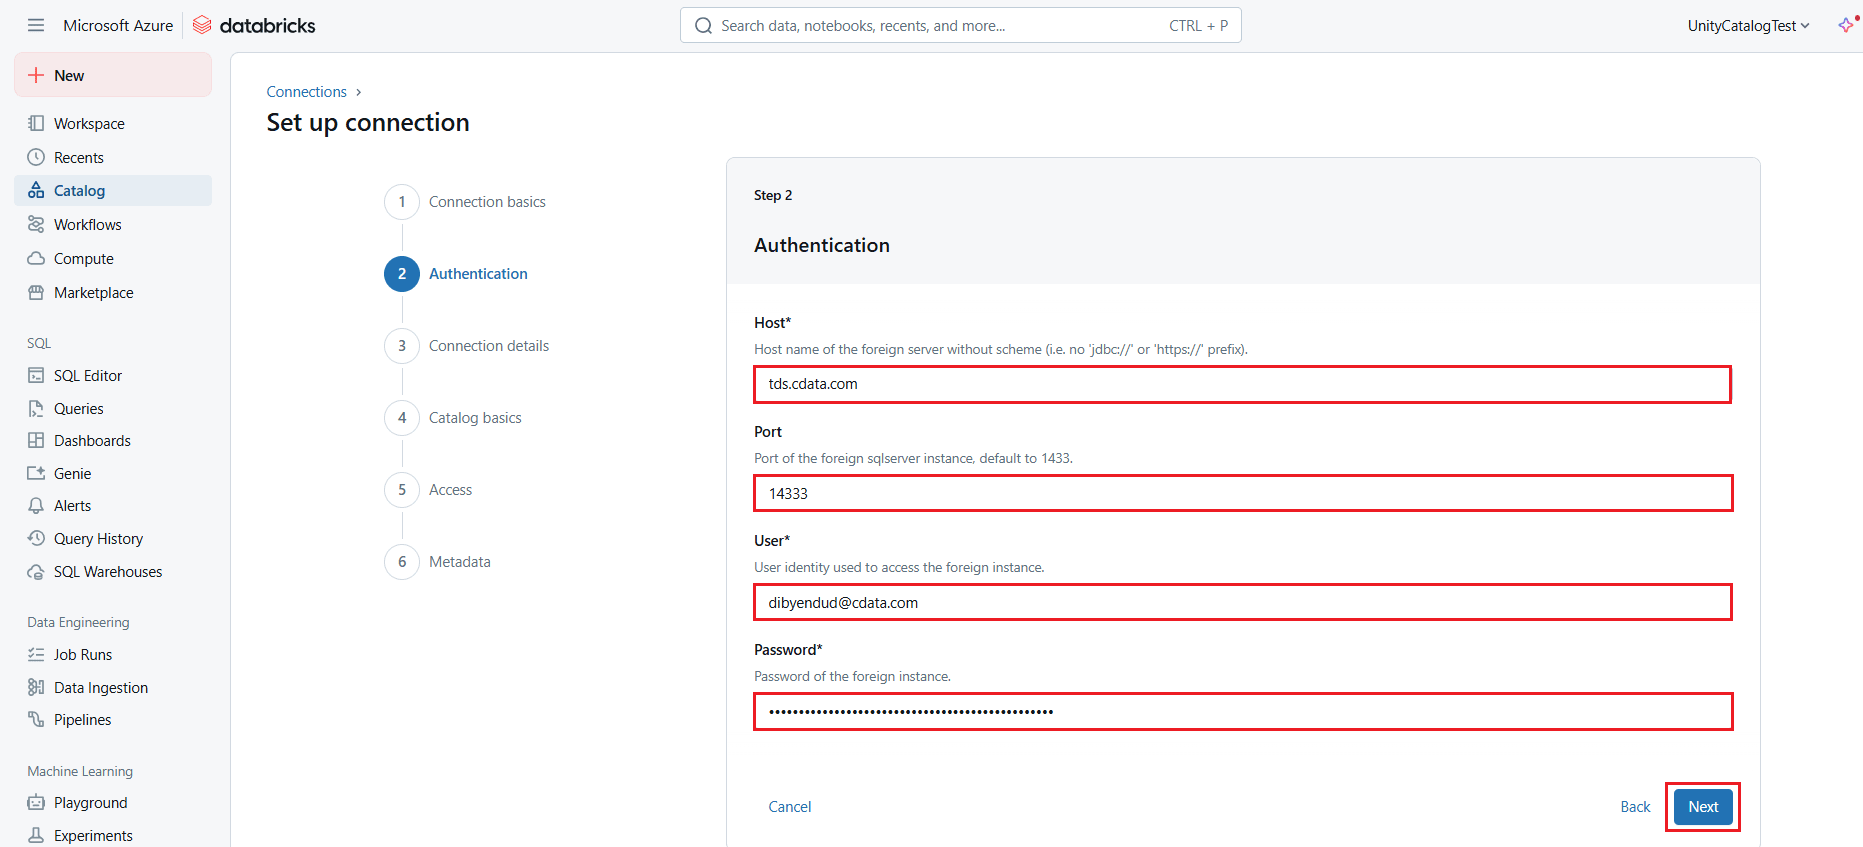
- In the Authentication section (or Step 2), enter the required authentication details, and click Next:
- Host: tds.cdata.com
- Port: 14333
- User: enter your CData Connect AI username, displayed in the top-right corner of the CData Connect AI interface. For example, [email protected]
- Password: enter the PAT generated and copied in the previous section.
- In the Connection details section (or Step 3), enable the Trust server certificate checkbox and select the appropriate Application intent. Click Create Connection.
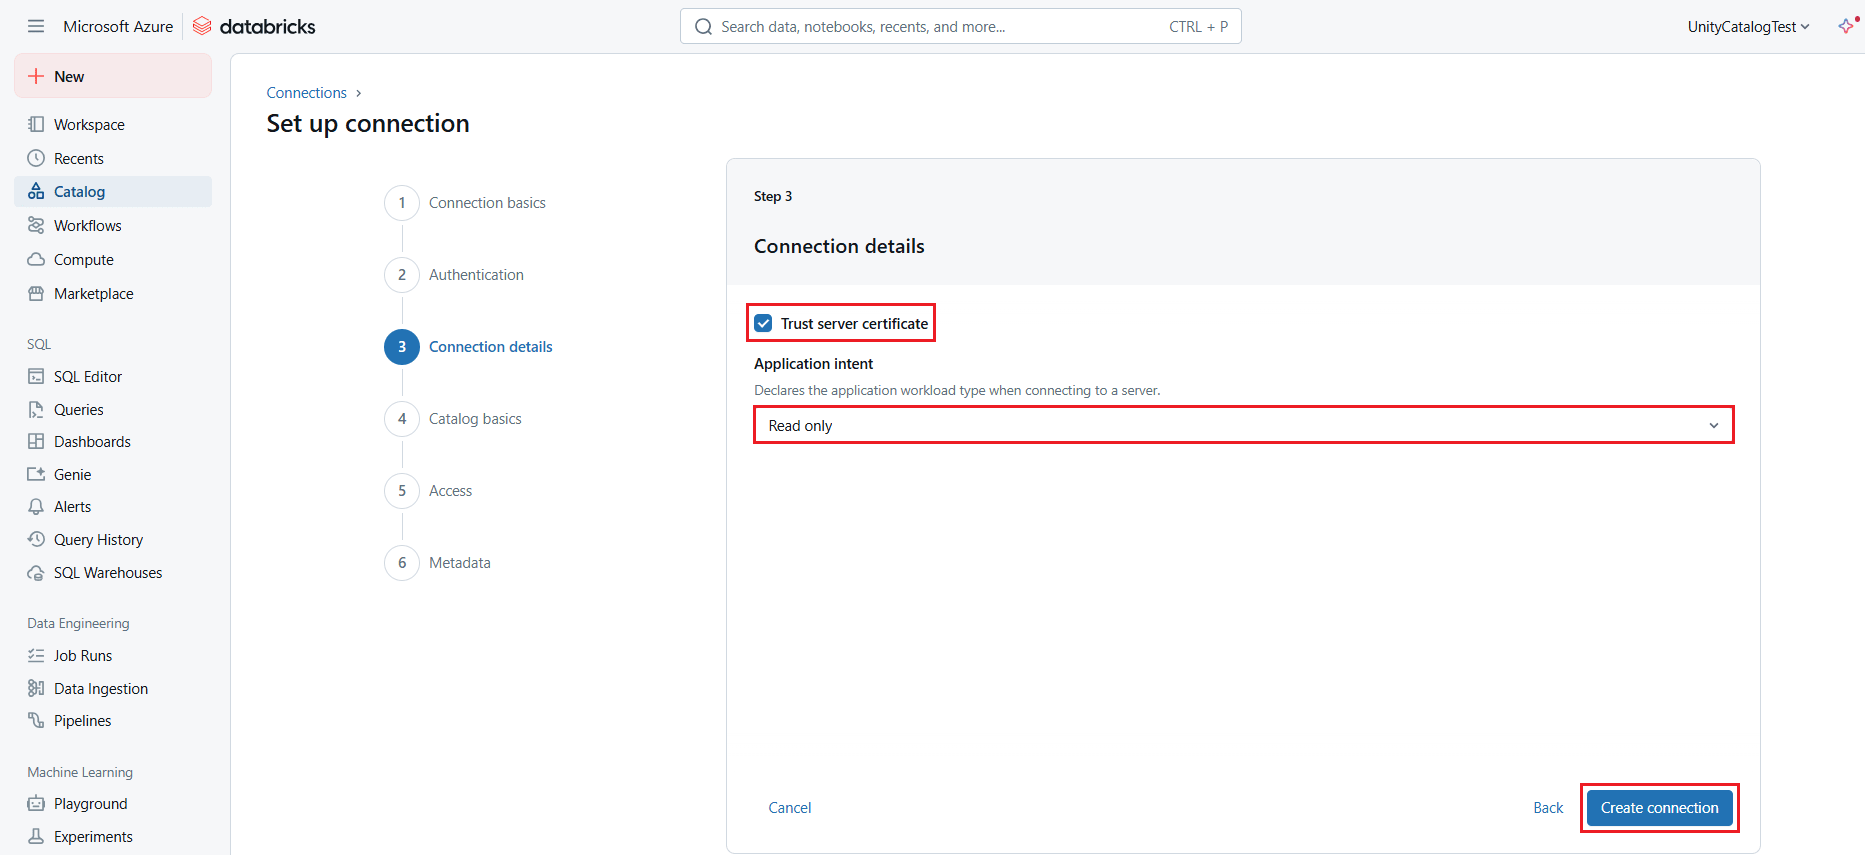
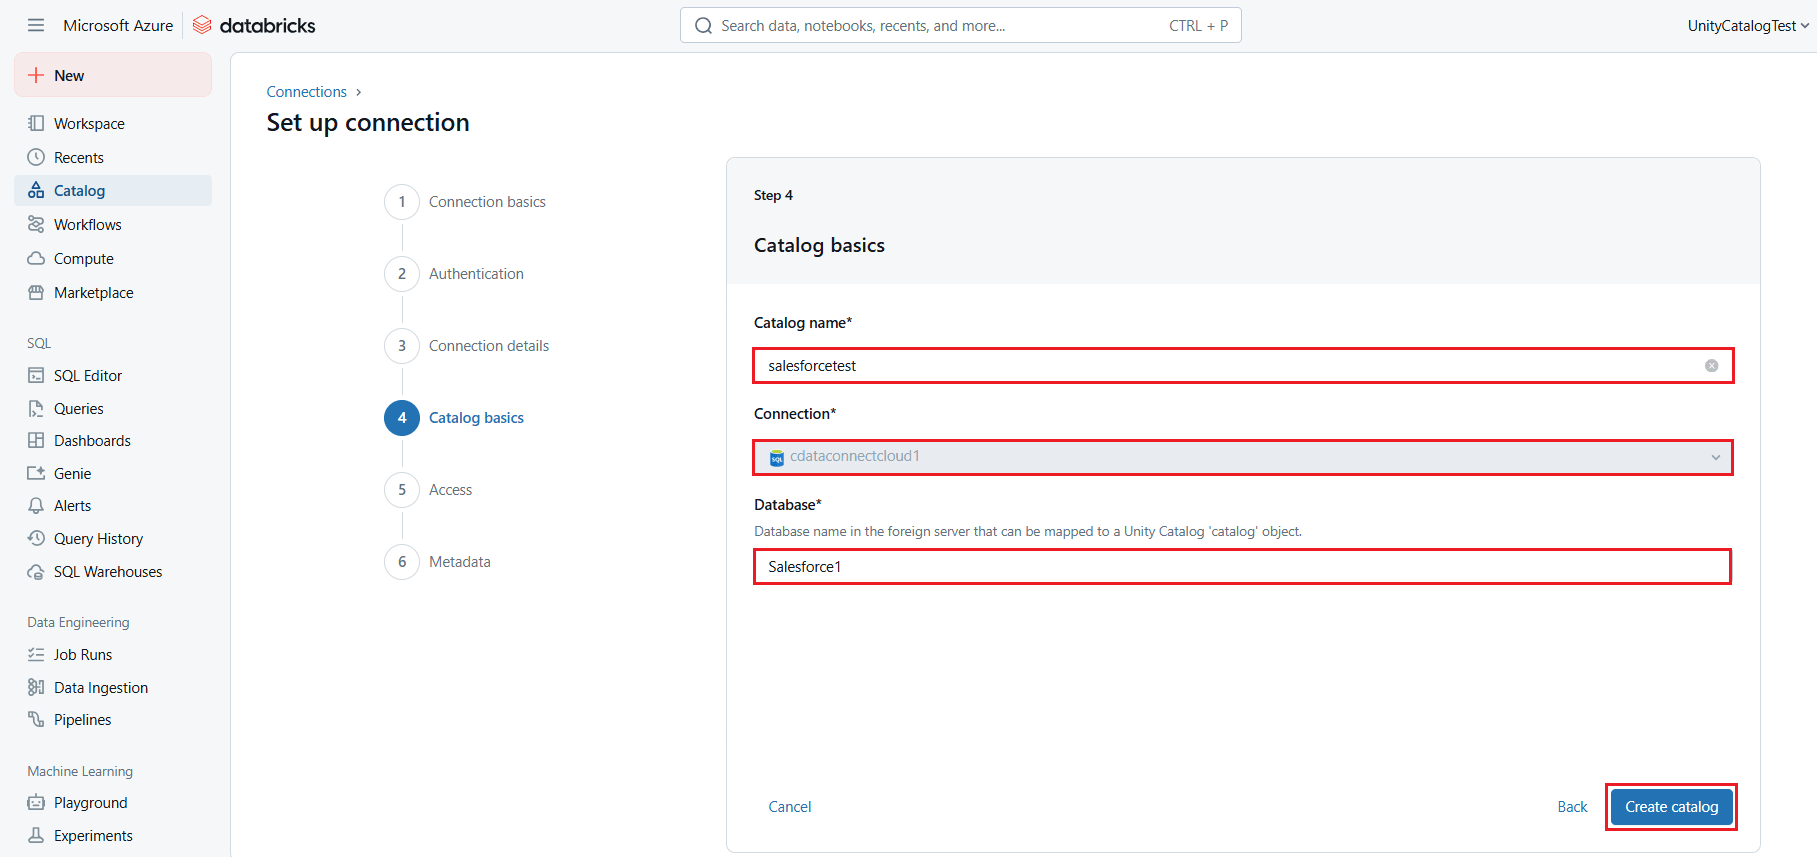
- In the Catalog basics section (or Step 4), enter the required details and click Create catalog:
- Catalog name: enter a name of your choice
- Connection: this will be the Databricks connection you defined earlier
- Database: enter your HubDB connection name (for example, HubDB1)
- In the Access section (or Step 5), assign the Workspace, User access rights, and Grant read or edit privileges to the catalog.
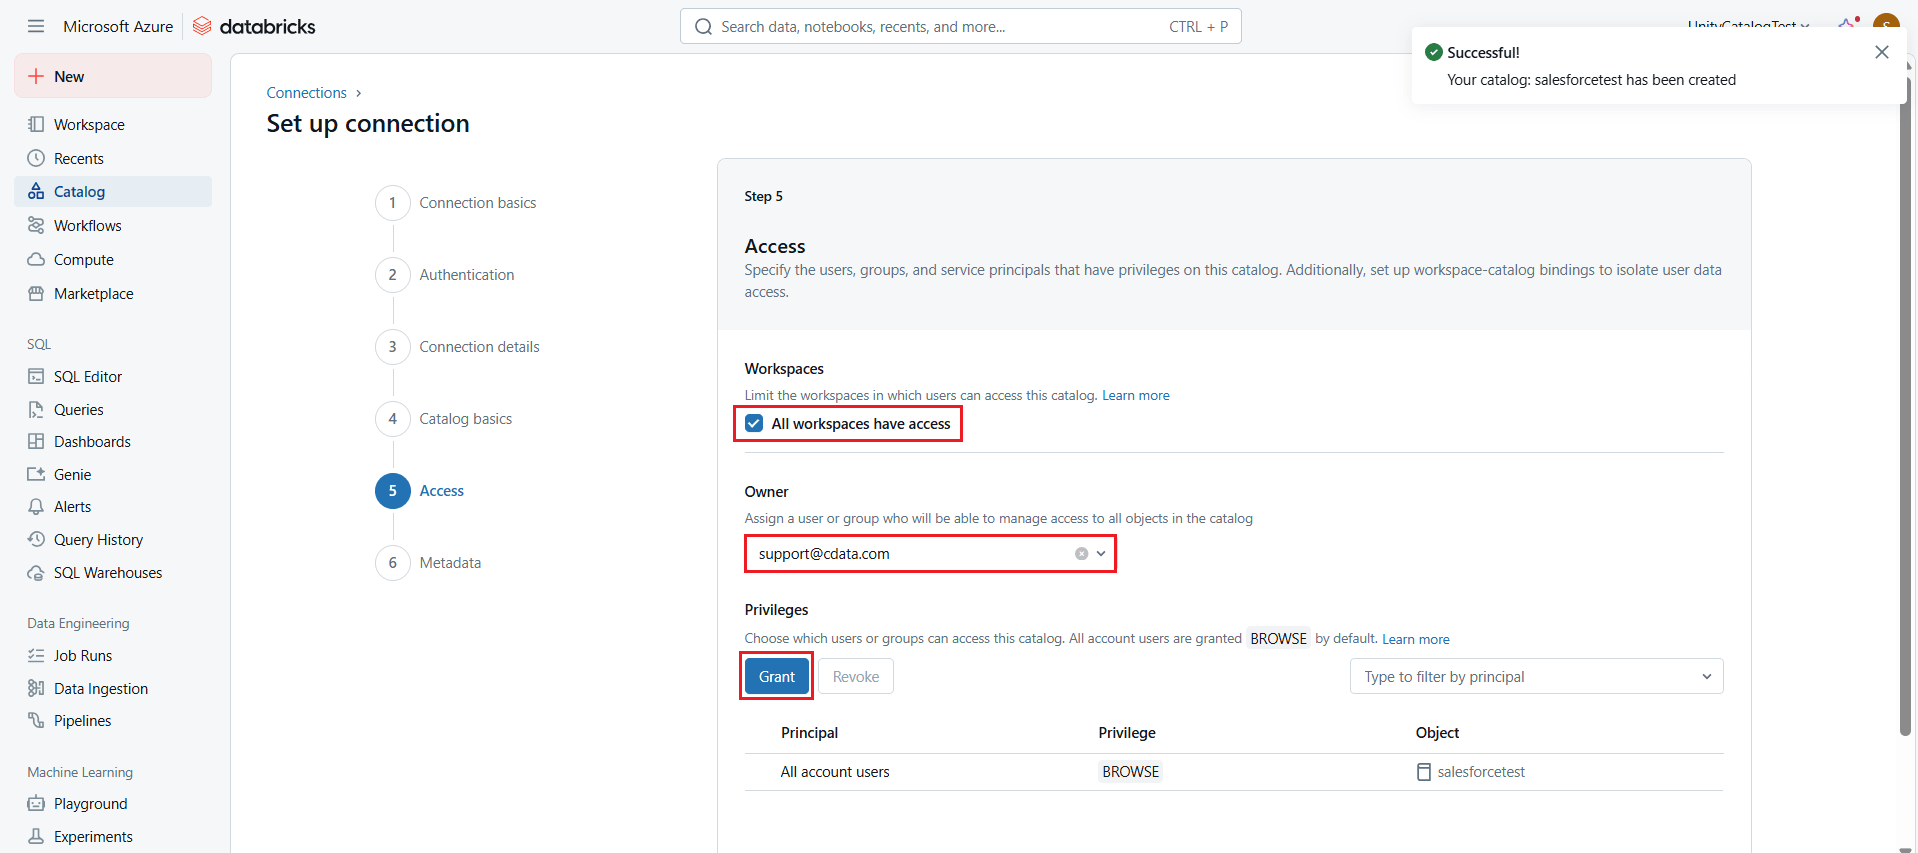
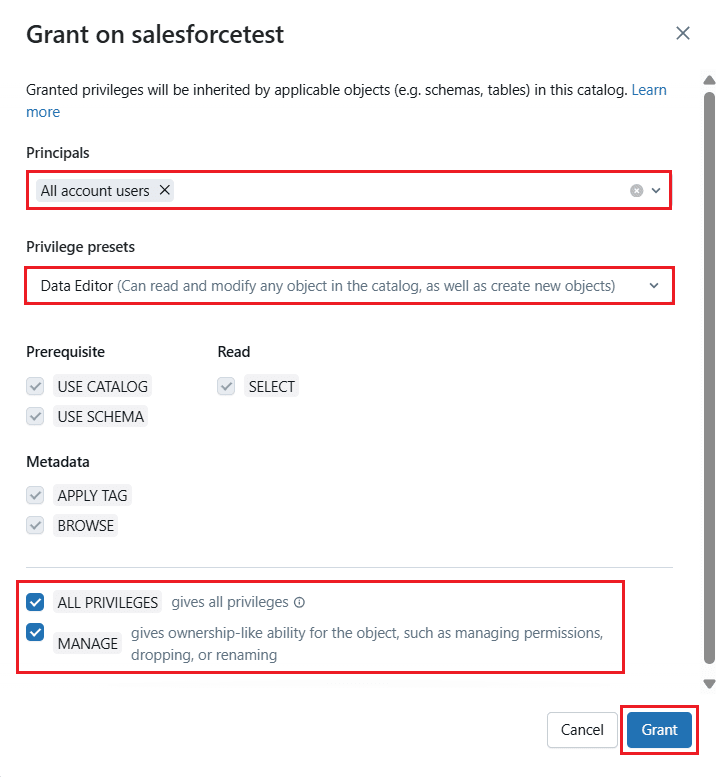
- Click Next > Save to save all the details for the catalog.
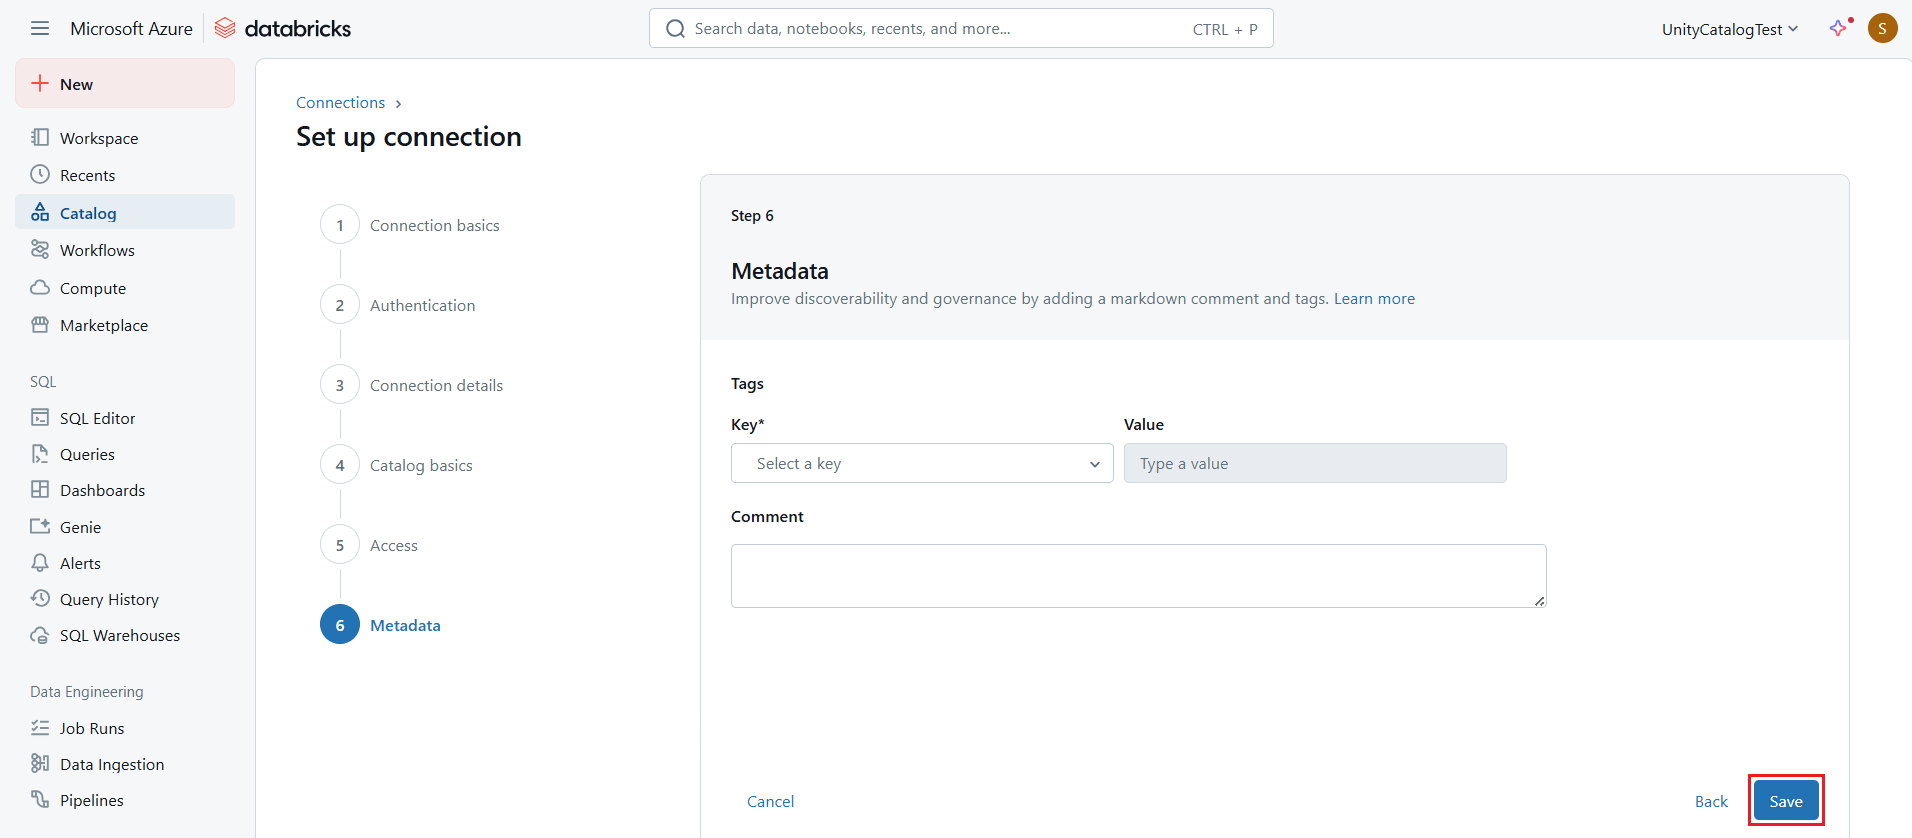
Access the catalog and visualize live HubDB data in Databricks
To access the newly created catalog and create a dashboard to visualize live HubDB data in Databricks, follow these steps:
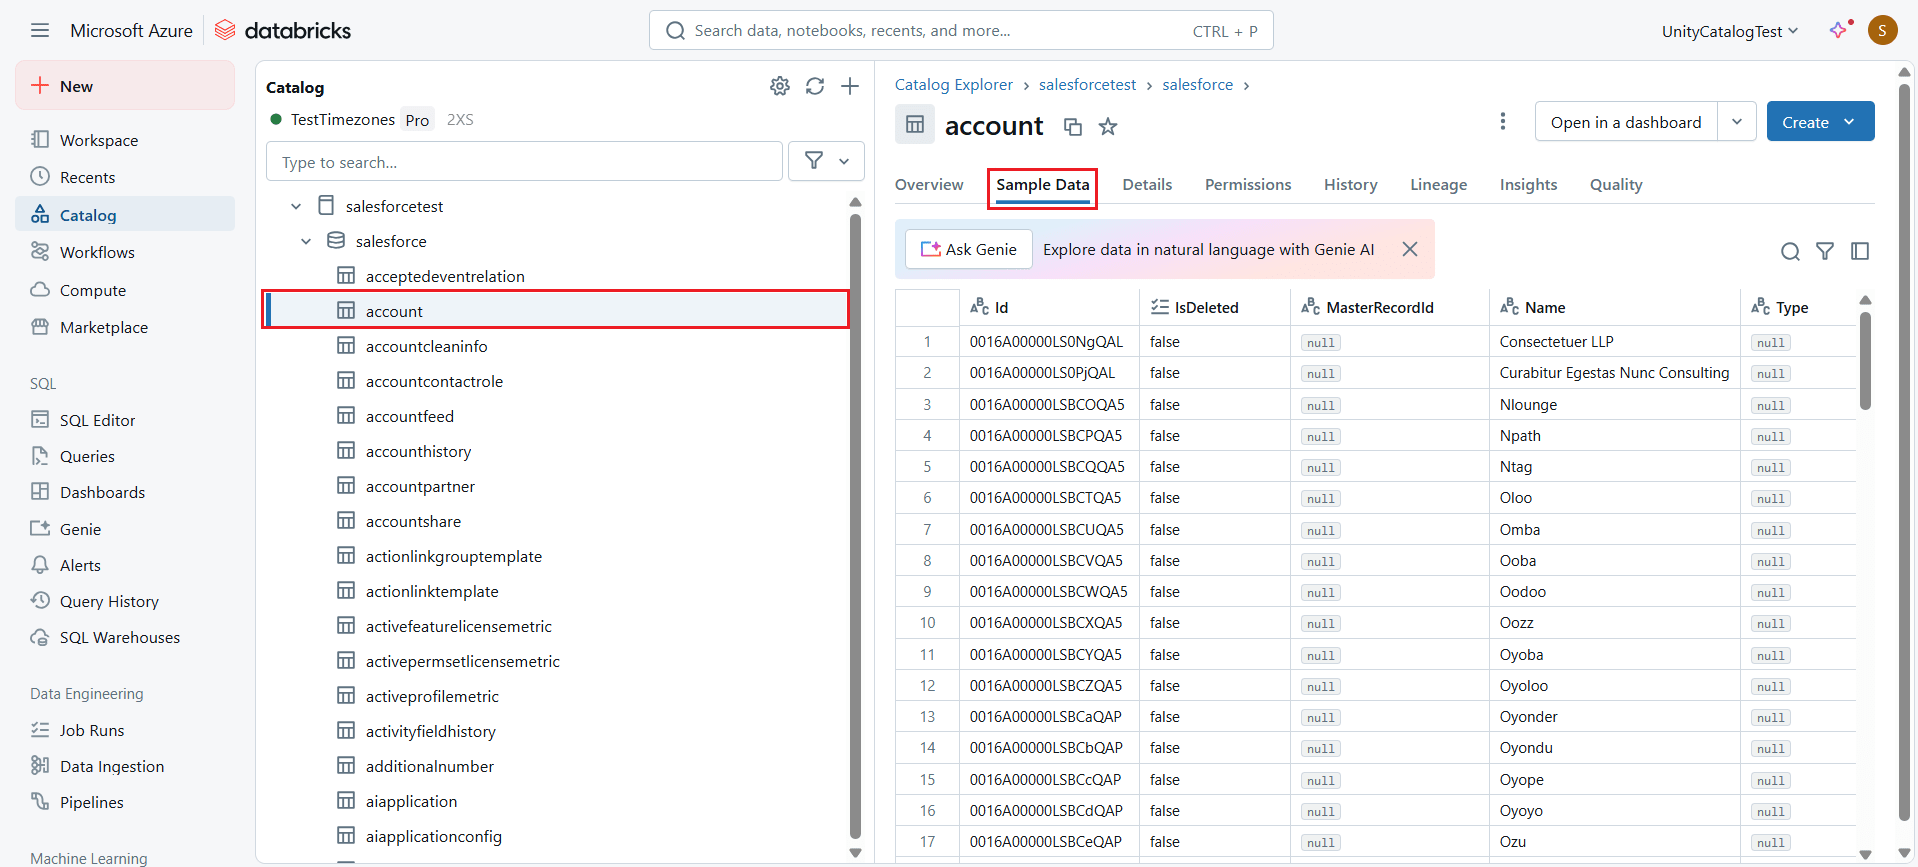
- Select the catalog and expand it. A list of tables from HubDB will appear on the screen.
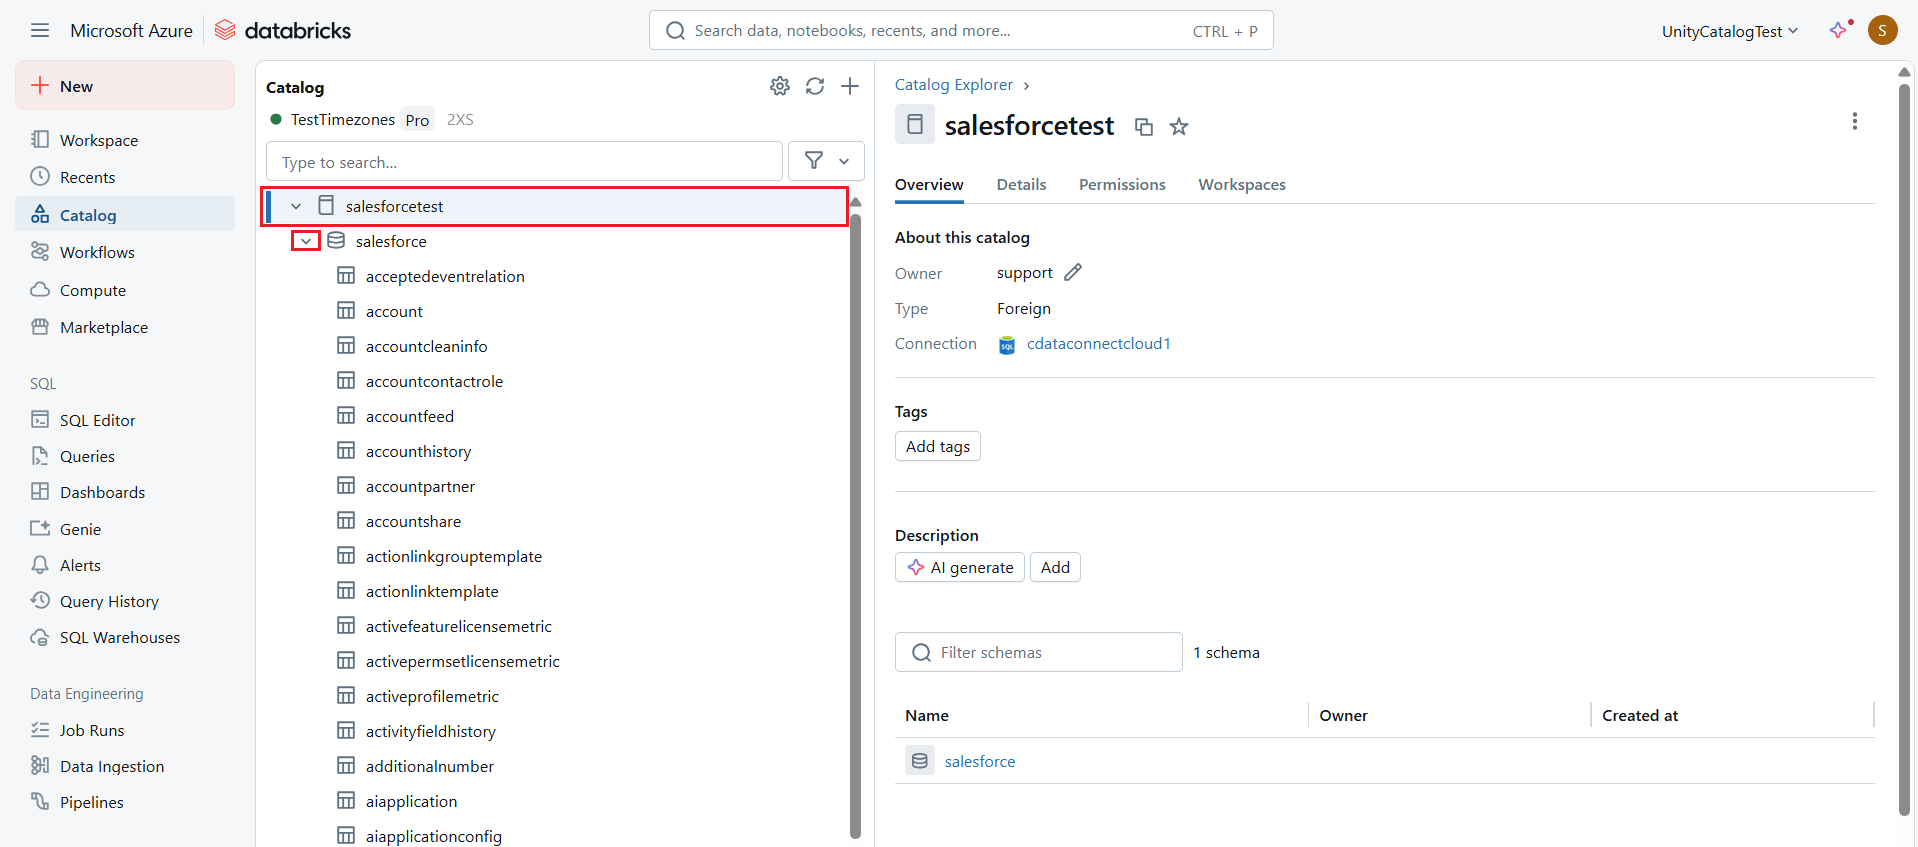
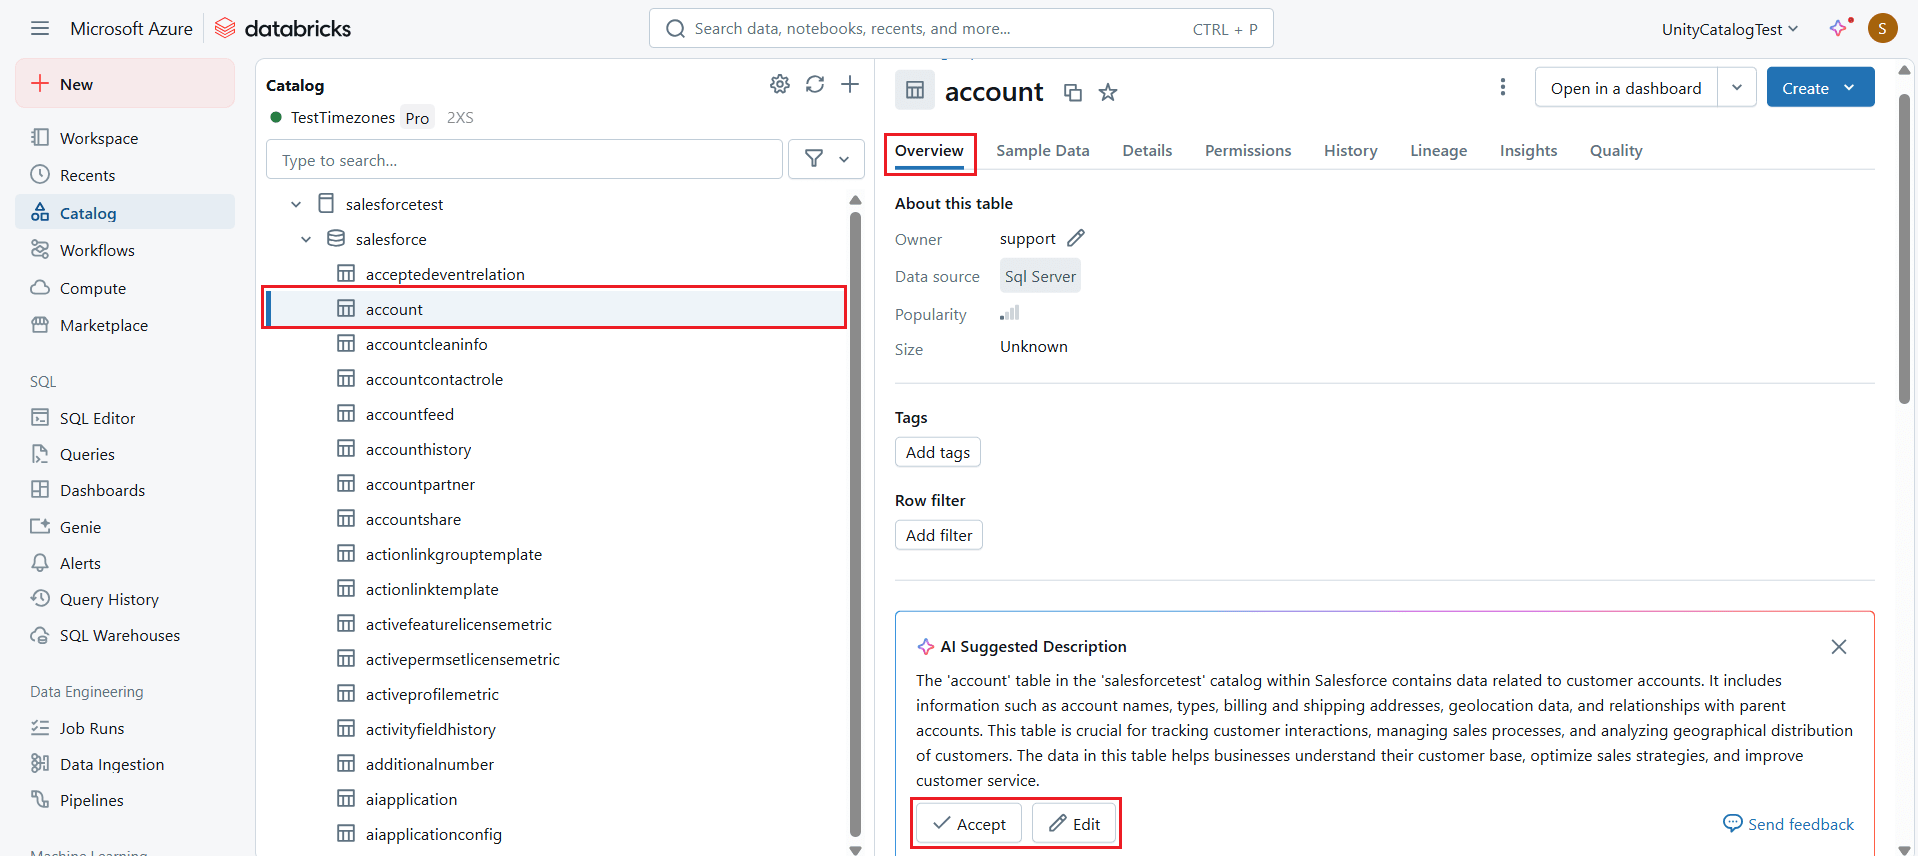
- Choose the desired table and click the Overview tab to view the table metadata.
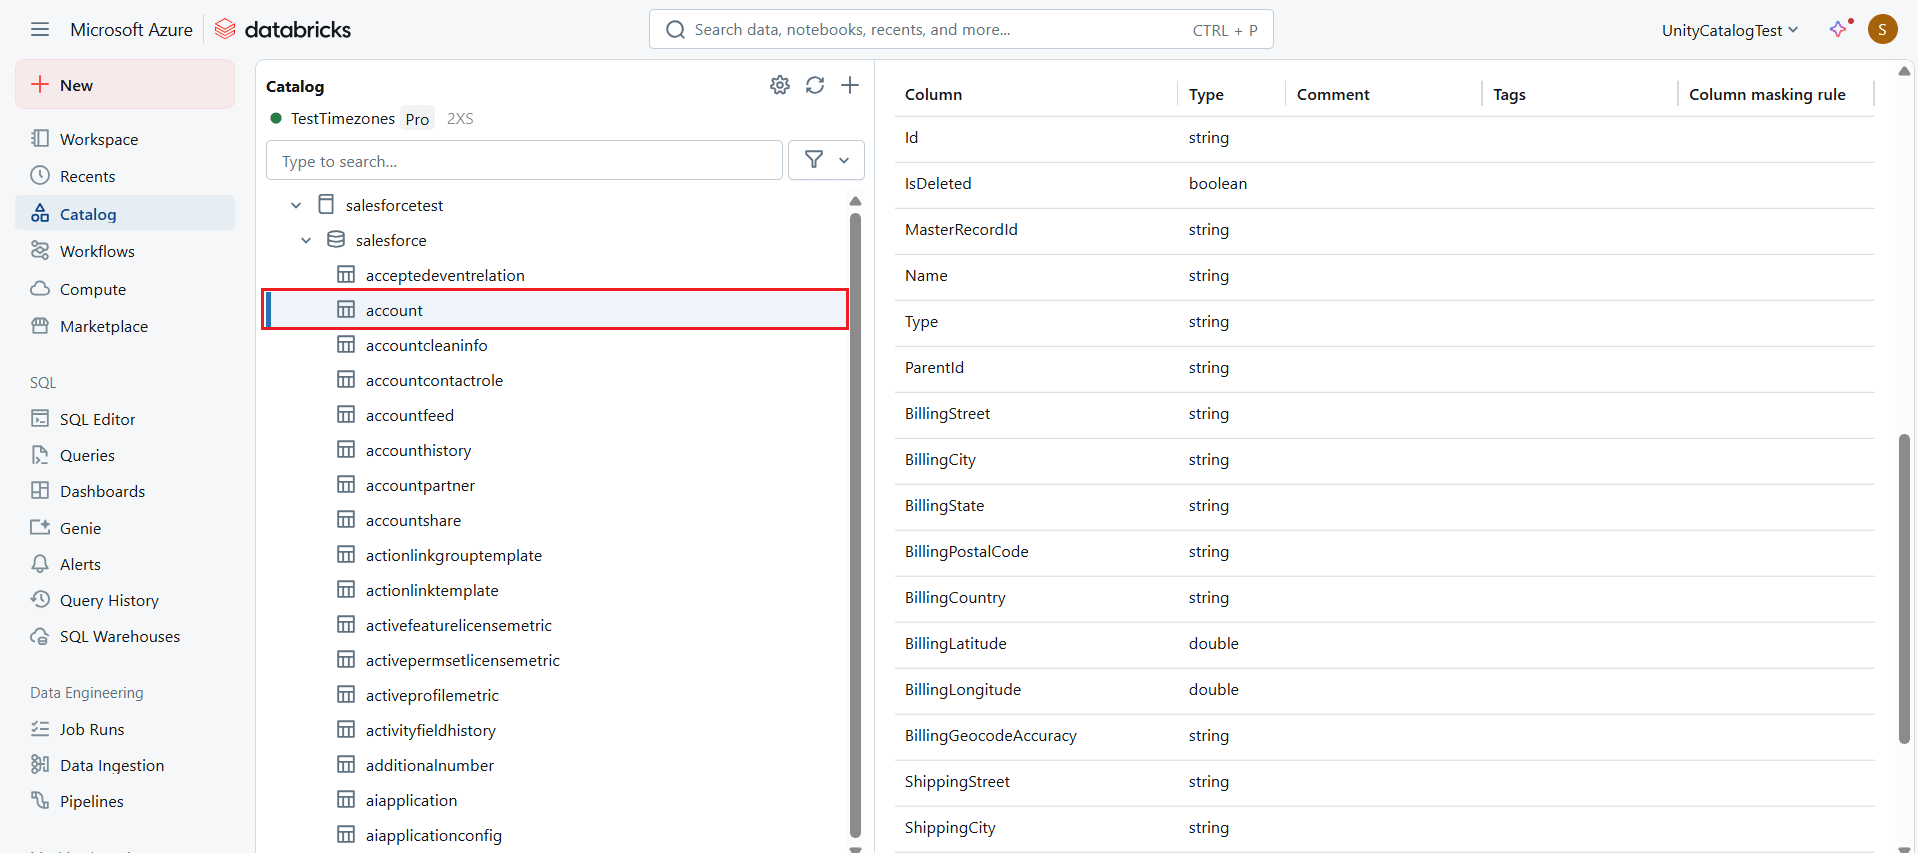
- Click the Sample Data tab to view real-time data in the table.
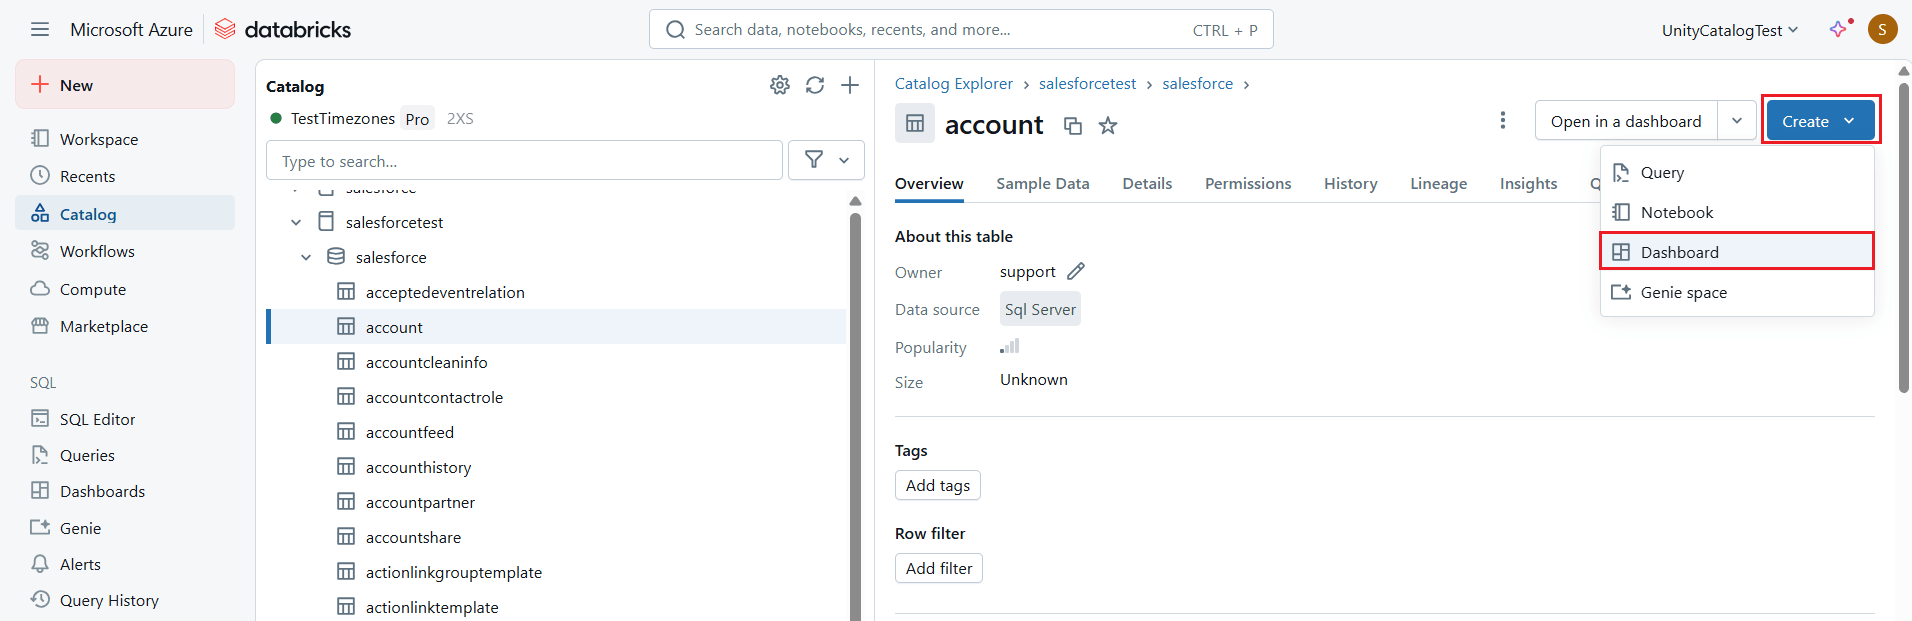
- Now, click Create at the top right corner and select Dashboard.
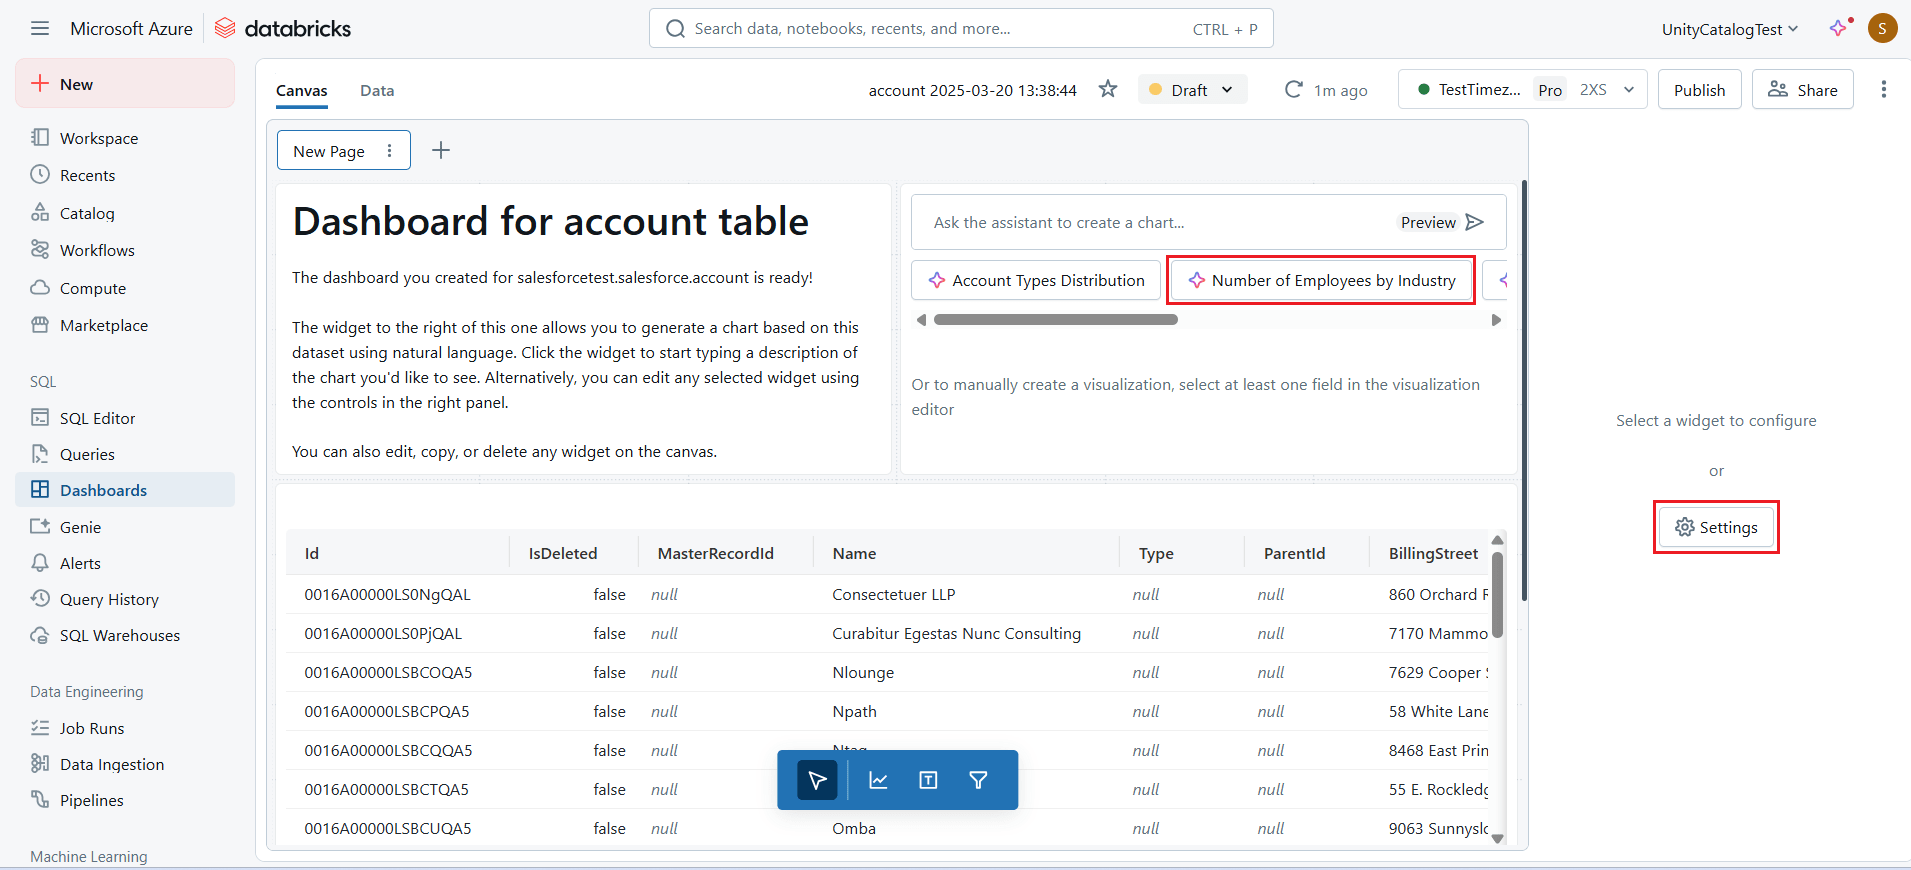
- Manually create a visualization by selecting at least one field in the visualization editor from the widget, or choose one of the visualization options suggested by Databricks AI.
- Once the visualization is created, edit the details in the widget settings of the dashboard.
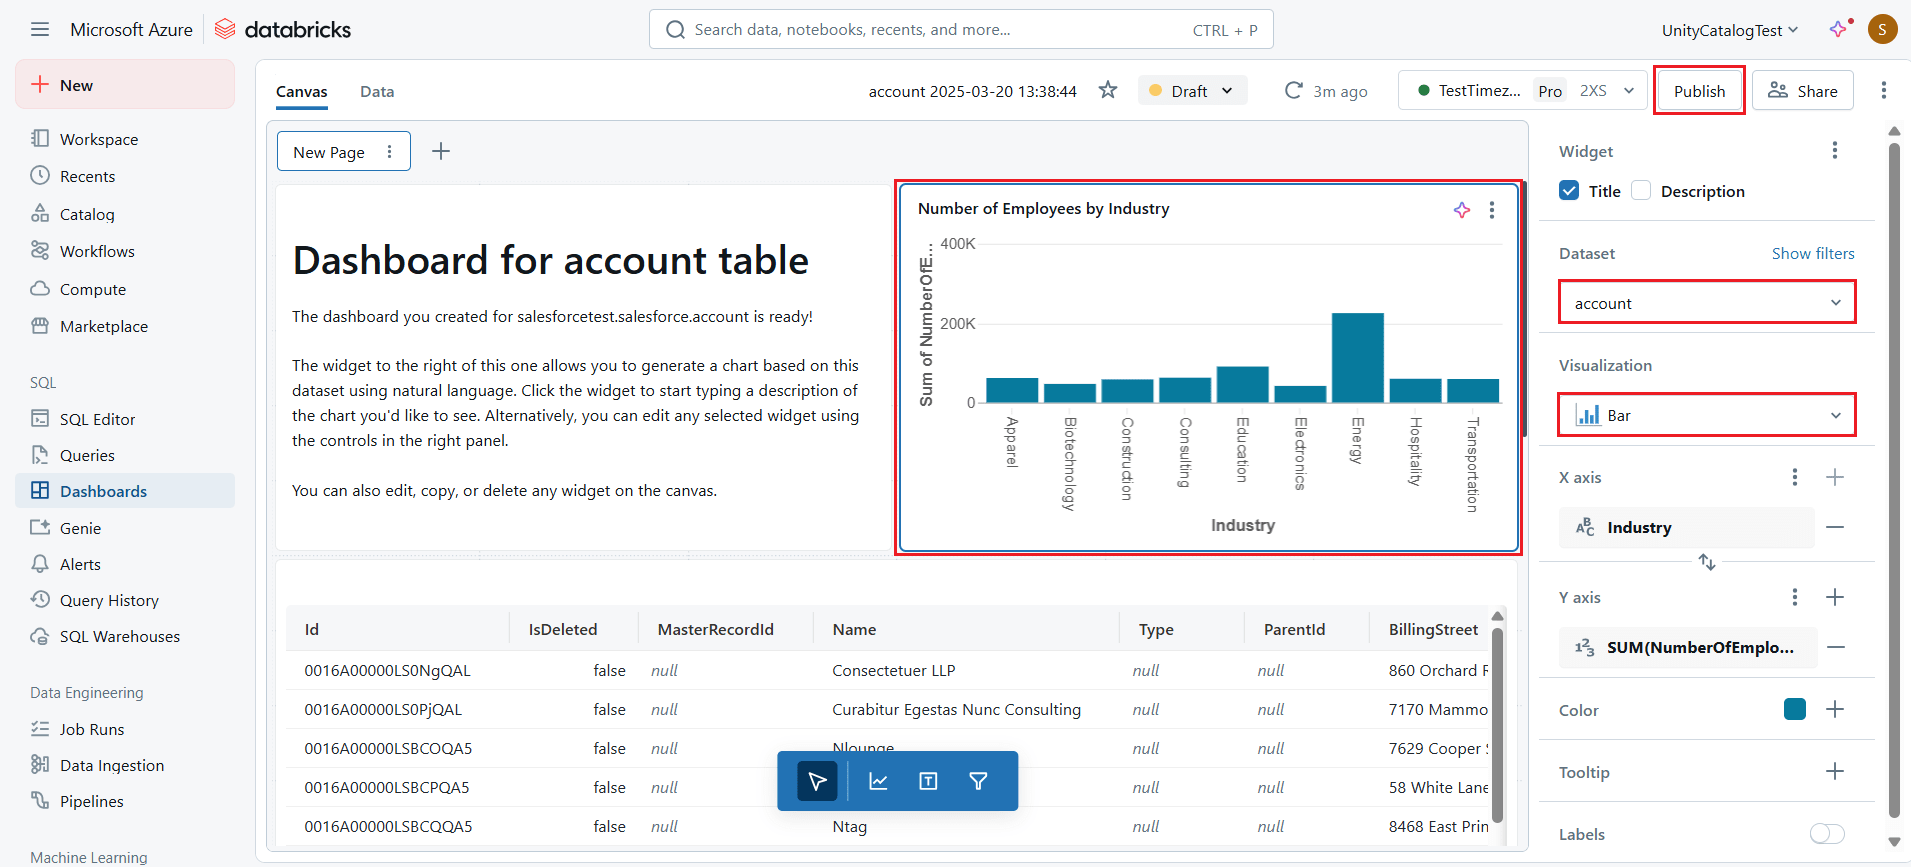
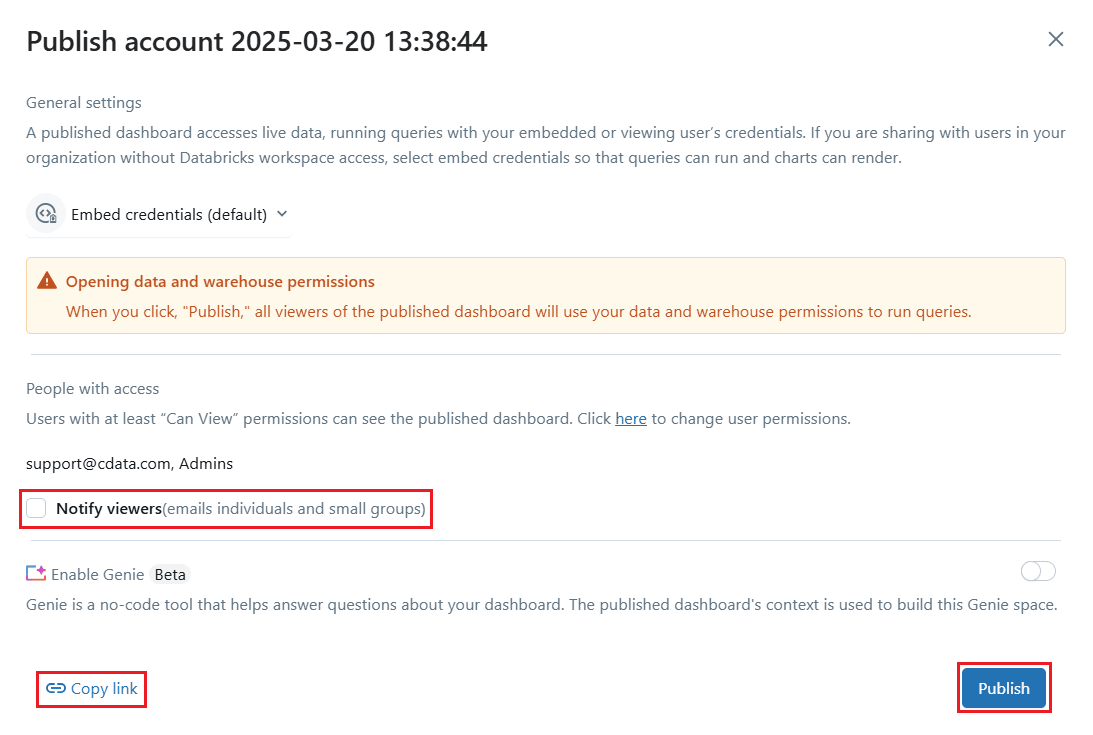
- Click Publish to publish the dashboard report.
Live access to HubDB data from cloud applications
At this stage, you have established a direct, cloud-to-cloud connection to live HubDB data in Databricks. This enables you to create dashboards to monitor and visualize your data seamlessly.
For more details on accessing live data from over 100 SaaS, Big Data, and NoSQL sources through cloud applications like Databricks, visit our Connect AI page. As always, let us know if you have any questions during your evaluation. Our world-class CData Support Team is always available to help!