








Model PingOne Data Using Azure Analysis Services

Microsoft Azure Analysis Services (AAS) is a fully-managed platform-as-a-service (PaaS) offering that delivers enterprise-grade data models in the cloud. When combined with CData Connect AI, AAS facilitates immediate cloud-to-cloud access to PingOne data for applications. This article outlines the process of connecting to PingOne via Connect AI and importing PingOne data into Visual Studio using an AAS extension.
CData Connect AI offers a seamless cloud-to-cloud interface tailored for PingOne, enabling you to create live models of PingOne data in Azure Analysis Services without the need to replicate data to a natively supported database. While constructing high-quality semantic data models for business reports and client applications, Azure Analysis Services formulates SQL queries to retrieve data. CData Connect AI is equipped with optimized data processing capabilities right from the start, directing all supported SQL operations, including filters and JOINs, directly to PingOne. This leverages server-side processing for swift retrieval of the requested PingOne data.
Prerequisites
Before you connect, you must first do the following:
- Connect a data source to your CData Connect AI account. Detailed steps are provided in the next section.
- Generate a Personal Access Token (PAT). Copy this down, as it acts as your password during authentication.
- Create a server in Azure Analysis Services to which you will deploy your data from CData Connect AI.
- Install and configure an On-Premise Gateway in your system. This will pull data from the source via CData Connect AI into the Azure Analysis Services project and deploy models to the server. Refer to the given link to find the detailed process.
Configure PingOne Connectivity for AAS
Connectivity to PingOne from Azure Analysis Services is made possible through CData Connect AI. To work with PingOne data from Azure Analysis Services, we start by creating and configuring a PingOne connection.
- Log into Connect AI, click Sources, and then click Add Connection
- Select "PingOne" from the Add Connection panel
-
Enter the necessary authentication properties to connect to PingOne.
To connect to PingOne, configure these properties:
- Region: The region where the data for your PingOne organization is being hosted.
- AuthScheme: The type of authentication to use when connecting to PingOne.
- Either WorkerAppEnvironmentId (required when using the default PingOne domain) or AuthorizationServerURL, configured as described below.
Configuring WorkerAppEnvironmentId
WorkerAppEnvironmentId is the ID of the PingOne environment in which your Worker application resides. This parameter is used only when the environment is using the default PingOne domain (auth.pingone). It is configured after you have created the custom OAuth application you will use to authenticate to PingOne, as described in Creating a Custom OAuth Application in the Help documentation.
First, find the value for this property:
- From the home page of your PingOne organization, move to the navigation sidebar and click Environments.
- Find the environment in which you have created your custom OAuth/Worker application (usually Administrators), and click Manage Environment. The environment's home page displays.
- In the environment's home page navigation sidebar, click Applications.
- Find your OAuth or Worker application details in the list.
-
Copy the value in the Environment ID field.
It should look similar to:
WorkerAppEnvironmentId='11e96fc7-aa4d-4a60-8196-9acf91424eca'
Now set WorkerAppEnvironmentId to the value of the Environment ID field.
Configuring AuthorizationServerURL
AuthorizationServerURL is the base URL of the PingOne authorization server for the environment where your application is located. This property is only used when you have set up a custom domain for the environment, as described in the PingOne platform API documentation. See Custom Domains.
Authenticating to PingOne with OAuth
PingOne supports both OAuth and OAuthClient authentication. In addition to performing the configuration steps described above, there are two more steps to complete to support OAuth or OAuthCliet authentication:
- Create and configure a custom OAuth application, as described in Creating a Custom OAuth Application in the Help documentation.
- To ensure that the driver can access the entities in Data Model, confirm that you have configured the correct roles for the admin user/worker application you will be using, as described in Administrator Roles in the Help documentation.
- Set the appropriate properties for the authscheme and authflow of your choice, as described in the following subsections.
OAuth (Authorization Code grant)
Set AuthScheme to OAuth.
Desktop Applications
Get and Refresh the OAuth Access Token
After setting the following, you are ready to connect:
- InitiateOAuth: GETANDREFRESH. To avoid the need to repeat the OAuth exchange and manually setting the OAuthAccessToken each time you connect, use InitiateOAuth.
- OAuthClientId: The Client ID you obtained when you created your custom OAuth application.
- OAuthClientSecret: The Client Secret you obtained when you created your custom OAuth application.
- CallbackURL: The redirect URI you defined when you registered your custom OAuth application. For example: https://localhost:3333
When you connect, the driver opens PingOne's OAuth endpoint in your default browser. Log in and grant permissions to the application. The driver then completes the OAuth process:
- The driver obtains an access token from PingOne and uses it to request data.
- The OAuth values are saved in the location specified in OAuthSettingsLocation, to be persisted across connections.
The driver refreshes the access token automatically when it expires.
For other OAuth methods, including Web Applications, Headless Machines, or Client Credentials Grant, refer to the Help documentation.

- Click Save & Test
-
Navigate to the Permissions tab in the Add PingOne Connection page and update the User-based permissions.



Add a Personal Access Token
When connecting to Connect AI through the REST API, the OData API, or the Virtual SQL Server, a Personal Access Token (PAT) is used to authenticate the connection to Connect AI. It is best practice to create a separate PAT for each service to maintain granularity of access.
- Click on the Gear icon () at the top right of the Connect AI app to open the settings page.
- On the Settings page, go to the Access Tokens section and click Create PAT.
-
Give the PAT a name and click Create.

- The personal access token is only visible at creation, so be sure to copy it and store it securely for future use.
With the connection configured and a PAT generated, you are ready to connect to PingOne data from Visual Studio using Azure Analysis Services.
Connect to PingOne in Visual Studio Using AAS
The steps below outline connecting to CData Connect AI from Azure Analysis Services to create a new PingOne data source. You will need the Microsoft Analysis Services Project extension installed in Microsoft Visual Studio to continue.
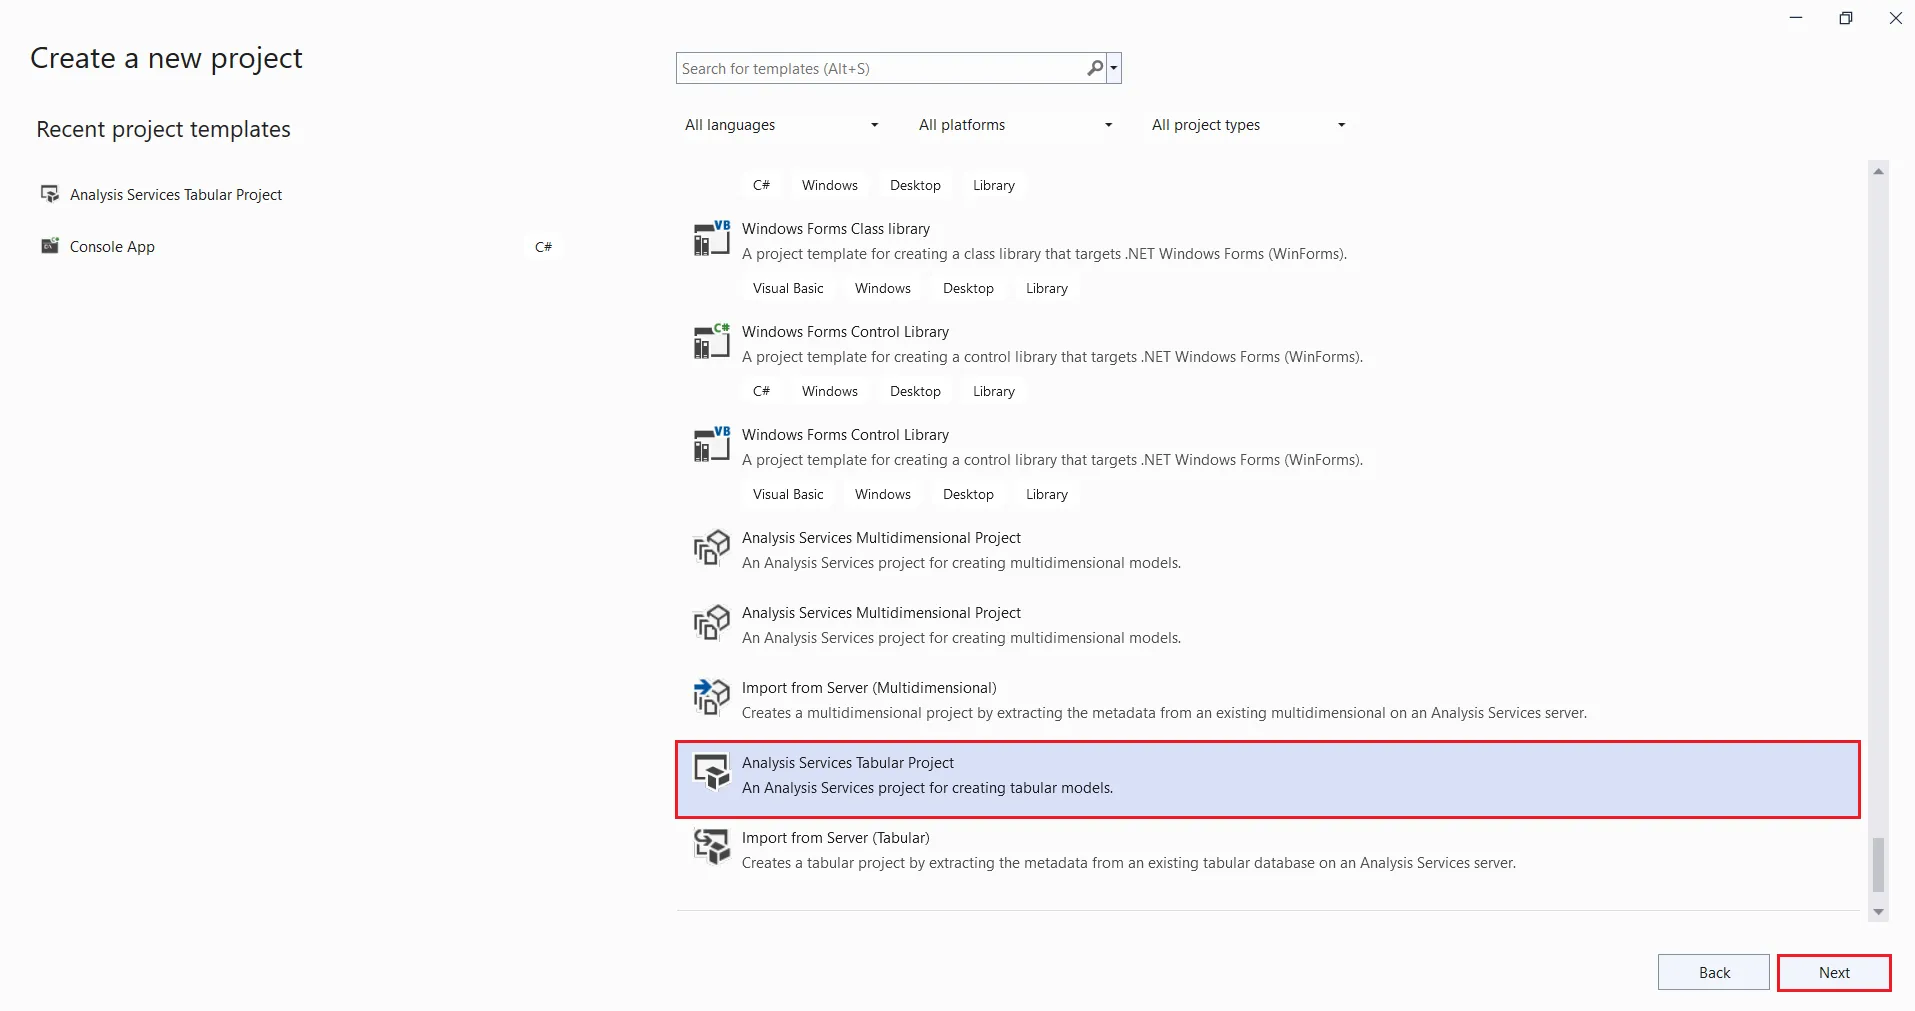
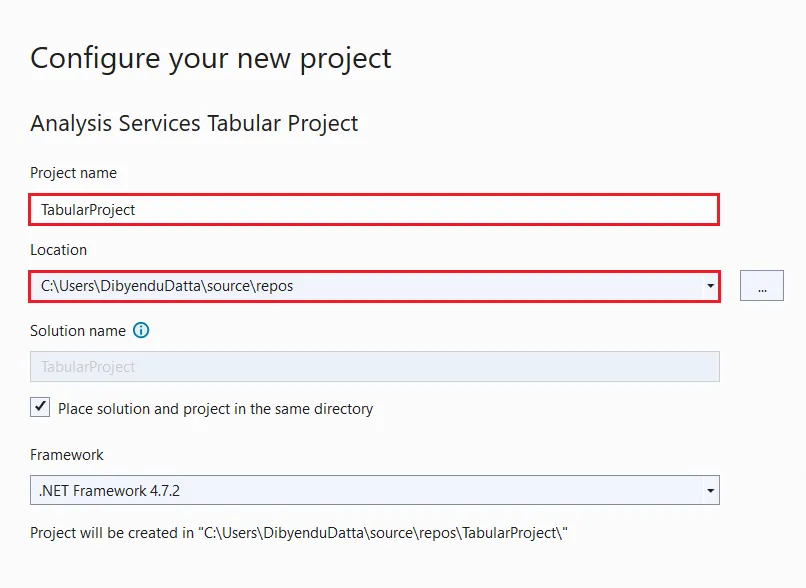
- In Visual Studio, create a new project. Select Analysis Services Tabular Project. Click on Next.
- In the Configure your new project dialog box, enter a name for your project in the Project name field. Fill in the rest of the fields.
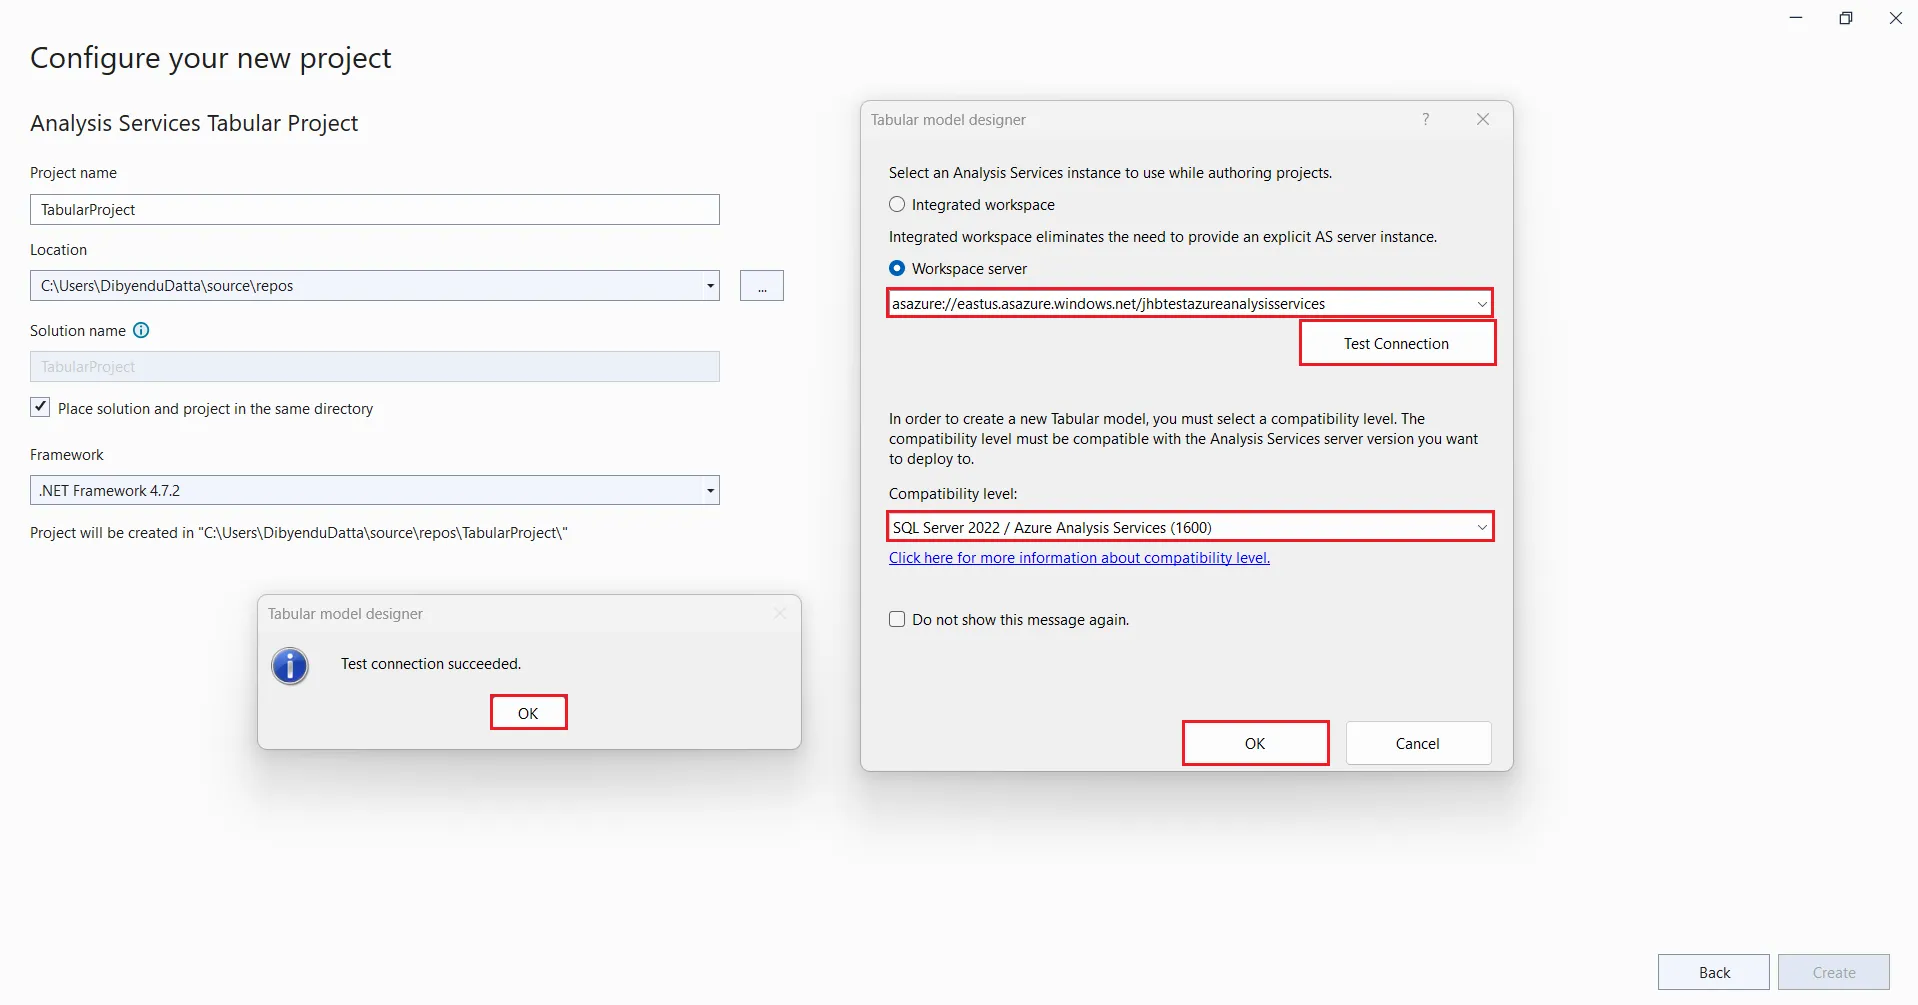
- Click on Create. The Tabular model designer dialog box opens. Select Workspace server and enter the address of your Azure Analysis Services server (for example, asazure://eastus.azure.windows.net/myAzureServer). Also, make sure to select the option SQL Server 2022 / Azure Analysis Services (1600) from the Compatibility level dropdown. Click on Test Connection to check if the connection details are correct. Click OK and sign in to your server.
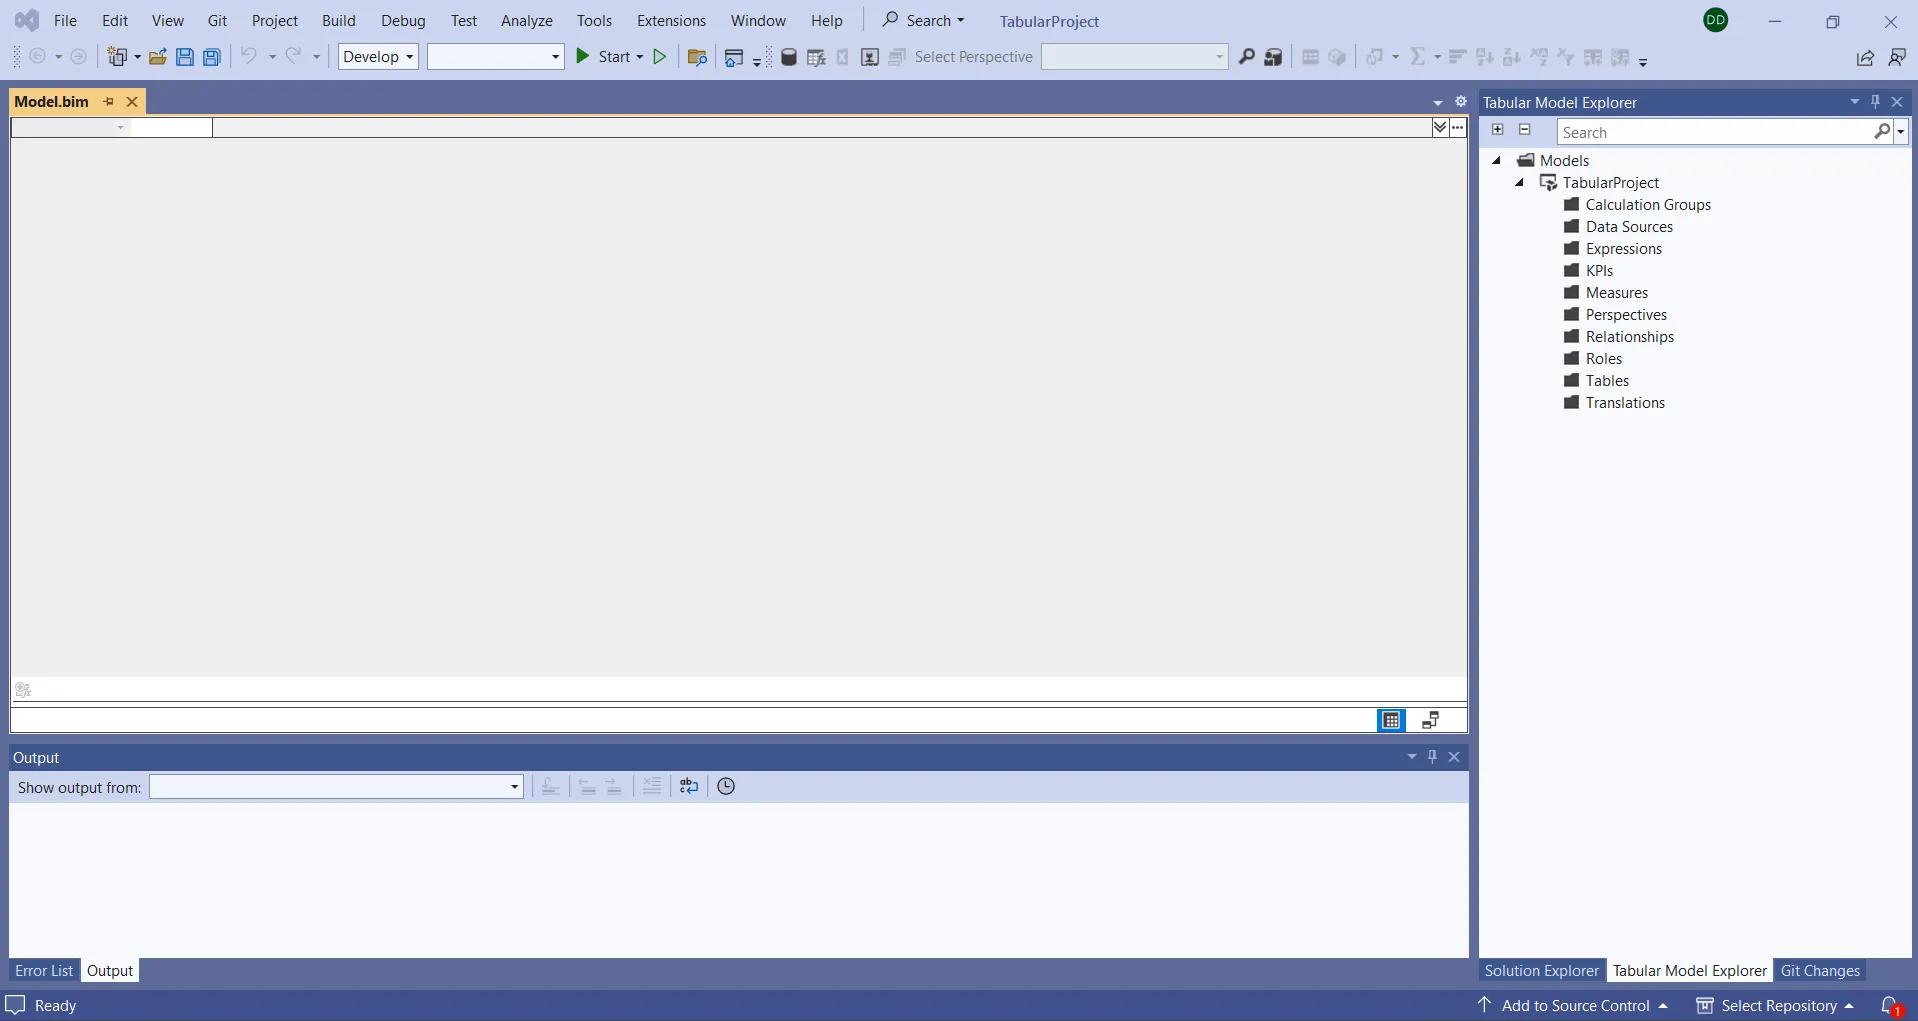
- Now, click on OK to create the project. Your Visual Studio window should resemble the following screenshot:
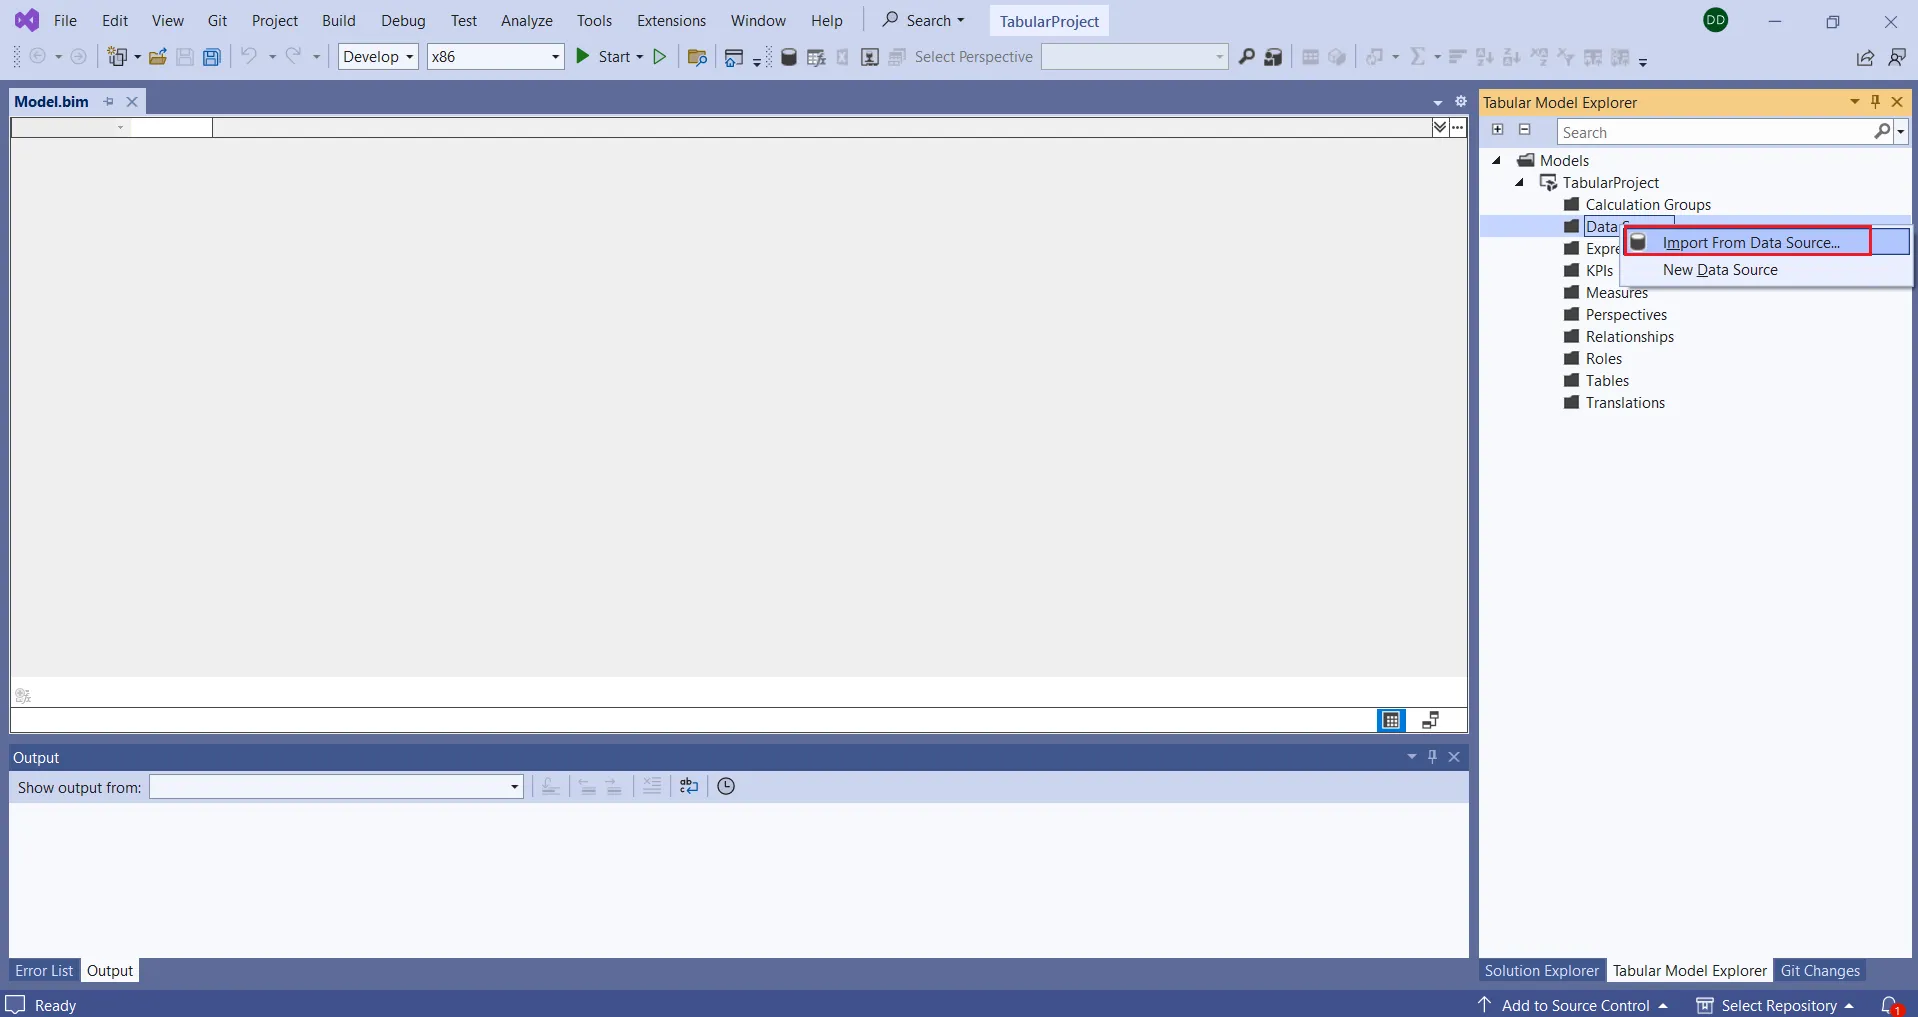
- In the Tabular Model Explorer window of Visual Studio, right-click Data Sources and select Import From Data Source.
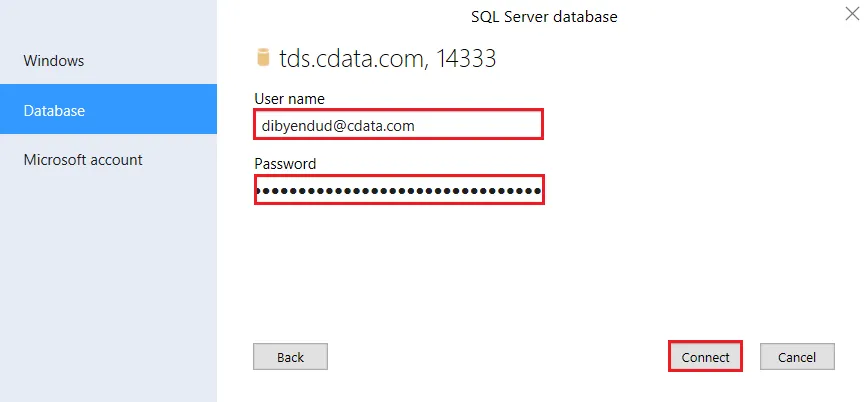
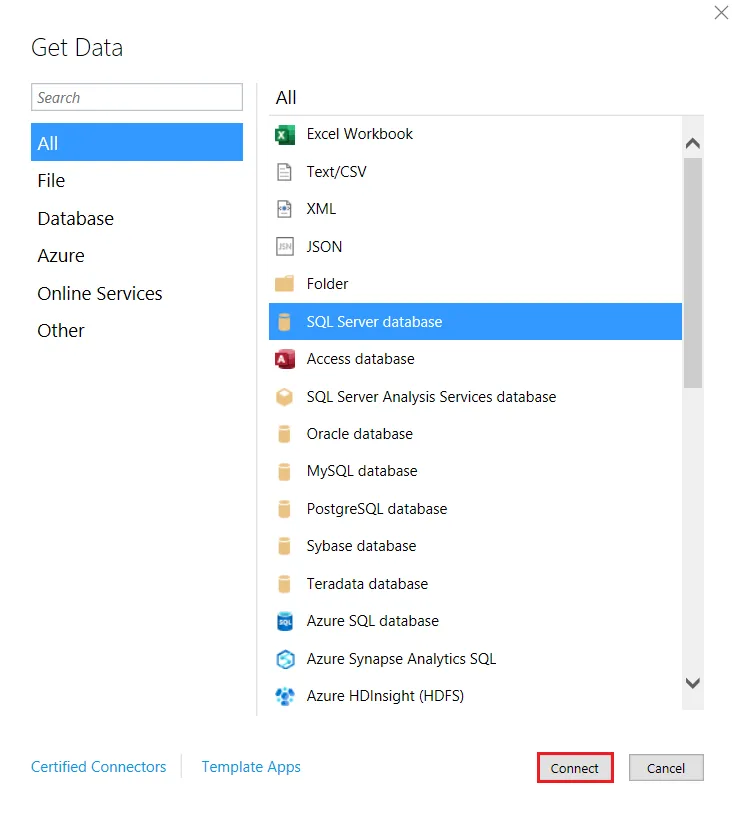
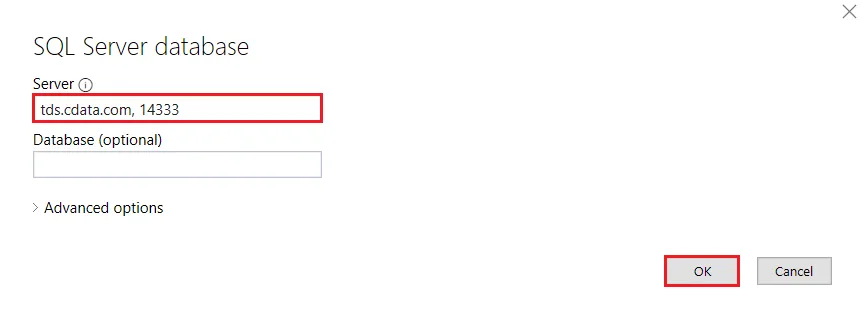
- In the Get Data window, select SQL Server database and click Connect. In the Server field, enter the Virtual SQL Server endpoint and the port separated by a comma: e.g., “tds.cdata.com, 14333”, and click on OK.
- Click on Database and enter the following information:
- User name: Enter your CData Connect AI username. This is displayed in the top-right corner of the CData Connect AI interface. For example, [email protected].
- Password: Enter the PAT you generated on the Settings page.
Click on Connect. If successful, the Navigator window will pop up.
-
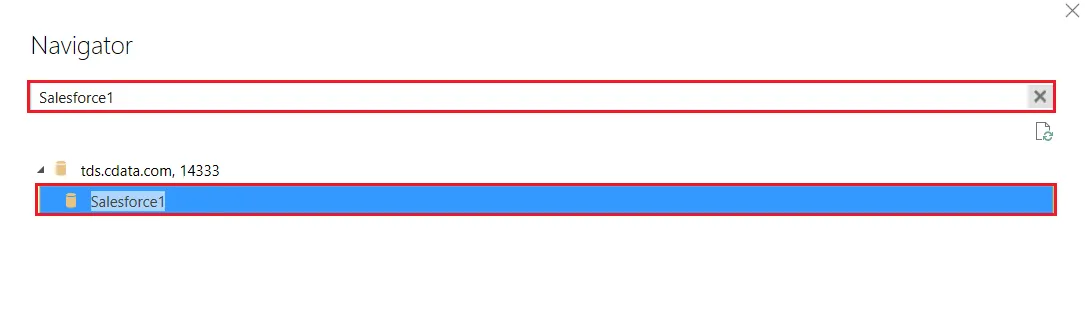
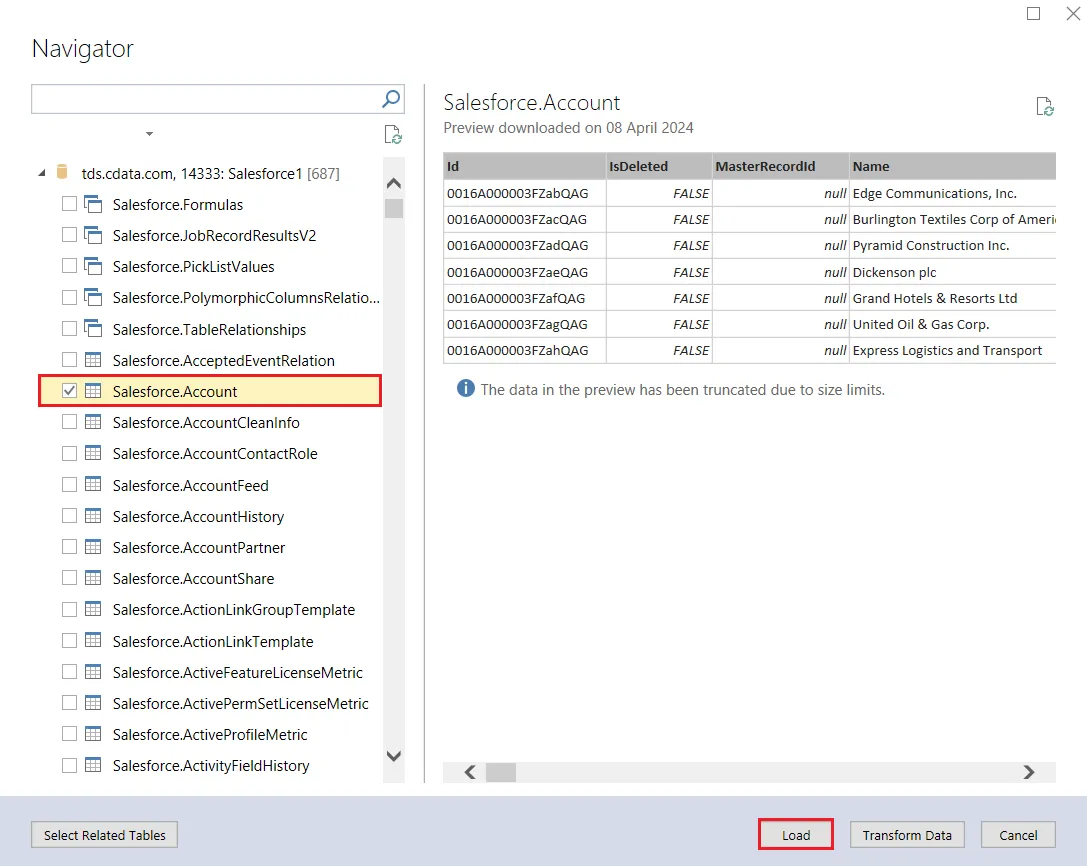
In the Navigator window, search and select the tables of your choice
- You should now see the Salesforce table populated with data in the preview section on the right panel.
-
Click on Load to import the data.
Now that you have imported the PingOne data into your data model, you are ready to deploy the project to Azure Analysis Services for use in business reports, client applications, and more.
Get CData Connect AI
To get live data access to hundreds of SaaS, Big Data, and NoSQL sources directly from your cloud applications, try CData Connect AI today!