








Connect to PingOne Data in Google Apps Script via Connect AI

Google Apps Script empowers users to build custom functionality within their Google documents, including Google Sheets and Google Docs. Apps Script natively supports SQL Server connectivity via JDBC, providing a powerful extensibility tool for connecting Google cloud applications to external data. Paired with the SQL connectivity offered by CData Connect AI, users can easily access live PingOne data directly from within their Google documents.
This article shows how to connect to PingOne in Connect AI and provides sample scripting for processing PingOne data in a Google Spreadsheet.
Configure PingOne Connectivity for Google Apps Scripts
Connectivity to PingOne from Google Apps Scripts is made possible through CData Connect AI. To work with PingOne data from Google Apps Scripts, we start by creating and configuring a PingOne connection.
CData Connect AI uses a straightforward, point-and-click interface to connect to data sources.
- Log into Connect AI, click Sources, and then click Add Connection
- Select "PingOne" from the Add Connection panel
-
Enter the necessary authentication properties to connect to PingOne.
To connect to PingOne, configure these properties:
- Region: The region where the data for your PingOne organization is being hosted.
- AuthScheme: The type of authentication to use when connecting to PingOne.
- Either WorkerAppEnvironmentId (required when using the default PingOne domain) or AuthorizationServerURL, configured as described below.
Configuring WorkerAppEnvironmentId
WorkerAppEnvironmentId is the ID of the PingOne environment in which your Worker application resides. This parameter is used only when the environment is using the default PingOne domain (auth.pingone). It is configured after you have created the custom OAuth application you will use to authenticate to PingOne, as described in Creating a Custom OAuth Application in the Help documentation.
First, find the value for this property:
- From the home page of your PingOne organization, move to the navigation sidebar and click Environments.
- Find the environment in which you have created your custom OAuth/Worker application (usually Administrators), and click Manage Environment. The environment's home page displays.
- In the environment's home page navigation sidebar, click Applications.
- Find your OAuth or Worker application details in the list.
-
Copy the value in the Environment ID field.
It should look similar to:
WorkerAppEnvironmentId='11e96fc7-aa4d-4a60-8196-9acf91424eca'
Now set WorkerAppEnvironmentId to the value of the Environment ID field.
Configuring AuthorizationServerURL
AuthorizationServerURL is the base URL of the PingOne authorization server for the environment where your application is located. This property is only used when you have set up a custom domain for the environment, as described in the PingOne platform API documentation. See Custom Domains.
Authenticating to PingOne with OAuth
PingOne supports both OAuth and OAuthClient authentication. In addition to performing the configuration steps described above, there are two more steps to complete to support OAuth or OAuthCliet authentication:
- Create and configure a custom OAuth application, as described in Creating a Custom OAuth Application in the Help documentation.
- To ensure that the driver can access the entities in Data Model, confirm that you have configured the correct roles for the admin user/worker application you will be using, as described in Administrator Roles in the Help documentation.
- Set the appropriate properties for the authscheme and authflow of your choice, as described in the following subsections.
OAuth (Authorization Code grant)
Set AuthScheme to OAuth.
Desktop Applications
Get and Refresh the OAuth Access Token
After setting the following, you are ready to connect:
- InitiateOAuth: GETANDREFRESH. To avoid the need to repeat the OAuth exchange and manually setting the OAuthAccessToken each time you connect, use InitiateOAuth.
- OAuthClientId: The Client ID you obtained when you created your custom OAuth application.
- OAuthClientSecret: The Client Secret you obtained when you created your custom OAuth application.
- CallbackURL: The redirect URI you defined when you registered your custom OAuth application. For example: https://localhost:3333
When you connect, the driver opens PingOne's OAuth endpoint in your default browser. Log in and grant permissions to the application. The driver then completes the OAuth process:
- The driver obtains an access token from PingOne and uses it to request data.
- The OAuth values are saved in the location specified in OAuthSettingsLocation, to be persisted across connections.
The driver refreshes the access token automatically when it expires.
For other OAuth methods, including Web Applications, Headless Machines, or Client Credentials Grant, refer to the Help documentation.

- Click Save & Test
-
Navigate to the Permissions tab in the Add PingOne Connection page and update the User-based permissions.



Add a Personal Access Token
When connecting to Connect AI through the REST API, the OData API, or the Virtual SQL Server, a Personal Access Token (PAT) is used to authenticate the connection to Connect AI. It is best practice to create a separate PAT for each service to maintain granularity of access.
- Click on the Gear icon () at the top right of the Connect AI app to open the settings page.
- On the Settings page, go to the Access Tokens section and click Create PAT.
-
Give the PAT a name and click Create.

- The personal access token is only visible at creation, so be sure to copy it and store it securely for future use.
With the connection configured and a PAT generated, you are ready to connect to PingOne data from Google Apps Script.
Connect to PingOne Data from Apps Script
At this point, you should have configured a connection PingOne in Connect AI. All that is left new is to use Google Apps Script to access Connect AI and work with your PingOne data in Google Sheets.
In this section, you will create a script (with a menu option to call the script) to populate a spreadsheet with PingOne data. We have created a sample script and explained the different parts. You can view the raw script at the and of the article.
1. Create an Empty Script
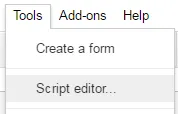
To create a script for your Google Sheet, click Tools Script editor from the Google Sheets menu:
2. Declare Class Variables
Create a handful of class variables to be available for any functions created in the script.
//replace the variables in this block with real values as needed
var address = 'tds.cdata.com:14333';
var user = 'CONNECT_USER'; // [email protected]
var userPwd = 'CONNECT_USER_PAT';
var db = 'PingOne1';

var dbUrl = 'jdbc:sqlserver://' + address + ';databaseName=' + db;
3. Add a Menu Option
This function adds a menu option to your Google Sheet, allowing you to use the UI to call your function.
function onOpen() {
  var spreadsheet = SpreadsheetApp.getActive();
  var menuItems = [
    {name: 'Write data to a sheet', functionName: 'connectToPingOneData'}
  ];
  spreadsheet.addMenu('PingOne Data', menuItems);
}

4. Write a Helper Function
This function is used to find the first empty row in a spreadsheet.
/*
 * Finds the first empty row in a spreadsheet by scanning an array of columns
 * @return The row number of the first empty row.
 */
function getFirstEmptyRowByColumnArray(spreadSheet, column) {
  var column = spreadSheet.getRange(column + ":" + column);
  var values = column.getValues(); // get all data in one call
  var ct = 0;
  while ( values[ct] && values[ct][0] != "" ) {
    ct++;
  }
  return (ct+1);
}
5. Write a Function to Write PingOne Data to a Spreadsheet
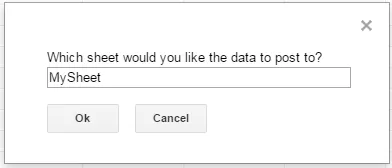
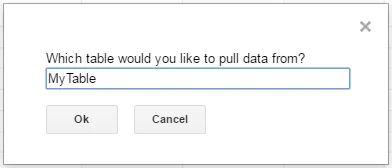
The function below writes the PingOne data, using the Google Apps Script JDBC functionality to connect to Connect AI, SELECT data, and populate a spreadsheet. When the script is run, two input boxes will appear:
The first one asks the user to input the name of a sheet to hold the data (if the spreadsheet does not exist, the function creates it).
The second asks the user to input the name of a PingOne table to read. If an invalid table is chosen, an error message appears and the function is exited.
Note, while the function is designed for use as a menu option, you can extend it for use as a spreadsheet formula.
/*
 * Reads data from a specified PingOne 'table' and writes it to the specified sheet.
 *    (If the specified sheet does not exist, it is created.)
 */
function connectToPingOneData() {
  var thisWorkbook = SpreadsheetApp.getActive();

  //select a sheet and create it if it does not exist
  var selectedSheet = Browser.inputBox('Which sheet would you like the data to post to?',Browser.Buttons.OK_CANCEL);
  if (selectedSheet == 'cancel')
    return;

  if (thisWorkbook.getSheetByName(selectedSheet) == null)
    thisWorkbook.insertSheet(selectedSheet);
  var resultSheet = thisWorkbook.getSheetByName(selectedSheet);
  var rowNum = 2;

  //select a PingOne 'table'
  var table = Browser.inputBox('Which table would you like to pull data from?',Browser.Buttons.OK_CANCEL);
  if (table == 'cancel')
    return;

  var name = Jdbc.getConnection(dbUrl, {
    user: user,
    password: userPwd
	}
  );

  //confirm that var table is a valid table/view
  var dbMetaData = name.getMetaData();
  var tableSet = dbMetaData.getTables(null, null, table, null);
  var validTable = false;
  while (tableSet.next()) {
    var tempTable = tableSet.getString(3);
    if (table.toUpperCase() == tempTable.toUpperCase()){
      table = tempTable;
      validTable = true;
      break;
    }
  }
  tableSet.close();
  if (!validTable) {
    Browser.msgBox("Invalid table name: " + table, Browser.Buttons.OK);
    return;
  }

  var stmt = name.createStatement();

  var results = stmt.executeQuery('SELECT * FROM ' + table);
  var rsmd = results.getMetaData();
  var numCols = rsmd.getColumnCount();

  //if the sheet is empty, populate the first row with the headers
  var firstEmptyRow = getFirstEmptyRowByColumnArray(resultSheet, "A");
  if (firstEmptyRow == 1) {
    //collect column names
    var headers = new Array(new Array(numCols));
    for (var col = 0; col < numCols; col++){
      headers[0][col] = rsmd.getColumnName(col+1);
    }
    resultSheet.getRange(1, 1, headers.length, headers[0].length).setValues(headers);
  } else {
    rowNum = firstEmptyRow;
  }

  //write rows of PingOne data to the sheet
  var values = new Array(new Array(numCols));
  while (results.next()) {
    for (var col = 0; col < numCols; col++) {
      values[0][col] = results.getString(col + 1);
    }
    resultSheet.getRange(rowNum, 1, 1, numCols).setValues(values);
    rowNum++;
  }

  results.close();
  stmt.close();
}
When the function is completed, you have a spreadsheet populated with your PingOne data, and you can now leverage all of the calculating, graphing, and charting functionality of Google Sheets anywhere you have access to the Internet.
Complete Google Apps Script
//replace the variables in this block with real values as needed
var address = 'tds.cdata.com:14333';
var user = 'CONNECT_USER'; // [email protected]
var userPwd = 'CONNECT_USER_PAT';
var db = 'PingOne1';

var dbUrl = 'jdbc:sqlserver://' + address + ';databaseName=' + db;

function onOpen() {
  var spreadsheet = SpreadsheetApp.getActive();
  var menuItems = [
    {name: 'Write table data to a sheet', functionName: 'connectToPingOneData'}
  ];
  spreadsheet.addMenu('PingOne Data', menuItems);
}

/*
 * Finds the first empty row in a spreadsheet by scanning an array of columns
 * @return The row number of the first empty row.
 */
function getFirstEmptyRowByColumnArray(spreadSheet, column) {
  var column = spreadSheet.getRange(column + ":" + column);
  var values = column.getValues(); // get all data in one call
  var ct = 0;
  while ( values[ct] && values[ct][0] != "" ) {
    ct++;
  }
  return (ct+1);
}

/*
 * Reads data from a specified 'table' and writes it to the specified sheet.
 *    (If the specified sheet does not exist, it is created.)
 */
function connectToPingOneData() {
  var thisWorkbook = SpreadsheetApp.getActive();

  //select a sheet and create it if it does not exist
  var selectedSheet = Browser.inputBox('Which sheet would you like the data to post to?',Browser.Buttons.OK_CANCEL);
  if (selectedSheet == 'cancel')
    return;

  if (thisWorkbook.getSheetByName(selectedSheet) == null)
    thisWorkbook.insertSheet(selectedSheet);
  var resultSheet = thisWorkbook.getSheetByName(selectedSheet);
  var rowNum = 2;

  //select a PingOne 'table'
  var table = Browser.inputBox('Which table would you like to pull data from?',Browser.Buttons.OK_CANCEL);
  if (table == 'cancel')
    return;

  var name = Jdbc.getConnection(dbUrl, {
    user: user,
    password: userPwd
	}
  );

  //confirm that var table is a valid table/view
  var dbMetaData = name.getMetaData();
  var tableSet = dbMetaData.getTables(null, null, table, null);
  var validTable = false;
  while (tableSet.next()) {
    var tempTable = tableSet.getString(3);
    if (table.toUpperCase() == tempTable.toUpperCase()){
      table = tempTable;
      validTable = true;
      break;
    }
  }
  tableSet.close();
  if (!validTable) {
    Browser.msgBox("Invalid table name: " + table, Browser.Buttons.OK);
    return;
  }

  var stmt = name.createStatement();

  var results = stmt.executeQuery('SELECT * FROM ' + table);
  var rsmd = results.getMetaData();
  var numCols = rsmd.getColumnCount();

  //if the sheet is empty, populate the first row with the headers
  var firstEmptyRow = getFirstEmptyRowByColumnArray(resultSheet, "A");
  if (firstEmptyRow == 1) {
    //collect column names
    var headers = new Array(new Array(numCols));
    for (var col = 0; col < numCols; col++){
      headers[0][col] = rsmd.getColumnName(col+1);
    }
    resultSheet.getRange(1, 1, headers.length, headers[0].length).setValues(headers);
  } else {
    rowNum = firstEmptyRow;
  }

  //write rows of PingOne data to the sheet
  var values = new Array(new Array(numCols));
  while (results.next()) {
    for (var col = 0; col < numCols; col++) {
      values[0][col] = results.getString(col + 1);
    }
    resultSheet.getRange(rowNum, 1, 1, numCols).setValues(values);
    rowNum++;
  }

  results.close();
  stmt.close();
}